
How to run: pitchComp
Special circumstances: part of battery
This experiment is part of the cerebellar battery run in 2022-2023. For controls, it is in the FIRST session. For patients, it is in the SECOND session.
In this battery, participants come in for multiple sessions and do multiple experiments in a row. As such, this is a bare bones document on how to run the experiment. Procedures for consent, hearing screening, awareness surveys, general equipment set up, and payment are not included in this document. See the documents below for how these procedures are implemented in this multi-study session:- Protocol for cerebellar battery: controls
- For patients
What's special about this experiment
This is a experiment examining compensation to upwards and downwards pitch shifting of the speaker's own voice. Three different pitch compensation studies test the ability to compensate for pitch shifting:
- run_pitchComp_expt.m: the pitch is suddenly shifted up or downward 1 semitone in the window 200-500 ms after onset of the vocalization
- run_pitchCompOnset_expt.m: the pitch is already shifted 1 semitone at the onset, but the perturbation is removed during the 200-500 ms window
- run_pitchComp400_expt.m: the pitch is suddenly shifted up or downward 1 semitone in the window 200-500 ms after onset of the vocalization, and the perturbation is removed after 400 ms
The study requires a calibration part before the session starts, during with the f0 of the speaker is calculated and the correct shifting paradigm is selected. If the participant has already run the pitch adaptation version of this experiment (pitchAdaptRetest), the experiment will take the stored information about the algorithm and not run the calibration phase again. This calibration part is included in the pitch adaptation and compensation scripts: run_pitchAdaptRetest_expt.m, run_pitchAdaptTwoWords_expt and run_pitchComp_expt.m , run_pitchCompOnset_expt.m, run_pitchComp400_expt.m
The instructions for all three versions are identical.
Prepping for participant
- closed back headphones
- microphone
- Audapter
- FocusRite
Pre-experiment instructions
Tell the participant: "During this experiment, you will be reading the vowel "ah" from the computer screen and listening to your speech over headphones.
Don’t hesitate to ask questions or raise concerns at any point."
Phase 1: Calibration
Instructions for calibration
-
Calculate the f0 of the speaker: The participant is instructed to say “AH” (The instructions also appear on the screen of the participant). You see the waveform in a figure on the experiment computer. You will be prompted ‘Is the recorded sample good?’ at the command line.
-
If the recording looks okay and there is no clipping visible in the figure (see below for an example), press ‘y’ and hit enter.
-
If there is clipping visible in the figure (see below), reduce the microphone gain, then press ‘n’ and hit enter. The whole process will repeat. Repeat as needed until the audio looks good and no clipping is visible in the figure.
-
If there is a problem with the audio signal (participants didn’t speak, said the wrong thing, coughed, etc.), press ‘n’ and hit enter. The whole process will repeat. Repeat as needed until the audio looks good and no clipping is visible in the figure.
-
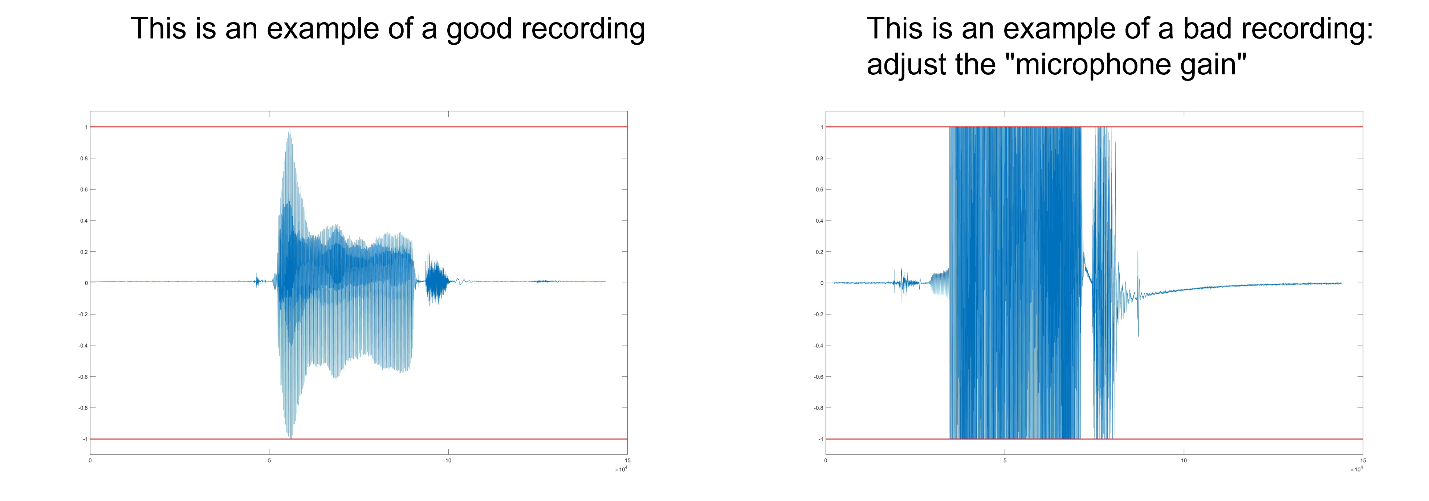
Fig 1: Two examples of speech waveforms. In the image on the left, the waveform falls between -1 and 1 (indicated by the red lines). This is an example of an appropriately set microphone gain. In the image on the right, the waveform is “clipped”—it is cut off by the -1 and 1 boundaries. In this case, the microphone gain needs to be reduced. If the microphone gain is too low (not shown), the waveform will have a very small range. Aim to use most of the range between -1 and 1 without any clipping.
-
Enter a percentage value for upper and lower boundaries for pitch tracking: this value will be used to calculate the upper and lower boundaries for tracking the vocal pitch. The closer the boundaries are to the f0, the better the estimate of the pitch and the better the shifting algorithm works. However, there will be problems if the actual pitch goes outside these boundaries. The exact boundaries that work best depend on the speaker. The default value is 20%, and will work well for most speakers. In this next section, we will set the pitch boundaries. After inspecting 3 figures with this percentage (see below), you can change the value. In most cases, the 20% value is the right one. There might be pitch contours that are not as steady as in the given example and the green and blue lines touch the red lines ones in a while. In this case, the boundaries should be a little bit larger, such as 25% or 30%.
-
You will see a figure pop up like this: NOTE: IF THE UPPER PANEL IS EMPTY, RESTART MATLAB BECAUSE PITCH SHIFTING IS NOT WORKING.
-

-
Click “enter” for the next figure that shows the pitch contour, shifted up (green line). Press ENTER again.
-
The next slide is the pitch contour, shifted down.
-
Press “enter” again.
-
Confirm percentage: Both the green and blue lines should be contained within the red horizontal borders in all the three figures. if the participant said 'bod,' it's OK if a portion at the end is outside the red borders. If this is the case, enter ‘y’ in the command line, after prompted: 'Is the percentage good?', {'y', 'n'}.
-
Examples of boundaries: In the figures below, you see two bars: one bar shows the pitch shifting output of Audapter; the lower bar shows the extracted pitch from the waveform. These can differ slightly but should not differ to a large extent. The default boundary value is 20% (example pitch shifted up first figure); the 10% boundaries in the example below are too narrow. In case the speaker has an unstable pitch and 20% is too narrow, the boundaries must be adjusted to a larger value, e.g., 25% or 30%. In general, 20 % is the lowest value, and boundaries need only be adjusted to a larger value. The 10% figure is for demonstrating how a too-narrow band looks like. The final disturbances are caused by the ‘d’ in the word “bod” and can be ignored.

-
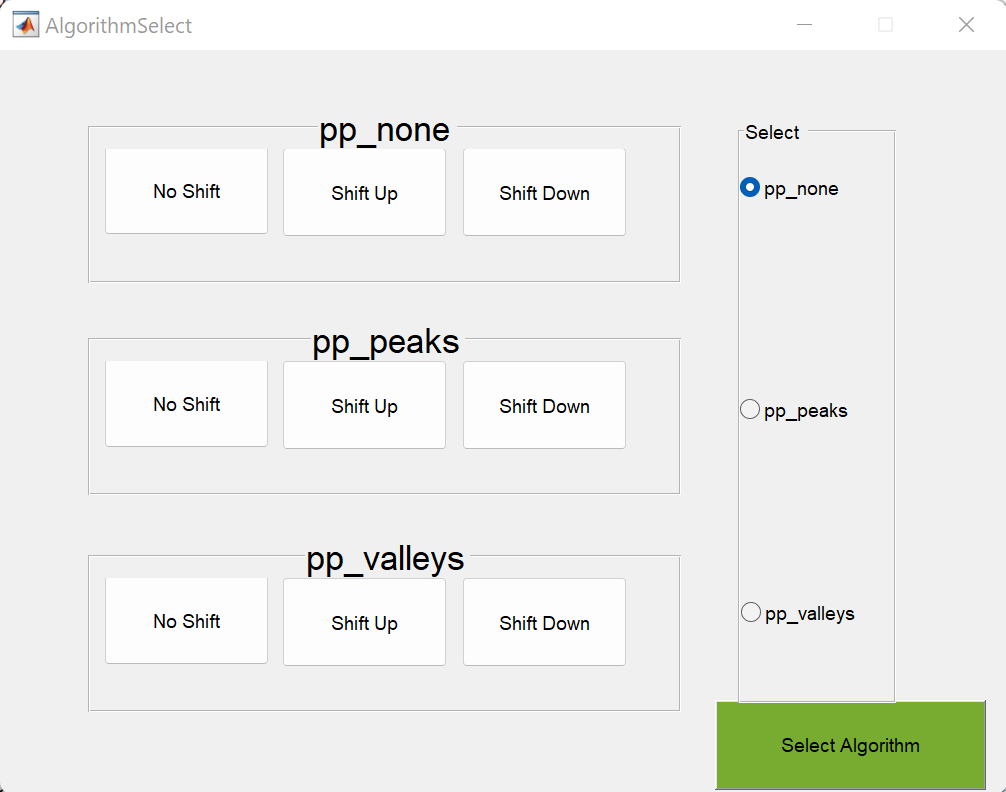
Select pitch shifting manner: Next, the AlgorithmSelect window opens. Here, you select one of three algorithms that Audapter can use to shift the pitch of the voice. There are nine buttons on the left of the screen. When you click on one of these buttons, it will play back an audio sample demonstrating how the participant’s voice will sound with that combination of pitch shifting direction (up, down, none) and pitch shifting algorithm on the right (pp_none, pp_peaks, or pp_valleys). It’s not important to understand the differences in the pitch shifting algorithms; they just indicate certain ways to shift a pitch up and down. Listen to the different algorithms to see which one sounds the most natural. In most cases, this will be pp_none. Then click the radio button on the right corresponding to the best algorithm and click “Select Algorithm”.
Main experiment
"Please put the headphones on now." [make sure they are on correctly]
"On each trial, you will say the word “ah” like you just did. Start when the text prompt appears on the screen and keep going until the text prompt disappears. Try to keep the pitch of your voice at a constant, monotone level. So, try not to raise your pitch or lower your pitch. You will be given feedback on the screen if you say “ah” for less than the required time or speak too quietly. Just continue with the task and try to adjust your speech accordingly. Before the actual session starts, we will do some practice so you can get used to the task. You will have several breaks throughout the experiment.
Do you have any questions?
Practice trials:
After the practice trials, the experimenter can make
- the trial duration (from onset to end of trial) longer if the speaker has difficulties to start on time, (default is 2 seconds)
- the display time a bit longer than 1 second (the duration the word is on the screen): if the speaker takes a long time to start speaking, the recorded word is often too short. In this case, add the value of the time before onset (displayed in the command line during the study as: time before onset) to the duration of the display time (1.4 second is the default). So, if the speaker always starts to produce the word after 0.6 seconds, the new display time is 1.6 seconds.
The experiment starts after you press "enter".
What to monitor for:
- During the study, monitor for correct loudness in the figures that appear for each trial. In case the signal is too loud, adjust the microphone gain.
- Monitor the boundaries indicated by the red horizontal lines: The boundaries can be adjusted mid-session by pressing the button (b) on the display and entering a new percentage (see figure below).
- Monitor if speakers make the vowel consistently too short or starts too late to fit in the trial duration time. You can check this by monitoring the length of the vowel, indicated by the green vertical lines in the display figure. If the right line is frequently at the utmost right side of the figure, the production started too late and you can adjust the length of the trial. Press the button (e) on the display to enter a new value (see left arrow in the figure below).This way, it is avoided that the speaker hears their own voice without the feedback after the trial.
- If the speaker has difficulty producing the correct vowel length, you can adjust the time that the stimulus is shown on the screen. Make the stimulus presentation on the screen longer if the speaker makes the vowel consistently too short, so the speaker is forced to lengthen the vowel.

If Matlab crashes during the experiment
As of 10/24/2022 there is no restart script for this experiment.