
SharedDrive - Getting Started
Getting Started with DoIT's SharedDrive Service
In order to use and administer your SharedDrive, which provides departmental file & print sharing, for your department you will need to do the following:
- Request an OU administrator account in the Campus Active Directory.
- Rename the computer before joining it to the domain.
- Join the computer to the ad.wisc.edu domain.
- Install the Active Directory Remote Administration Tools.
- Login to the computer using your OU administrator account.
After completing all 5 of these steps, you will be ready to use and administer your SharedDrive fileshare.
Request an OU administrator account in the Campus Active Directory
Note: DoIT may have already made this request on your behalf if you are a SharedDrive customer. If the request was made, you should have received an email containing your OU account information. If not, please follow these steps:
- Fill out the Campus Active Directory Request Form located here in the Overview section.
- In a couple of days you will receive an email from the Campus Active Directory Team that contains your OU account information. The OU administrator account looks like netid-ou.
Rename the computer before joining it to the domain
Note: To rename the computer you will need to have local admin rights on that computer. This process will require a reboot.
- Login to the computer you want to use for AD administration as a local admin account.
- Right click on Computer and click Properties.
- Under Computer name, domain, and workgroup settings click Change settings.

- In System Properties, under the Computer Name tab click Change...
- In the Computer name text box, change the computer name to organizational unit followed by the user's netID or the service tag of the machine (e.g. doit-bucky or doit-1234567).
- Note: The Campus Active Directory is a shared resource on campus and in order to accommodate growth computer objects need to have a unique name. Naming the computer OrgUnit-NetID or -ServiceTag will accomplish this. If you have any issues or problems with naming your department's computers like that please contact the Campus Active Directory Team.
- Note: If this is a virtual machine, you can name the computer OrgUnit-NetID-vm (if multiple VM's use vm1, vm2, etc).
- Leave the computer as Member of Workgroup for now.
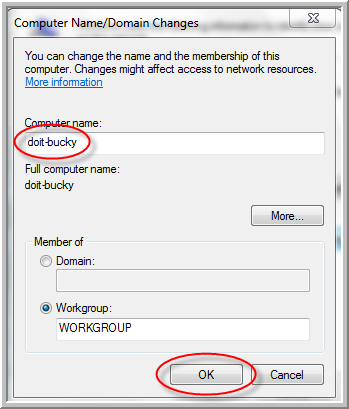
- Click OK.
- You will be prompted to reboot the computer. Reboot.
- Note: If the computer is not rebooted after renaming, attempting to join the domain will result in an error message.
Join the computer to the ad.wisc.edu domain
Note: To join the ad.wisc.edu you will need to use an OU administrator account. This process will require a reboot.
- Login to the computer as a local admin account again. Right click on Computer and click Properties.
- Under Computer name, domain, and workgroup settings clicked Change settings.
- In System Properties, under the Computer Name tab click Change...
- Verify the computer name is orgUnit-netID or -ServiceTag before joining the machine to the Campus Active Directory.
- Click the Domain radio button and type ad.wisc.edu in the text box.

- Click OK.
- When prompted, enter your OU admin credentials (user name will be netid-ou).
- If done correctly, you should receive a message welcoming you to the domain.
- Click OK.
- Reboot the computer.
Install the Active Directory Remote Administration Tools
- Login to the computer as a local admin account again.
- Navigate to Remote Server Administration Tools for Windows 7, choose x86 or x64 depending on your computer and download and run the file.
- After installing the tools, open Control Panel - Programs and Features and click on Turn Windows features on or off.
- Expand Remote Server Administration Tools. Expand Feature Administration Tools and check the box next to Group Policy Management Tools.

- Expand Role Administration Tools. Expand AD DS and AD LDS Tools. Expand everything under this level and check all boxes including the box for AD DS and AD LDS Tools. Click OK.

- The main tool used for domain administration will be Active Directory Users and Computers. To find that go to Control Panel - Administrative Tools and click on Active Directory Users and Computers.
- Note: In order to use Active Directory Users and Computers, you must be logged in to an account with domain administration rights.
Login to the computer using your OU administrator account
Note: Before you can login to the computer using your OU administrator account, you must first add the OU account to the Administrators group.
- Login to the computer as a local admin account again.
- Note: Now that the computer is joined to the domain you will see Press Ctrl + Alt + Del to login. To login as a local admin simply type ".\" in the text box before entering in your local admin account name. The ".\" changes the authentication from the domain to local. For example, to specify a domain you can enter "AD.WISC.EDU\username" or to authenticate into the local computer you can enter ".\username".
- Open Control Panel - Administrative Tools and click on Computer Management.
- Expand Local Users and Groups. Select Groups. Right-click on Administrators and select Properties.

- Click Add.
- In the Enter the object names to select text field, type in your OU account (e.g. bucky-ou) and click Check Names.
- When prompted, enter your OU credentials.
- It should auto-fill in the rest of your OU account name (e.g. bucky-ou (bucky-ou@ad.wisc.edu)). Click OK.
- Click Apply.
- Click OK. Your OU account should now be a local administrator on that computer.
- Log off the computer.
- At the login screen, click Switch User then Other User and in the text box type [your OU account]@AD.WISC.EDU (e.g. bucky-ou@AD.WISC.EDU) and your OU account password.
- Note: AD.WISC.EDU does not have to be in all caps.
- This will be a brand new account (no settings from your old account). Active Directory Users and Computer may now be used to perform SharedDrive administration tasks.
- Note: To find that go to Control Panel - Administrative Tools and click on Active Directory Users and Computers.
