Student Center - Pre-Enrollment Checklist Guide

Important Note for Incoming Students
As an incoming student, you may not yet have access to all of the functions within the Student Center. For an overview of what you'll find in the Student Center and when you'll receive full access, visit the Office of the Registrar's Student Center Navigation webpage.
If you have questions about what you need to do before you arrive on campus, contact the Office of Admissions and Recruitment. You can also talk to your advisor during Student Orientation, Advising, and Registration (SOAR).
Overview
Below is an overview of the eight tasks of the PEC you must complete before enrolling each fall and spring semester. Note a Financial Responsibility Agreement enrollment hold will be placed on your student record until you have completed the PEC. The hold will be automatically removed once you’ve finished the PEC. These tasks should take about five minutes to complete in total.
In each task you will be asked to "Save" and "Confirm" information. The "Next" button will not appear until the information is "Saved" and "Confirmed".
Task 1: Pre-Enrollment Welcome
Task 4: Review Student Privacy (FERPA)
Task 5: Intended Completion Term (ICT)
Task 7: Financial Responsibility Agreement (terms and conditions)
Steps
Below are step-by-step instructions walking you through the PEC process.
From MyUW, enter into your Student Center.

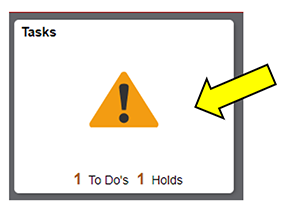
Once in your Student Center, the Tasks tile will indicate a To Do. Click on the tile.
Note: In case an error message pops up stating "You are not authorized to access this component", clear your browser cache and cookies and try again. See Clearing Browser Cache and Cookies for instructions.
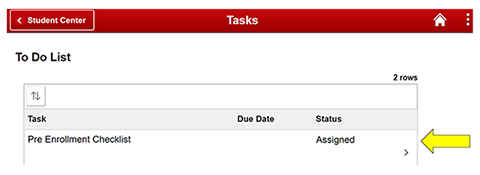
Under the To Do List, you will see the Pre-Enrollment Checklist (PEC) task. Click on this task to begin the checklist.
Note: When you first start the PEC, the status will be “assigned.” If you start the PEC and leave the task without completing the PEC, once you return the status will be “in progress.” When you return to an “in progress” PEC, you will resume where you left off.
Task 1: Pre-Enrollment Welcome
Once you read through the welcome, click "Confirm," then click "Next" in the top right.

Task 2: Emergency Contacts
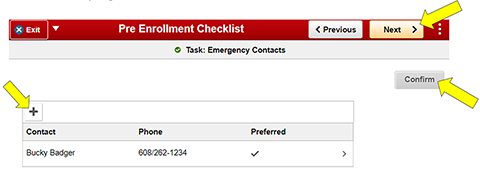
This is the contact the university will reach out to in case of emergency. Click “Add Contact” to enter the name, relationship, and phone number of your emergency contact. Once you have entered and saved the contact information, click "Confirm" and then "Next" in the top right.
In future semesters, click on the + sign if you need to enter a new contact.
To confirm the emergency contact is correct or if you need to make changes, click on the contact. Once you have entered any new information click save. Then click "Confirm" and then "Next" in the top right.

Task 3: Addresses
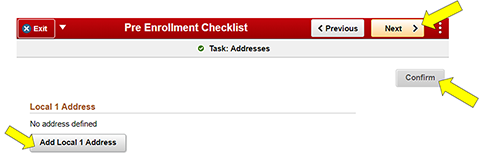
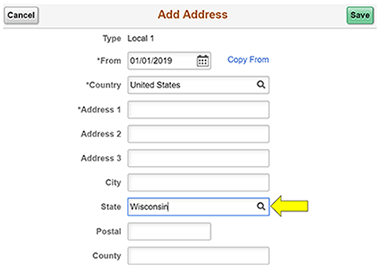
A "local address" is your physical address - usually in or around Madison - where you currently or will live and/or frequently stay while you'll be taking classes for the upcoming semester. UW treats your local address a little differently than other addresses you may have listed. It's more confidential, and will only be used in times of emergency or as required for SEVIS record and federal reporting for students studying on F-1 and J-1 visas.
If you don't know where you'll live during the upcoming semester, you can enter your current address to continue with the Pre-Enrollment Checklist (PEC). Once you know your an updated address, edit it in your MyUW > Student Center > Profile so the local address is accurate and up to date.
Note: When entering a new address, the "From" field must be populated with today's date (if you are currently living at that address, even if you have lived at this address before today) or a future date (if the address you're entering will be where you live in an upcoming semester).
In future semesters, once an address is on record, click the + sign if you need to enter a new address.

If you need to make changes, click on the address. Once you have entered address information then click save. Then click "Confirm" and then "Next" in the top right. If there are no changes to the address listed, click save then "Confirm" then "Next" in the top right.

Troubleshooting Tip: If you follow the guidance above and the "Confirm" button won't activate, you are likely experiencing a browser issue. You can resolve this by opening the PEC in a new private/incognito window or by clearing your browser's cache and cookies. If accessing the PEC on a mobile device or tablet, you may also find success using a desktop or laptop computer instead.
“Address is not verified as deliverable. Unable to save.” Message: The system uses a USPS database to verify addresses; occasionally, even a valid address doesn't pass that validation check. First make sure you included your apartment number and zip code. If you still get this error message, email registrar@em.wisc.edu from your wisc.edu email account and include your campus ID number, the correct full address, and address type(s), such as local, home, mailing, etc.
Task 4: Review Student Privacy (FERPA)
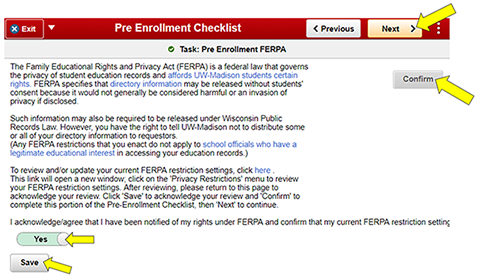
Read through your FERPA rights and make updates if desired. After reviewing, select Yes to acknowledge your rights and confirm your FERPA restriction settings. Then click "Save," then "Confirm," then "Next."
Task 5: Intended Completion Term (ICT)
The Intended Completion Term (ICT) is the semester you plan to complete your degree requirements. This is a flexible estimate that can change as you progress toward graduation. Only degrees are presented on the ICT page. ICT is not applicable to certificates, additional majors, and other non-degree programs. You can view all your declared credentials in MyUW > Academic Navigator by expanding the “Degree & Major” and “Certificates” sections.
Updating your ICT does not replace the formal application for graduation you must complete when you near your last semester of study. For instructions on applying for graduation, not updating your ICT, refer to Student Center - Applying for Graduation.
First review the Current ICT if one is displayed. If the Current ICT is correct, then click the acknowledgment toggle to make it “Yes”. Once you click the agreement toggle to “Yes”, click "Save", then click "Confirm" and then "Next" at the top right.
Note: the "Next" option does not appear until you have the acknowledgment as "Yes" clicked "Save" and then clicked "Confirm."

If your ICT is blank or not correct and you need to update it. Click “I need to update my term”. This will take you to your MyUW Student Center. Refer to Student Center - Intended Completion Term for help updating your ICT.
When you click “I need to update my term”, a new window should open to the Student Center’s ICT form. If nothing happens when you click “I need to update my term”, make sure your web browser’s pop-up blocker is disabled. Refer to Web Browsers - Popup Blockers for browser-specific instructions for pop-up settings. If that doesn’t work, you can open a new window and follow the instructions in Student Center - Intended Completion Term
Then return to the Pre-Enrollment Checklist (PEC) to continue.

When you complete the change, then go back to the PEC page and click the acknowledgment toggle to make it “Yes”. Once you click the agreement toggle to “Yes”, click "Save" and then "Next" at the top right.
Note: If you make changes to your ICT, while completing the PEC, you can click “Refresh” in the PEC page to see the updated ICT. In periods of high volume, the PEC page may take up to an hour to update. You do not have to wait for the PEC page show your changes to continue.
Task 6: SSN Confirmation
If you have a valid Social Security Number (SSN) on record or are not required to provide one, you will see the page below. Click "Confirm" and then "Next" in the top right.

If you receive the message “The Social Security Number on file is invalid or missing,” you will either need to enter your SSN or indicate you do not wish to provide an SSN at this time. Make sure to click "Save" then click "Confirm" and then "Next" in the top right to move forward.

Note: Clicking “Here” will open a new tab and bring you to your UW Personal Profile where you can select the Social Security Number tab to enter your SSN.
Task 7: Financial Responsibility Agreement
Review and agree to the Terms and Conditions statement. This statement shares your financial responsibilities connected to enrollment in classes at UW–Madison and explains potential consequences if you fail to meet those obligations (for example paying tuition). Once you click the "I Agree to the Above Statement" box, click "Save" and then "Next" at the top right.
Note: The "Next" option does not appear until you select "I Agree" and "Save."


Task 8: Complete
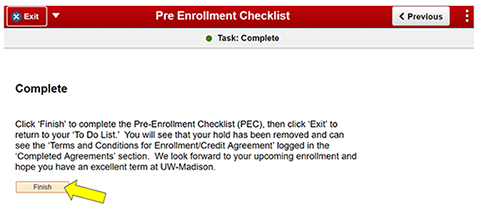
The final task is to click ‘"Finish" to complete the Checklist. Please note if you do not click "Finish," you have not fully completed the Pre-Enrollment Checklist (PEC) and the hold preventing your enrollment will not be lifted.
Congratulations! You have completed the PEC. Your enrollment hold will be automatically removed so you can enroll in future terms at and after your enrollment appointment time using the Course Search and Enroll App.
If you added courses to your Course Search and Enroll Cart before resolving all your holds, you may notice a lingering hold warning. To refresh your cart after all holds are cleared, refer to Course Search & Enroll - Error Messages Persisting.

