[155] [355] Panasonic GH5 Kit
A set of instructions about the use of the Panasonic GH5 kit

Table of Contents
Quick Links
General Information & Kit Packing
- What equipment can I check out from the IMC?
- What all comes in a Panasonic GH5 Kit?
- Tripod Information
- How to repack the camera kit
- How to power on GH5
- How to format your SD card
- Common SD card issues
- How to white balance with a card
GH5 Buttons & Settings
- Primary camera controls/buttons
- LCD Screen Display Indicators
- How to adjust shutter speed
- How to adjust ISO
- How to choose the correct video format
Guides & Focus Assist
- Compositional Guides (Rule of Thirds)
- Exposure Peaking (Zebra Stripes)
- Focus Peaking (Blue Outlines)
- How to use focus assist
Lenses
Audio
Uploading Footage
Equipment
- Panasonic GH5 Kit
- Boom Pole
- Sachtler ACE Tripod
- Panasonic GH5 Battery
- SD Card (64GB)
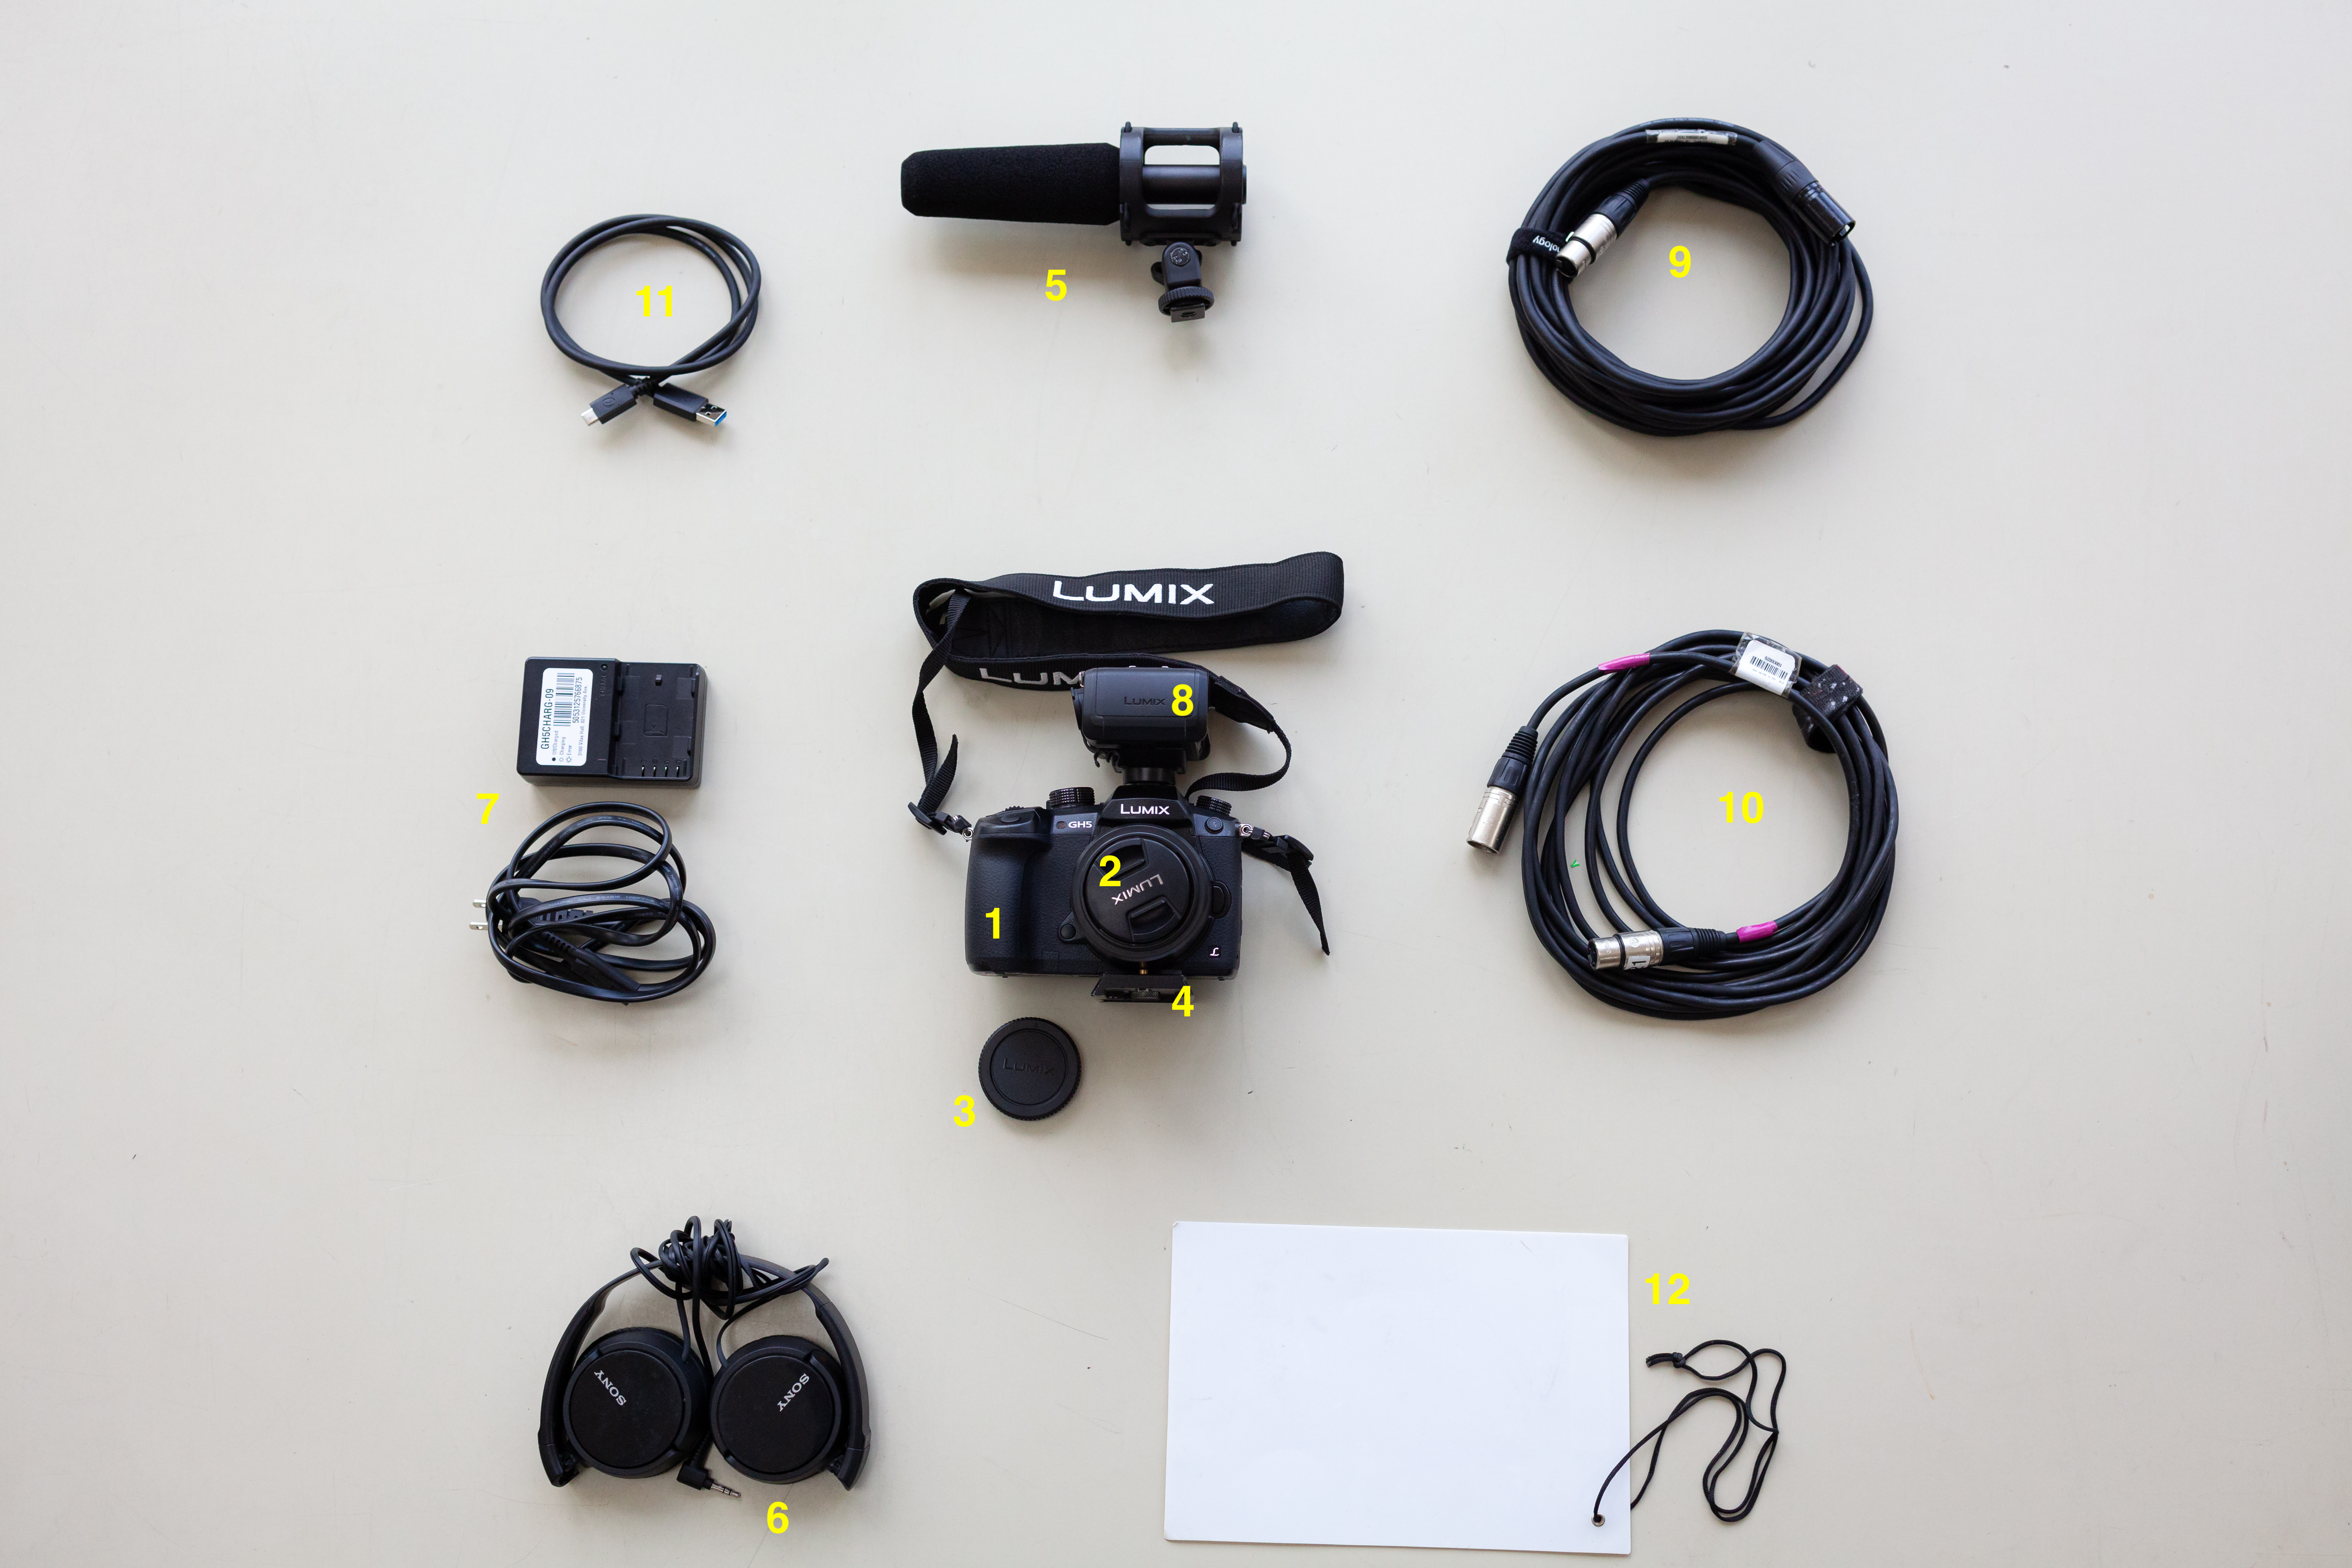
Panasonic GH5 Camera Kit
- Panasonic GH5 Camera
- Lumix 14-42mm Zoom Lens
- Body Cap
- Manfrotto Tripod Plate
- AT875R Microphone
- Sony Headphones
- Panasonic GH5 Charger & Cable
- Lumix XLR Adapter
- 25ft XLR Cable
- 15ft XLR Cable
- USB-C to USB-A Cable
- White Card
Tripod Information
For information on the Sachtler Ace Tripod, visit its help documentation page.
Repacking the Camera Kit
- Please make sure to pack the camera kit exactly how it was upon checkout.
- The position/orientation of the camera within the kit is especially important.
- This is very important for the long-term safety of the equipment.
- See photo for proper kit storage.
Common SD Card Issues
- When the SD card is set to "write lock", the SD card will not be writable (camera will provide corresponding alert)

- To fix this, set lock to upward position.

- If no SD card is inserted into the camera, it will prompt with corresponding alert.

Powering on GH5
- Insert battery in compartment on bottom of camera body.

- Insert SD card into port on grip side of camera body (slide back door to reveal ports).

- Rotate top mode dial to desired mode (manual movie mode (video) or manual mode (photo))
- Turn power switch (located adjacent to mode dial) to ON.

Formatting SD Card
- Select Menu/Set button (in center of menu dial).

- Navigate to wrench icon menu set (not C Wrench).
- Scroll down with menu dial to select Format.

- Select the SD card slot you wish to format.
- Select Yes when prompted to delete data from card.
White Balancing with a Card
- Select WB button.

- Use any dial to navigate to the first custom white balance setting.

- Click up on the menu dial.

- Fill frame with white card (make sure the light hitting the white card is the primary light source).

- Select MENU/SET button.

LCD Screen Display Indicators

Primary camera controls/buttons
- Shutter speed - Index finger dial (verify at 50 or 1/50 sec for video)
- ISO - ISO button Thumb dial
- White balance - WB button on top of camera any dial
- Aperture - Thumb dial
- Shutter button/record button (photo/video)
- Press green play button (top left on back of camera body) to toggle through recorded photos/clips on SD card
- Press DISP button to toggle through display modes


Adjusting Aperture
- Turn the thumb dial to adjust aperture (the larger the number, the darker the image).
- The value on the LCD display screen will turn yellow with the new value you have assigned it.

Adjusting Shutter Speed
- Turn the thumb dial to adjust shutter speed (the larger the number, the darker the image).
- When adjusting shutter speed, the value on the LCD display screen will turn yellow with the new value you have assigned it.

Adjusting ISO
- Press the "ISO" button on top of the camera.
- The camera will provide a series of values to choose from.

- Use the thumb dial to scroll through the options.
- It is good practice to start at 800 ISO and adjust from there based on the amount of light on set.
How to choose the correct video format

- The proper video record format is FHD, 8bit, 100M, 24p.
- This should almost never need to be adjusted, but if your video format settings do not match those above, it is necessary to change them in the menu.
- To do this, press the MENU/SET button
- Navigate to the record menu (looks like a 35mm camera, the one without the 'M'
- Scroll to the setting entitled 'Rec Quality'.
- Choose FHD, 8bit, 100M, 24p.
Compositional Guides (Rule of Thirds)


- Compositional guides, such as third lines, can help when framing a shot.
- To toggle different compositional guide styles, press the Fn4 button and choose the desired pattern.
- The leveling guide will display on the LCD screen by default (a green line indicates the camera is level, a yellow line indicates how far off the camera is from a level position, & Fn2 button toggles this display on and off).
Exposure Peaking (Zebra Stripes)


- Exposure peaking will be set to On by default.
- Gray stripes will appear around the parts of the frame that are overexposed, which you can use to achieve proper exposure.
- If this setting gets turned off for some reason, you can turn it back on in the menu (press the MENU/SET button, navigate to the C wrench icon menu, select 'Monitor/Display', select 'Zebra Pattern', select 'Zebra 1'.
Focus Peaking


- Focus peaking will be set to ON by default
- Blue lines will appear around the parts of the frame that are in focus, which you can use to achieve proper focus on your subject.
- If this setting gets turned off for some reason, you can turn it back on in the menu (press the MENU/SET button, navigate to the C wrench icon menu, select 'Monitor/Display', select 'Peaking' and set to 'ON'.
Focus Assist

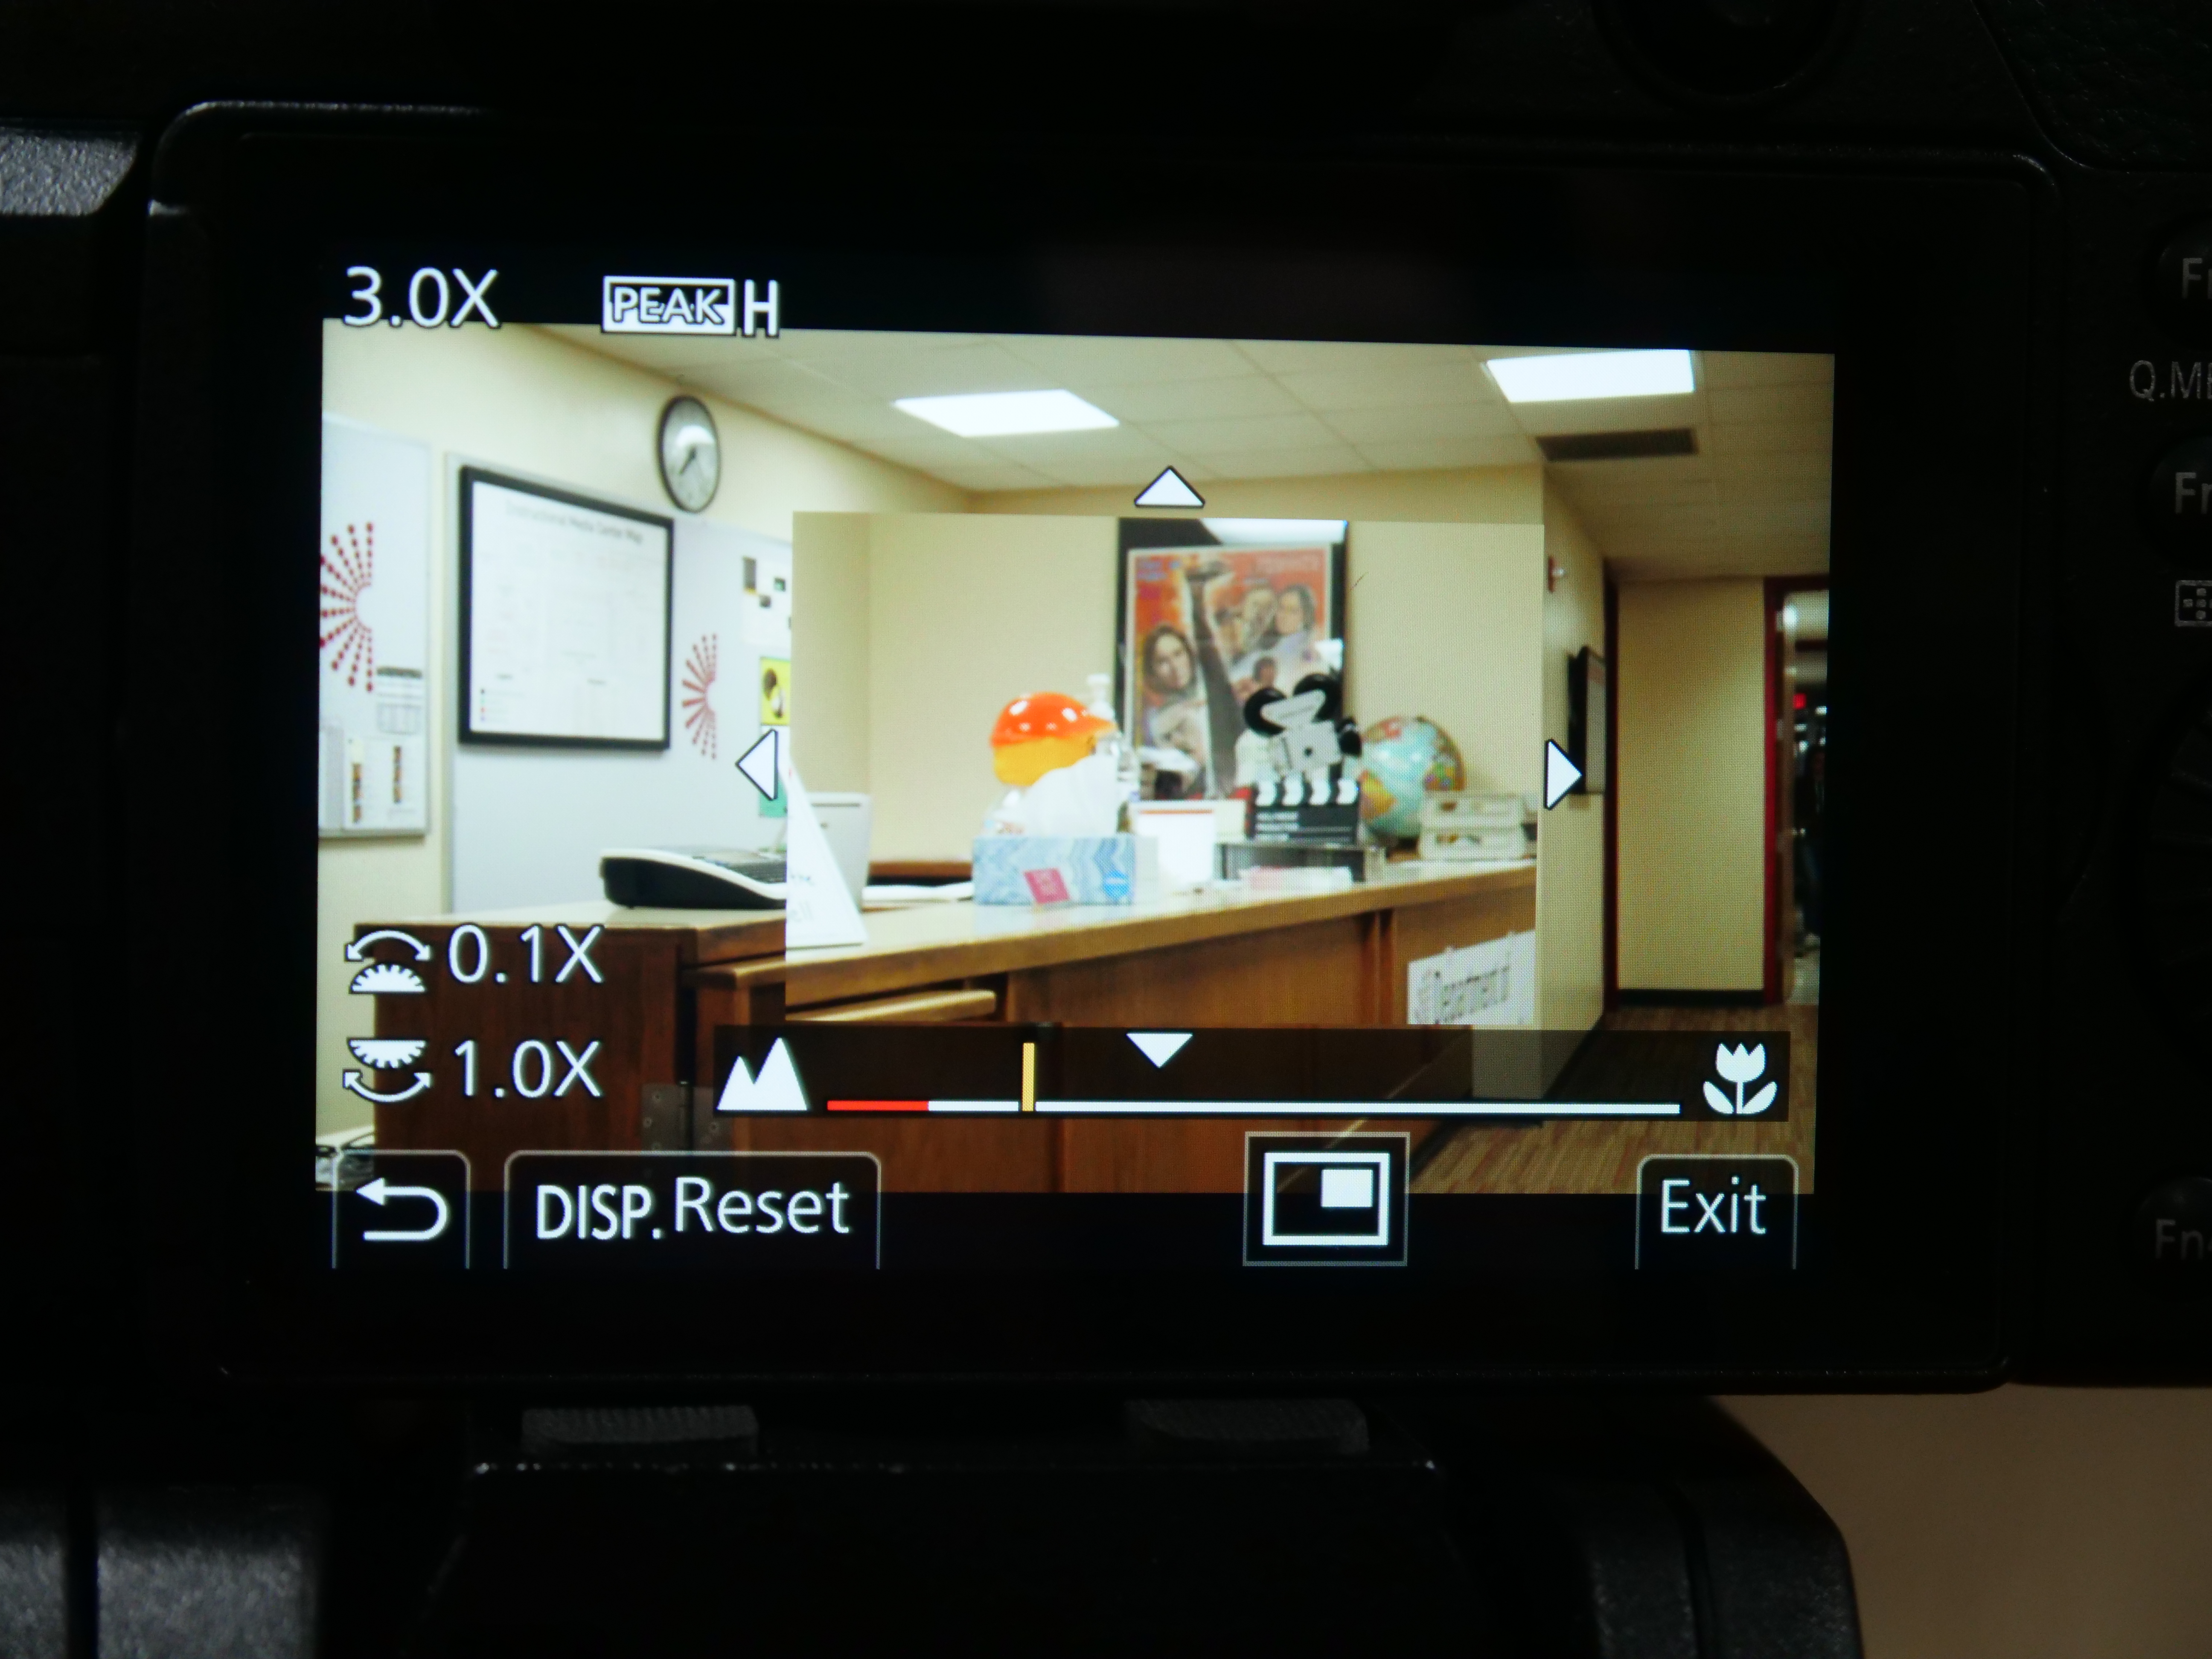
- Anytime you adjust focus, a window will appear on the LCD screen providing a zoomed-in view of the center of the frame to help more accurately establish focus.
- This feature is called "Focus Assist."
- The window will disappear a few seconds after you stop adjusting the focal ring
- To get it to disappear immediately, press the MENU/Set button.
- Note: If focus assist doesn't appear, double check that you have the camera in manual focus mode (MF).
Basic Lens Care

- Lenses are a very valuable part of the camera.
- Do NOT touch lens glass.
- NEVER change a lens with the camera on.
- If camera is not in immediate use, lens cap should remain on.
- Routine cleaning (performed by IMC) and proper lens care on set are essential.
Changing a lens (optional)
- TURN CAMERA OFF
- Lens caps should be on both mounted and replacement lens.
- Have replacement lens in hand or nearby.
- Press hold lens lock button (located to right of lens on front of camera body).

- Grab mounted lens by base (not by shade, focal ring, or zoom ring).

- Rotate lens counterclockwise to remove from body.
- Quickly and carefully remove back lens cap from replacement lens and screw onto back of lens just removed.

- Set removed lens safely aside/in case, pick up replacement lens (now without back lens cap).

- Align red dot on replacement lens with red dot on camera body lens mount.

- Gently press lens into mount and turn clockwise until locked (should hear a click)
Setting Up Audio
- Screw boom pole into threaded hole on bottom of microphone pistol grip.

- Connect XLR female end into microphone.

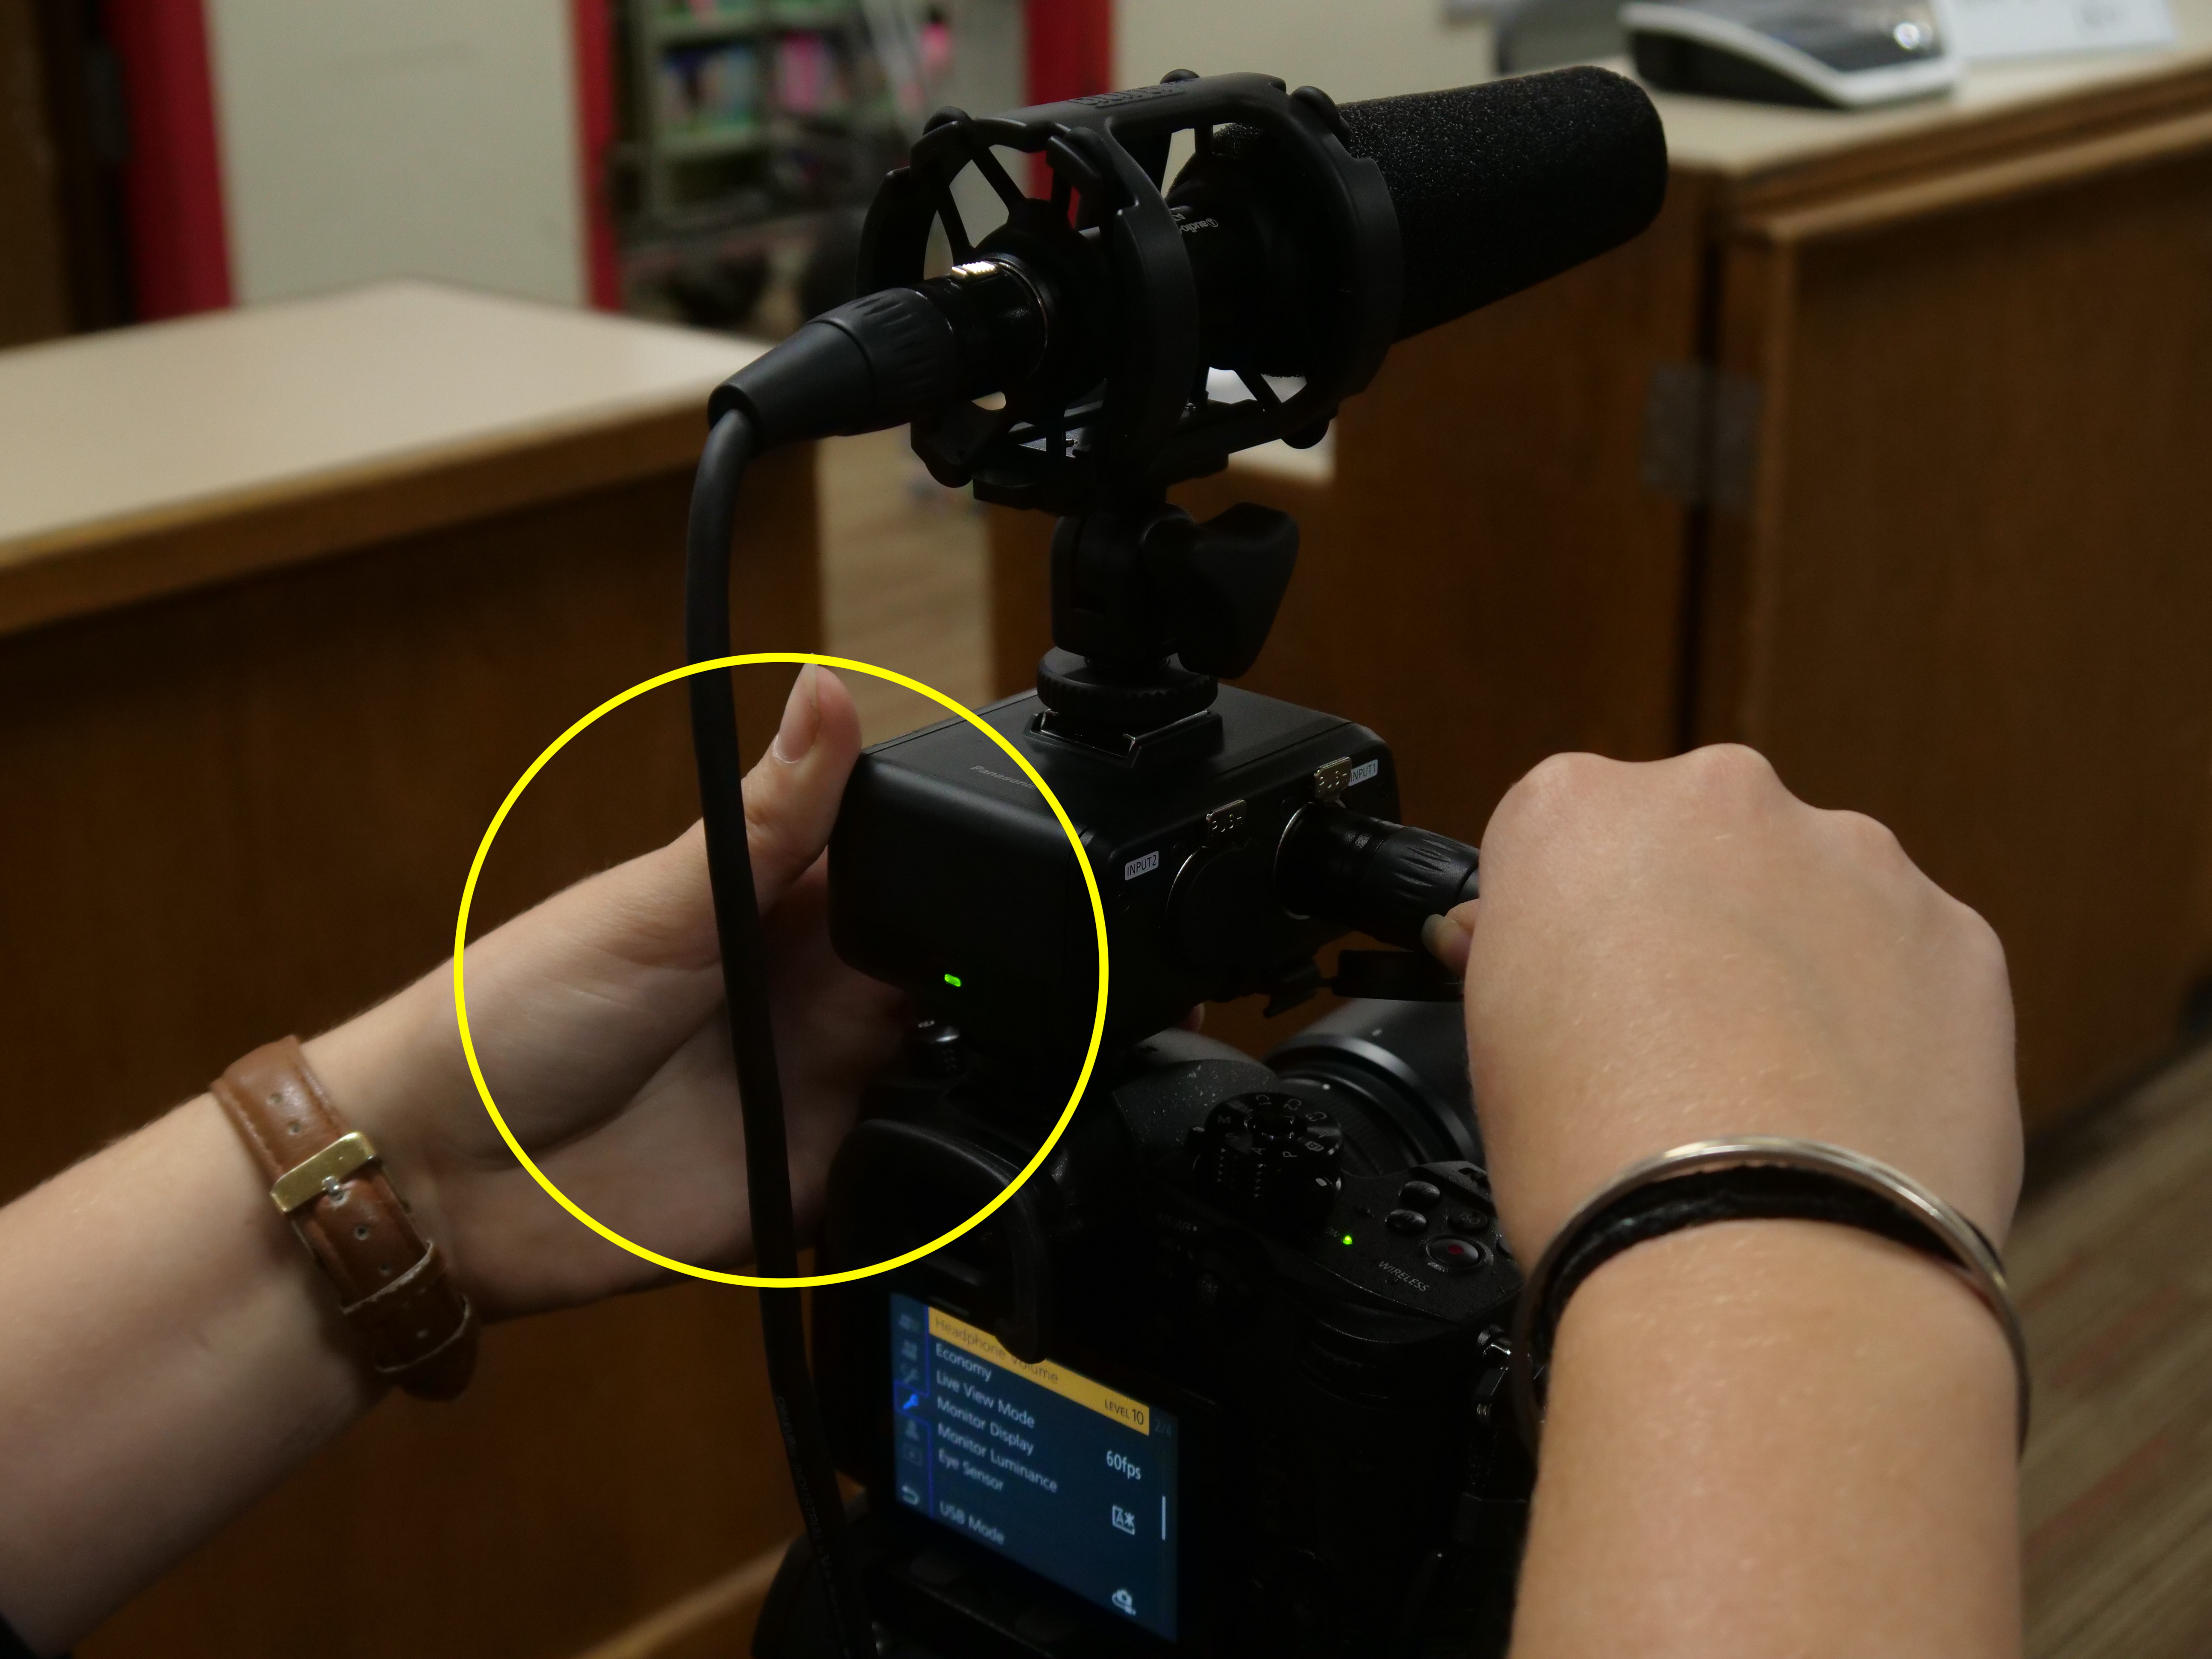
- Connect XLR male end into Panasonic XLR audio adapter (attached to top of camera body).

- The XLR adapter ports are very sticky and require a bit of physical force to properly connect the XLR cord to the adapter.
-

- Always brace the adapter and camera with your free hand to not tip over the tripod or put unnecessary stress on the XLR adapter's hotshoe connection to the camera body.
- The XLR adapter ports are very sticky and require a bit of physical force to properly connect the XLR cord to the adapter.
- Ensure settings are correct (see photo).

- Plug in headphones into camera body (if you are not hearing audio through headphones, ensure they are plugged into the correct port).

- Extend boom pole to desired length (unscrew the desired segment lock (counterclockwise), extend segment, lock back off (clockwise)).

- Wrap boom cord around pole twice/three times.

Adjusting Headphone Volume

- Headphone volume is different than audio gain.
- To adjust headphone volume, press the MENU/SET button.
- Next, navigate to the wrench menu (not C wrench).
- Scroll through the wrench menu to find 'Headphone Volume.
- Select it and adjust level to desired value (10 is a good place to start).
How to Properly Wrap a Cable
XLR cables should be wrapped neatly before storage in the camera bag. Properly "over-undering" a cable prevents kinks that could damage the cable.
- Hold female end of cable in left hand.

- Loop cable over itself first.

- Next, loop cable under itself.

- Alternate performing steps 2-3 until cable is completely wrapped.
- Always let the cable go where it wants to go. Do whichever kind of loop requires less bending of the cable, even if it means doing two under or over loops in a row.

- Secure wrapped cable with Velcro tie.

For a more detailed tutorial on how to over-under, check out this video tutorial:
Equipment Return Procedure
- Please bring all items back to the IMC on-time (according to the booking you made on Connect2).
- You will be asked to set up your tripod all the way (extend each leg), while the Media Assistant at the desk checks over your camera kit.
- Once your tripod and camera have been checked over, you will have the chance to upload the footage on your SD card.
- You do NOT need a computer reservation for this. You can use the IMC Ingest Rooms (located around the far corner of the IMC front desk).
How to ingest (upload) your footage
Via SD Card Reader
- Log into an IMC machine with your UW NetID, and open one of the Qdrive shares mounted on the Desktop. Ask your instructor exactly where they'd like the footage saved, but these are the typical use cases:
- Personal Project: Students > [your_NetID]
- Group Project: Courses > [your course number] AND/OR [your section number] > Collaborate
- NOTE: If the QDrive doesn't show up on the Desktop, try these steps.
- Copy the footage from the DCIM folder on your SD card into the folder on QDrive
Via USB Cord
- Connect the GH5 camera to your computer using the USB-C to USB-A cable included in the kit bag.
- Power the camera on and select "PC(Storage)" from the dropdown prompt.
- The SD card will now mount on your desktop exactly as it would had you used a card reader.
- Open the "LUMIX" drive and copy the footage from the DCIM folder onto your laptop or hard drive.


