Topics Map > Guide
Topics Map > Lumen Programs > Guide Content
Lumen/Guide: How to Add/Edit Undergraduate How to Get in Content
- How to add/edit content in the How to Get in - Requirements table
- How to add/edit content in the How to Get in - Application Deadlines table
- Review of the tables
- Frequently asked questions (FAQ)
- Technical how to set-up each of the tables
How to add/edit content in the How to Get in - Requirements table
General guidance
- Keep text simple and to the point.
- Use the Advising and Careers tab to provide information about the mechanics of how to declare.
- Relocate any other information to more appropriate tabs (Entering the School/College, Admissions, etc.).
- Only articulate how to get into the major with the assumption the student is already admitted to UW-Madison.
- In limited situations, application/declaration intent as a part of the application to UW-Madison may be articulated. Consult the How to Get in implementation team before adding this content on the tab.
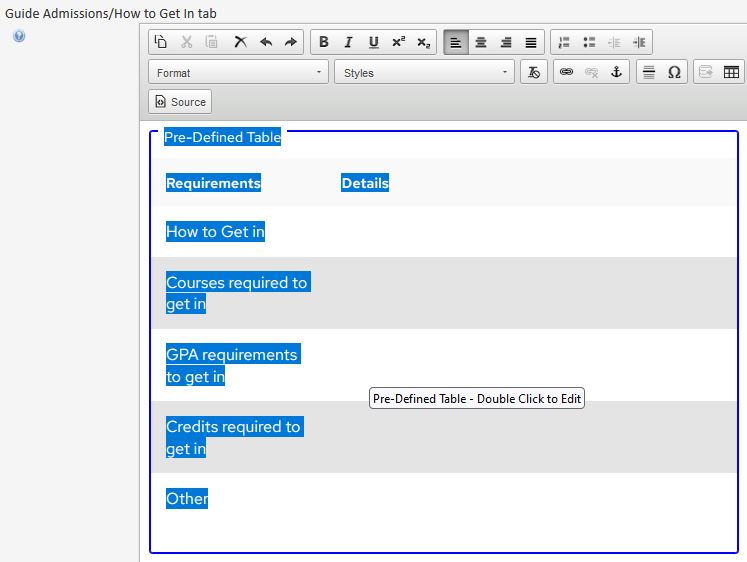
Reminder: The software does not auto save. It's recommended to click the green OK button and save your proposal frequently throughout this process. To open the table after saving, double click the blue Pre-Defined Table.
Specific field help
How to get in
You must choose one of two options, exactly as written, no more, and no less:
- No application required. All students who meet the requirements listed below are eligible to declare. For information on how to declare, see Advising & Careers.
- Application required. Meeting the requirements listed below does not guarantee admission. (insert link to application in parentheses)
Recommendations and formatting
It's recommended to use a go.wisc URL for all external websites; links cannot be embedded (URLs display in their entirety).
Courses required to get in
- You must list all courses required to declare/apply.
- Indicate whether the course must be completed prior to or can be concurrently enrolled for declaration/application.
- If no courses are required, enter "None."
- If General Education is included in the courses required to get in, list satisfaction of the requirement by name (Communication A, Quantitative Reasoning A) but don't list the specific courses.
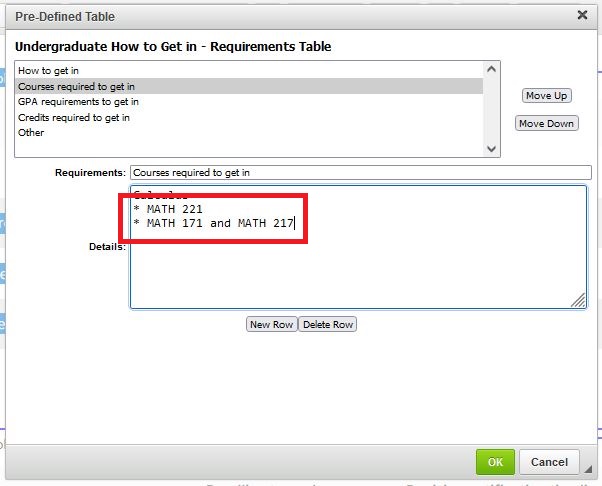
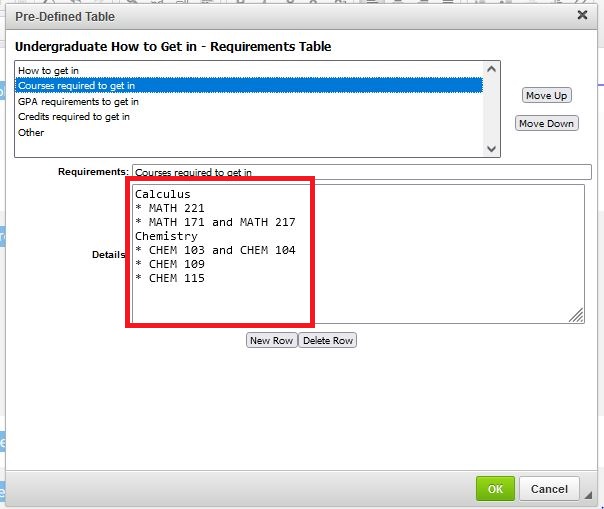
- Formatting is limited, but it's recommended to use text as a header and then use a bulleted list for the courses. See the table help below.
Recommendations and formatting
- When listing multiple courses, use commas and use the word "and". Ampersands cause display issues (ticket submitted to vendor, 2024-07-30)
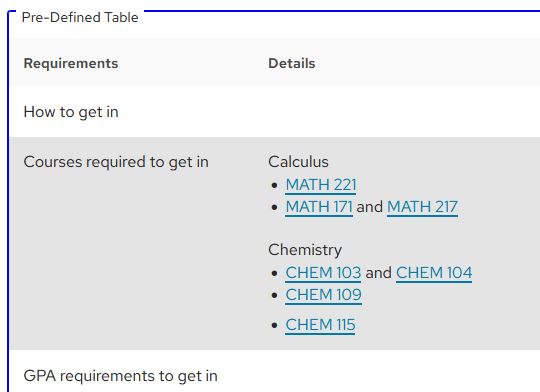
- When using the bulleted list, it's not necessary to insert an additional blank line between that and the next header (see next image).
- When using text, it is necessary to add an additional blank line between headers (see next image).
- Use the subject short description in all caps plus the catalog number (ex. BIOLOGY 151).
- If a course is cross-listed, list only one of the subjects.
- If listing a sequence or an "or" class, enter the subject before each catalog number (ex. BIOLOGY 151 and BIOLOGY 152)
GPA requirements to get in
- You must list the GPA requirements required to declare/apply.
- If no GPA requirements are required, enter "None."
Recommendations and formatting
If there is more than one statement, use a bulleted list. See the table help below.
Credits required to get in
- You must list the number of credits required (over or under) required to declare/apply.
- If there are no limits, enter "None."
Recommendations and formatting
If there is more than one statement, use a bulleted list. See the table help below.
Other
- Enter additional requirements that do not fit in the categories above, if applicable.
- If no additional requirements, enter "None."
- This field is a catch all for other relevant information about how to declare. Consult the How to Get in implementation team about appropriateness in this field.
Recommendations and formatting
If there is more than one statement, use a bulleted list. See the table help below.
Help by row (table format)
| Requirements field (must match exactly) | Details field | Examples |
|---|---|---|
| How to Get in |
This field must use one of the following:
|
|
| Courses required to get in |
|
Calculus I (one of)
General Chemistry (one of)
|
| GPA requirements to get in |
|
|
| Credits required to get in |
|
|
| Other |
|
|
Other help and examples
How to add/edit requirement details (right column)
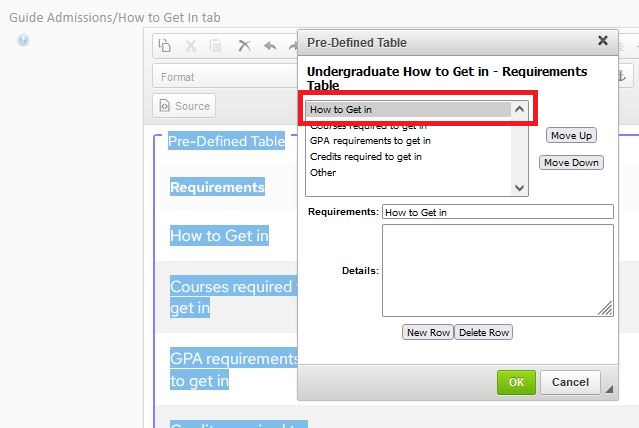
- Double click the Pre-Defined table.
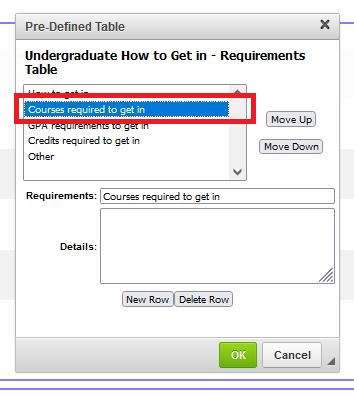
- Click on the header you wish to add/edit details.
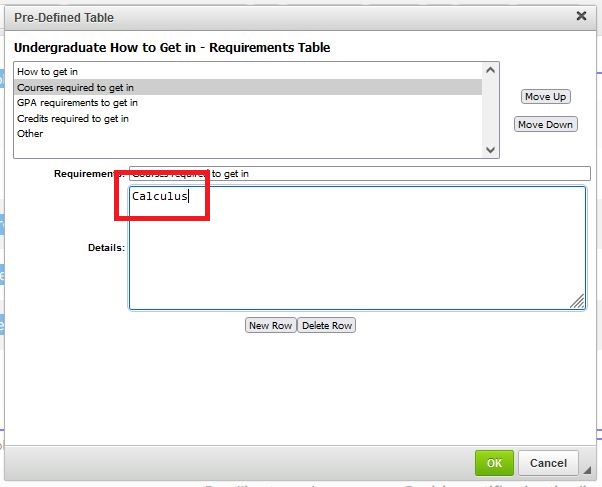
- Click in the Details field. Enter your text. The window may be made larger by clicking on the triangle next to the cancel button.

- Either Click the green OK button to save or click on another header to add/edit text in another field.

- When complete, click the green OK button and save your program proposal.

How-to help setting up bulleted lists in pre-defined tables
- Select the row where you want to add data.
- Click in the Details: box.

- Enter the header text. There is no additional formatting available (boldface, italic, etc.)
- Enter an asterisk, a single space (* ), and the content you want to have in the list (single item) ex. * MATH 221
- Return/Enter for a new line in the table and repeat step 4 until you have your whole list.
- Click the green OK button to save.

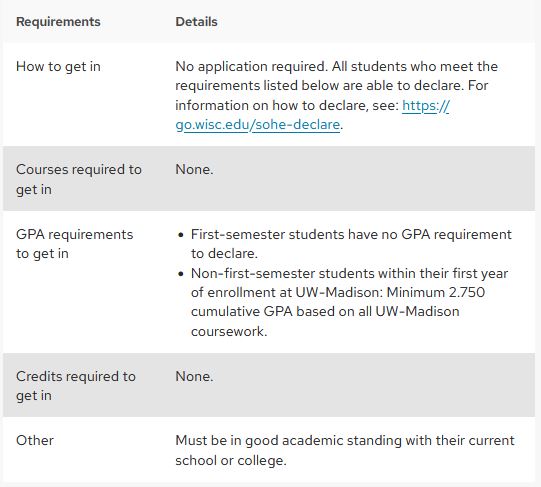
Final product
Example tables
Human Ecology
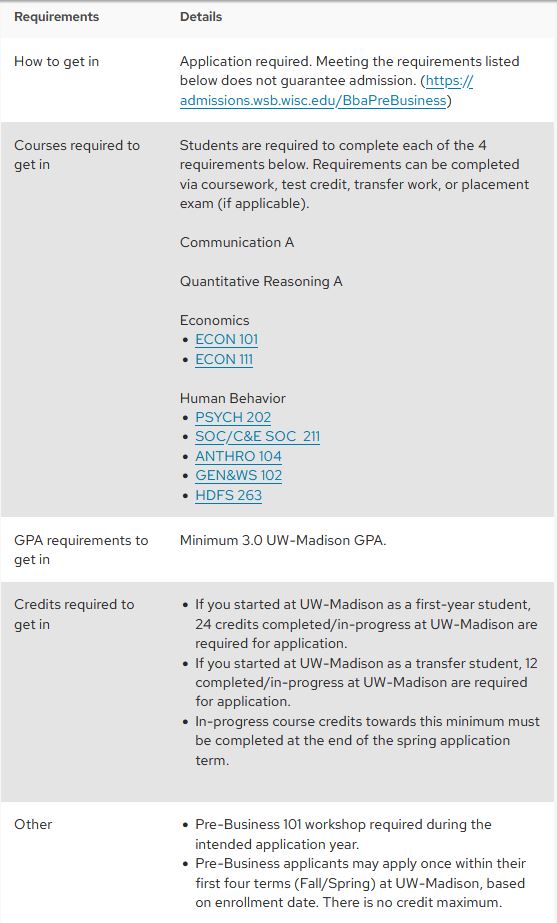
Business
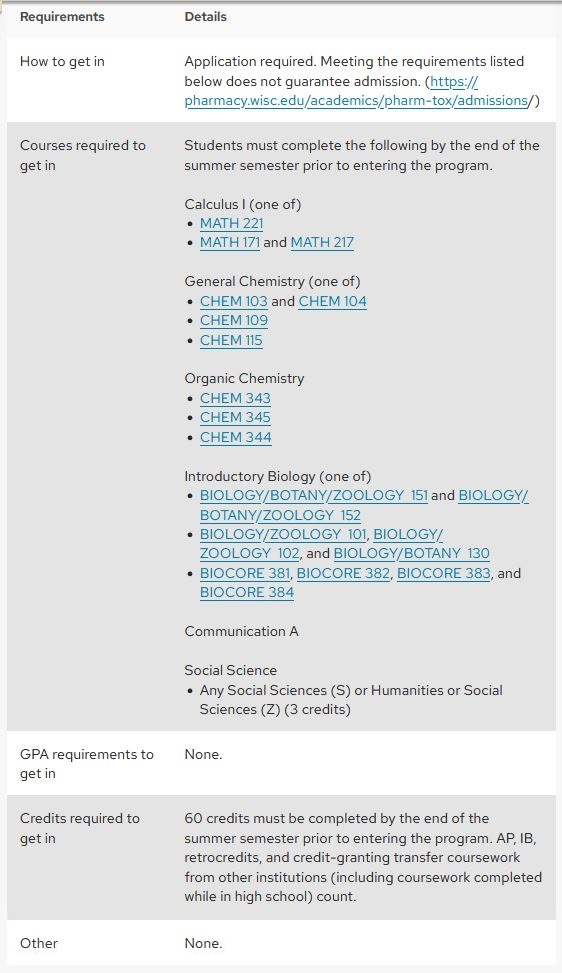
Pharmacy
How to add content in the How to Get in - Application Deadlines table
General guidance
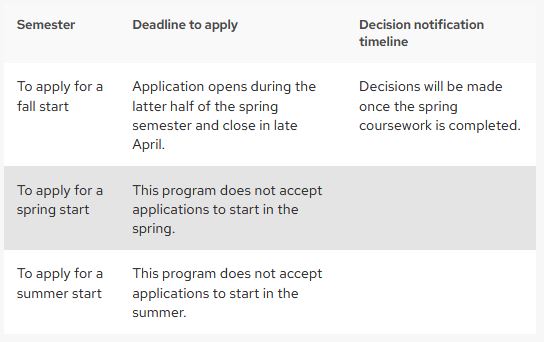
- If a program requires an application, you must include an application deadlines table.
- Only use a specific date if it is always the same, regardless the day of the week. ex. February 15
- Articulate a range that covers what the deadlines and decision notification timeline. Be accurate on the deadlines without being so specific that the table needs to be updated annually.
- Each "Deadline to Apply" column must be populated, even if you do not admit for that term.
- If you do not admit for one or more terms, use this exact language in the Deadline to Apply field:
- This program does not accept applications to start in the fall.
- This program does not accept applications to start in the spring.
- This program does not accept applications to start in the summer.
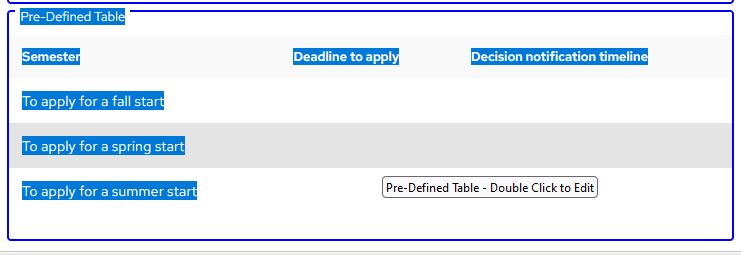
Reminder: The software does not auto save. It's recommended to click the green OK button and save your proposal frequently throughout this process. To open the table after saving, double click the blue Pre-Defined Table.
Other help and examples
How to add/edit deadline details (center and right column)
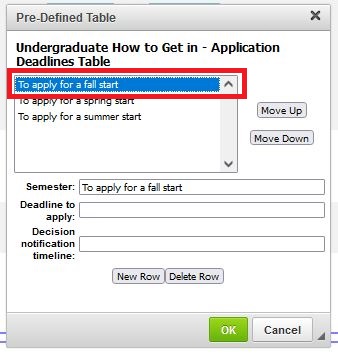
- Double click the Pre-Defined table. A new window will open.
- Click on the header you wish to add/edit details.
- Enter deadline information in the "Deadline to apply" field.

- Enter notification information in the "Decision notification timeline" field.

- Repeat steps 2-4 until complete.
- Click the green OK button to save.

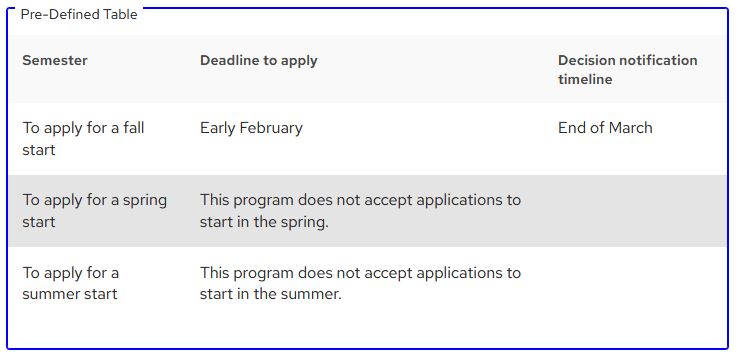
Final product
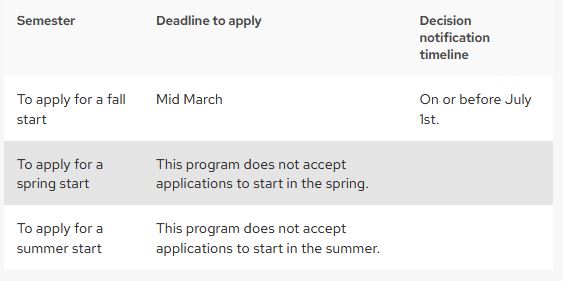
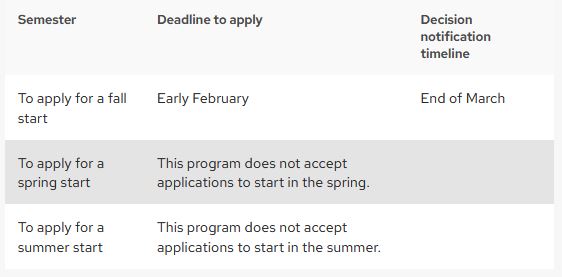
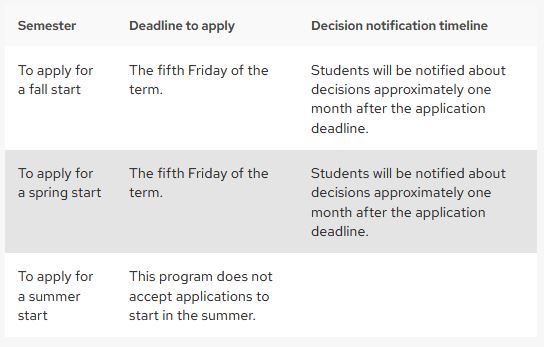
Example tables
Example 1
Example 2
Example 3
Example 4
Review of the tables
For tables including more complicated declarations content, DAPIR adds an additional workflow step for review (How to Get in). Diana Maki reviews the content to ensure:
- The content is digestible to students and advisors.
- The rules for table formatting are followed.
- If there are other considerations not articulated in this KB that should be considered, consults with the core implementation team for review.
In consultation with DAPIR, some formatting/content changes may be made post school/college governance to align with the standards in this KB. If there are questions about content that need school/college or department consultation, the proposal will be rolled back with feedback.
Frequently Asked Questions (FAQ)
Why do we have to do this?
This presents the necessary information on how to “get in” to a major in a student centered, consistent, easy-to-consume format. Feedback from students, advisors, and the Center for User Experience (CUE) indicates that the inconsistency across all Schools/Colleges is difficult to interpret in the various types of undergraduate programs (limited enrollment programs, no admissions requirements, applications, etc.).
Our requirements for declaring the major don’t fit neatly into the tables that are being used, what do we do?
Consult with your school/college academic planner. The intent is to present students with clear and consistent information. If the current set-up does not work, your academic planner will consult with the project team for best action.
What if any, changes can be made to the How to Get in tab as part of a mid-cycle update?
Mid-cycle updates follow the standard guidelines for updates: they should be rare, but not impossible. Consult with your school/college academic planners for eligibility.
What tips or advice do you have for what should be included?
- Be thoughtful about what you include. This is governed content and cannot be updated on-demand.
- Do not include specific names, personal emails, or specific dates.
- Refer to the contact box or the Advising and Careers for content that needs to be updated more frequently.
My program offers honors in the major and there are declaration requirements. Can I include information about how to get honors in the major?
You can reference honors in the major in the text below the table..
My program is available as an additional major. Can I include information about how to get into the additional major?
You can reference the additional major in the text below the table.
My program admits some students directly into the program through the university admission process. Can I include information about this?
You may reference this below the table using headings such as Prospective UW-Madison Students, Prospective First-Year Applicants or Prospective Transfer Applicants. The information provided should be limited to the fact that direct admission is an option.
My program admits some current UW-Madison differently based on distinguishable factors (e.g., admitted as a UW-Madison transfer student; student in their first year at UW-Madison). How can I account for this?
Create multiple tables; one for each distinct population.
Technical how to set-up each of the tables
- Requirements table
- Setting up the left column headers in the requirements table
- Application deadlines
- Setting up the left row headers in the deadlines table
How to add the How to Get in - Requirements table
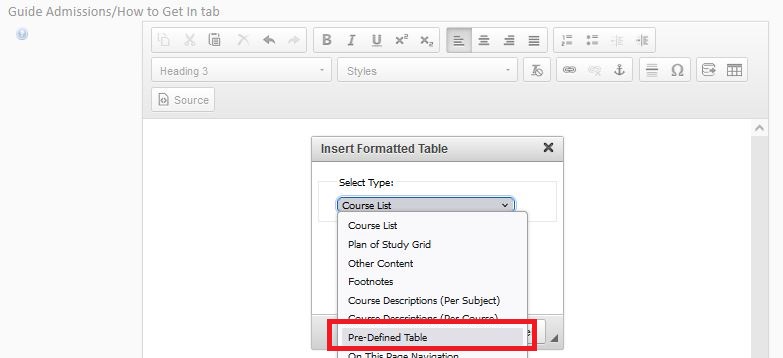
- Click the icon to Insert/Edit a formatted table.
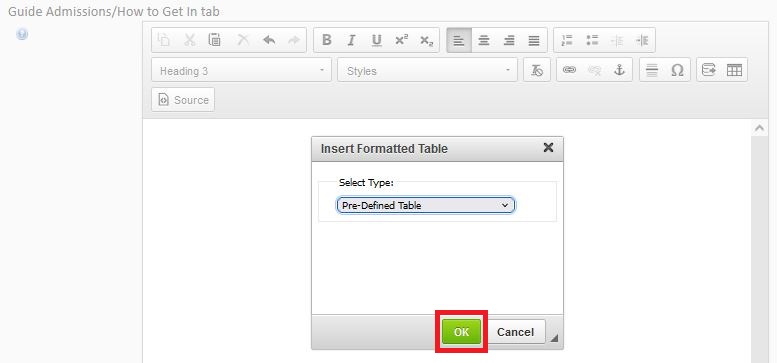
- A new window will open. Select from the drop-down "Pre-Defined Table"
- Click the green OK.
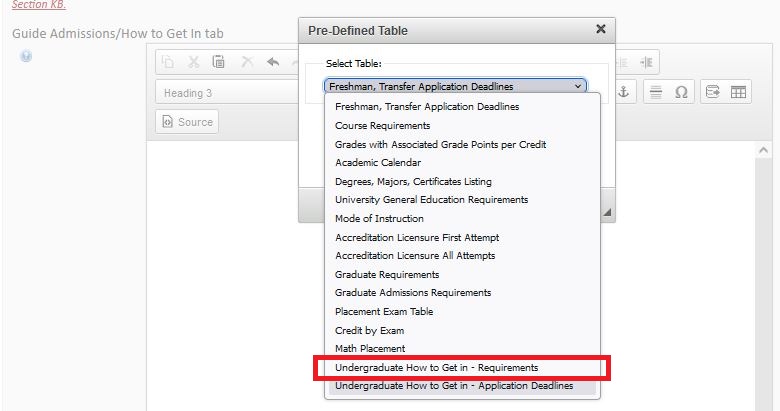
- A new window prompt opens. Select "Undergraduate How to Get in - Requirements"
- Click the green OK.
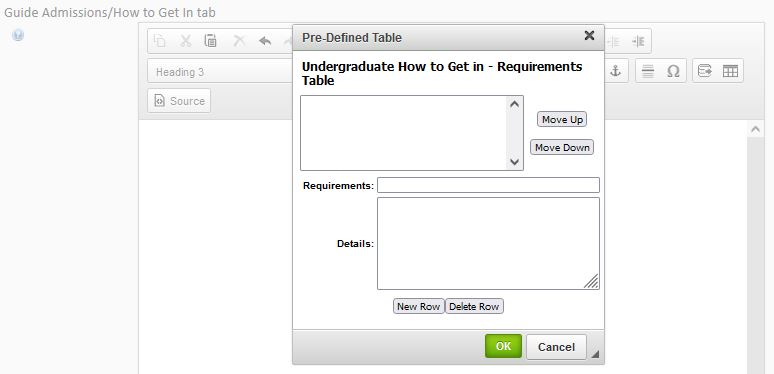
- This opens the pre-defined table.
Setting up the left column headers in the requirements table
Required rows
Each requirements table must have these rows (no more, no less):
- How to get in
- Courses required to get in
- GPA requirements to get in
- Credits required to get in
- Other
Step-by-step how-to
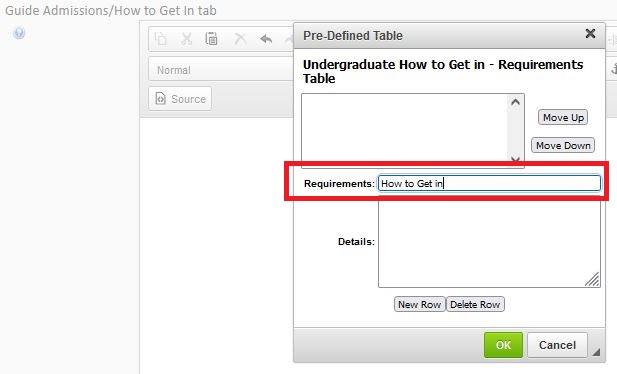
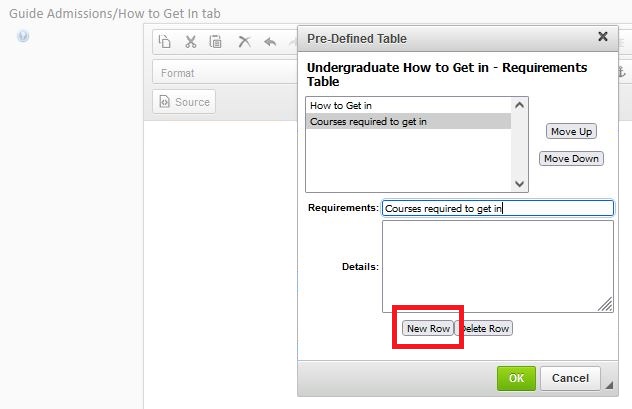
- Enter "How to Get in" in the Requirements field.
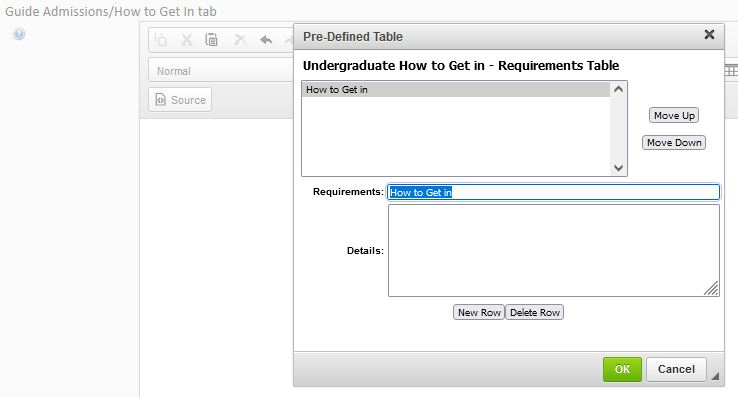
- Click "New Row." This will add the "How to Get in" in the upper box of the table.


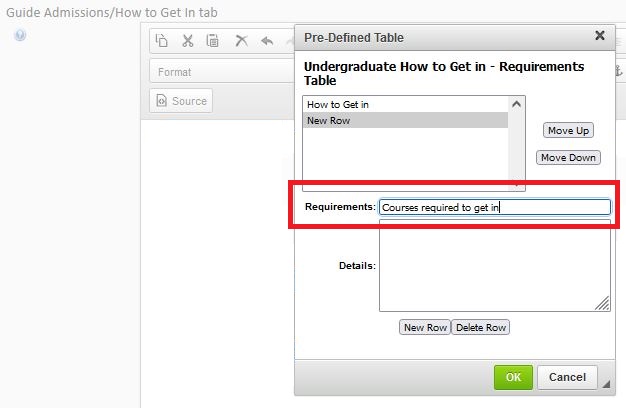
- Enter "Courses required to get in" in the Requirements field.
- Click "New Row."
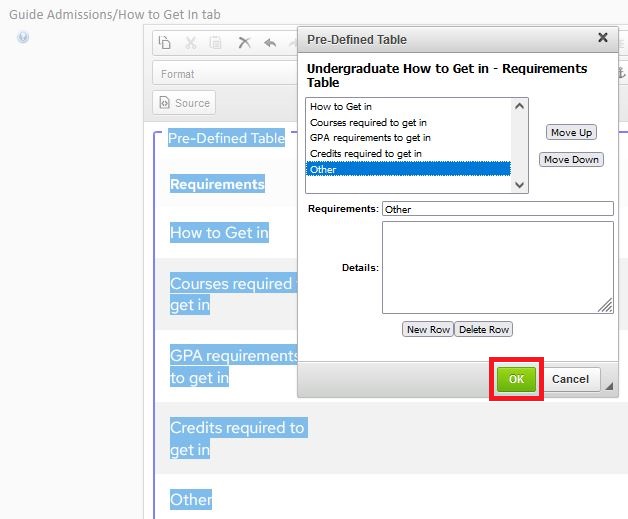
- Repeat these steps for the rest of the requirements fields utilizing the required rows.
- Click the green OK.
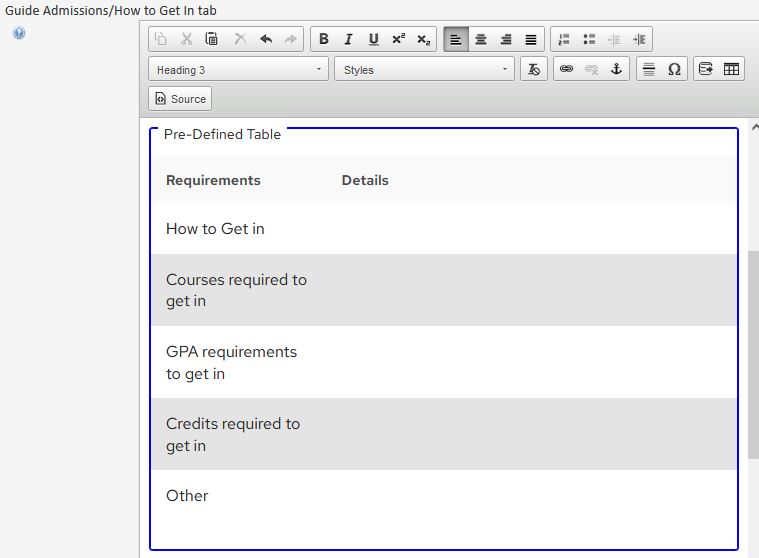
- Save changes. The table should look like this:
How to add the How to Get in - Application Deadlines table
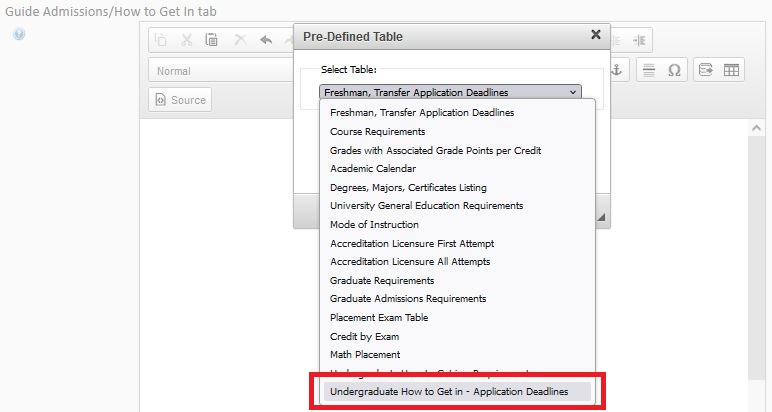
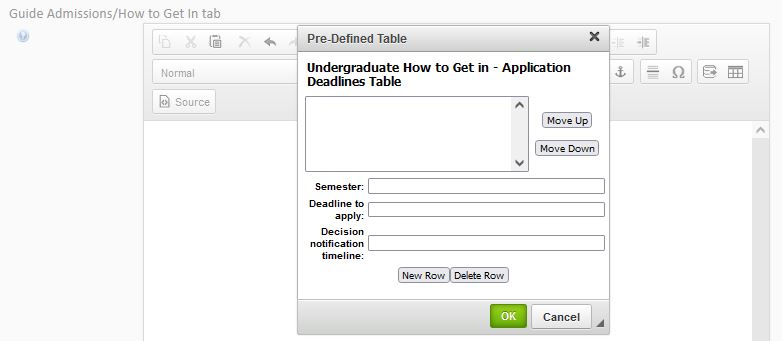
- Click the icon to Insert/Edit a formatted table.
- A new window will open. Select from the drop-down "Pre-Defined Table"
- Click the green OK.
- A new window prompt opens. Select "Undergraduate How to Get in - Application Deadlines"
- Click the green OK.
- This opens the pre-defined table.
Setting up the left row headers in the deadlines table
Required rows
Each requirements table must have these rows (no more, no less):
- To apply for a fall start
- To apply for a spring start
- To apply for a summer start
Step-by-step how-to
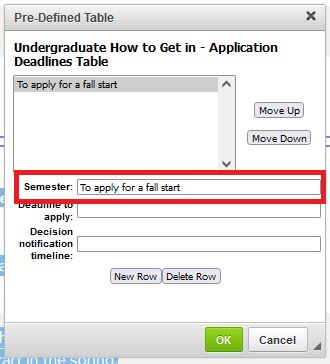
- Enter "To apply for a fall start" in the Semester field. This will auto-add it in the upper box once you click anywhere.
- Click New Row.

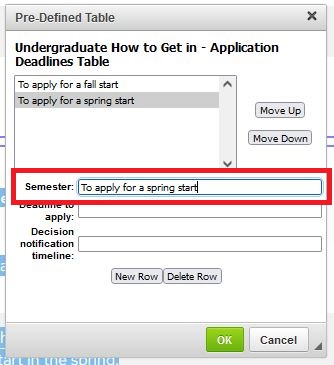
- Enter "To apply for a spring start" in the Semester field. This will auto-add it in the upper box once you click anywhere.
- Click New Row.

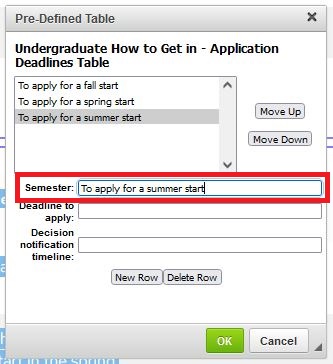
- Enter "To apply for a summer start" in the Semester field. This will auto-add it in the upper box once you click anywhere.
- Click the green OK button.


