MacBook WiFi Troubleshooting on UWNet
1. Try using EduRoam instead of UWNet on personal devices. Using EduRoam offers an encrypted connection and avoids the burden of periodically having to re-register your devices.
Go to your device's WiFi settings and choose EduRoam instead of UWNet.
Login with NetID@wisc.edu as your username and your NetID password for the password.
2. Turn off WiFi and turn it back on. This will force the MacBook to connect to the closest access point in the area.
Click on the WiFi icon on the bar at the top right of your screen.
Click "Turn Wi-Fi Off".

3. Make sure macOS is on the newest version. Newer versions of macOS fix some WiFi bugs that older versions were experiencing. Make sure you're on 10.15.7 as there was a major WiFi update in this version.
Click the Apple logo in the top left of the screen.
Click "System Preferences" from the drop down menu.

Click "Software Update".

Click "Upgrade Now" if there is an update available.
4. Delete all unneeded WiFi SSID's stored in the MacBook's network settings to prevent unnecessary connection attempts. Prioritize your networks according to this Apple Support Document.
https://support.apple.com/guide/mac-help/choose-preferred-wi-fi-networks-on-mac-mchlp1201/mac
Go to System Preferences as shown above.
Click "Network".
Make sure you're on the WiFi Connection on the left side bar in this menu.
Click "Advanced...".
On the Wi-Fi tab, click on every network except for UWNet and EduRoam. Once they're highlighted, click the minus button to remove them from the list.

If there are networks that you would like to keep on the list, like a WiFi connection at home, you may choose to leave it. Just make sure to uncheck the "Auto-Join" box next to any networks that aren't UWNet or EduRoam while on campus.
5. Turn off iCloud Backups in the background. If you only have 5GB iCloud storage (the default free storage) there is no reason to have this on at all. If you pay for iCloud, do backups manually occasionally instead of having your MacBook backup automatically in the background.
Go to System Preferences
Click "iCloud".
Listed here is everything that can be backed up to iCloud. Uncheck everything in this list if you don't have more than 5GB iCloud storage, especially iCloud Drive and iCloud Photos.

6. Make sure the MacBook is plugged in to avoid potentially destructive power-saving measures when doing something that needs consistent connection, like Black Board Collaborate or Zoom online video lectures.
Make sure the MacBook isn't entering sleep/standby if you're watching a lecture or attending an online meeting, move the mouse or hit a key on the keyboard to keep your device awake the entire time.
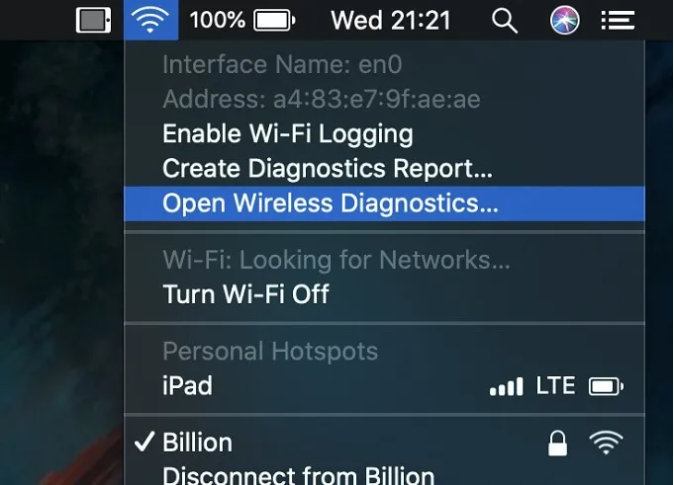
7. Try the WiFi Diagnostic Tool built in to macOS. This can sometimes find some systemic issues with the device's WiFi specifically.
Hold down the option key and then click on the WiFi icon in the top bar of the screen.
You will see an extra option in the dropdown menu called "Open Wireless Diagnostics". Click this option.
Follow the steps in this Diagnostic Wizard and see if it finds anything wrong with the MacBook's WiFi Connectivity.

If the diagnostic tool finds something wrong with the MacBook then you know that it is a device specific issue and there is nothing wrong with the UWNet or EduRoam WiFi Networks.