1Password - Create, share, and manage vaults

Learn how to create new vaults to organize your group’s information and give group members access to items they need.

**The ability to create Vaults is being rolled out slightly behind the 1Password invites because of the need to proceed cautiously with importing Shared Folders from LastPass. If you don't have the ability to create Vaults it is likely because you are a Shared Folder admin. Ref: 1Password - Recommendations for migrating Shared Folders

You can use vaults to organize your items and share them with others. You can also manage the access each person has in each vault.

A default group, Owners, will be added to your vault. The Owners group contains 1Password administrators from the Office of Cybersecurity. This group can only manage access to the vault, not see the contents. This ensures that access to your vault can be recovered in scenarios where current users leave or lose access and the vault is abandoned.

You'll be prompted about the Administrators default group. The members and permissions of the Administrators group mirror Owners today. In the future, support staff such as the Help Desk may be added so they can assist with recovering abandoned vaults. Just like Owners, this group can only manage access to the vault, not see the contents.

Sign in to your account on 1Password.com or open and unlock the 1Password app to get started.


Create a vault

In the 1Password apps

Instructions for Mac

To create a vault in 1Password for Mac, click the plus  button in the sidebar

If you’re signed in to multiple 1Password accounts, click the plus  button beside the name of the account where you’d like to create the vault.

Give your vault a name. You can also enter a description and choose an icon.

When you’re done, click Create. Your new vault will appear on all your devices.

The pop-up to create a new vault in the 1Password app

Instructions for iOS

To create a vault in 1Password for iOS, tap Items, then tap New Vault.

If you're using an iPad, tap New Vault in the sidebar.

If you’re signed in to multiple 1Password accounts, tap New Vault under the name of the account where you’d like to create the vault.

Give your vault a name. You can also enter a description and choose an icon.

When you’re done, tap Create. Your new vault will appear on all your devices.

The pop-up to create a new vault in the 1Password app

Help

If you don’t see the option to create a vault, learn how to customize the items tab to see your vaults. If you’re using an iPad, you can customize the sidebar instead.

Instructions for Windows

To create a vault in 1Password for Windows, click the plus  button in the sidebar.

If you’re signed in to multiple 1Password accounts, click the plus  button beside the name of the account where you’d like to create the vault.

Give your vault a name. You can also enter a description and choose an icon.

When you’re done, click Create. Your new vault will appear on all your devices.

The pop-up to create a new vault in the 1Password app

Instructions for Android

To create a vault in 1Password for Android, tap Items, then tap New Vault.

If you're using a tablet, tap New Vault in the sidebar.

If you’re signed in to multiple 1Password accounts, tap New Vault under the name of the account where you’d like to create the vault.

Give your vault a name. You can also enter a description and choose an icon.

When you’re done, tap Create. Your new vault will appear on all your devices.

The pop-up to create a new vault in the 1Password app

Help

If you don’t see the option to create a vault, learn how to customize the items tab to see your vaults. If you’re using a tablet, you can customize the sidebar instead.

Instructions for Linux

To create a vault in 1Password for Linux, click the plus  button in the sidebar.

If you’re signed in to multiple 1Password accounts, click the plus  button beside the name of the account where you’d like to create the vault.

Give your vault a name. You can also enter a description and choose an icon.

When you’re done, click Create. Your new vault will appear on all your devices.

The pop-up to create a new vault in the 1Password app


On 1Password.com

To create a vault on 1Password.com, click New Vault on your Home page.

Give your vault a name. You can also enter a description and choose an icon.

When you’re done, click Create Vault. Your new vault will appear on all your devices.

The pop-up to create a new vault on 1Password.com

Tip

After you create a new vault, you can move or copy items to it.

When you move an item, it’s copied to the destination vault, then deleted from the original vault. If you want to permanently delete the original copy of the item, learn how to permanently delete items


Edit a vault

In the 1Password apps

Instructions for Mac

To change a vault’s name or description in 1Password for Mac, right-click the vault in the sidebar and choose Edit Vault. Enter a new name or description, then click Save.

To permanently remove a vault and all its items from your account and your devices, right-click the vault in the sidebar and choose Delete Vault.

When you delete a shared vault, it will also be removed from the devices of everyone you were sharing it with. The built-in Personal, Private, or Employee vault can’t be renamed or deleted. The name of this vault varies depending on your account type.

The pop-up to edit a vault in the 1Password app

Instructions for iOS

To change a vault’s name or description in 1Password for iOS, tap Items, then tap the vault. Tap the ellipsis  and choose Edit Vault. Enter a new name or description, then tap Save.

If you're using an iPad, tap the vault in the sidebar.

To permanently remove a vault and all its items from your account and your devices, tap Items, then tap the vault. Tap the ellipsis  and choose Delete Vault.

If you're using an iPad, tap the vault in the sidebar.

When you delete a shared vault, it will also be removed from the devices of everyone you were sharing it with. The built-in Personal, Private, or Employee vault can’t be renamed or deleted. The name of this vault varies depending on your account type.

The pop-up to edit a vault in the 1Password app

Instructions for Windows

To change a vault’s name or description in 1Password for Windows, right-click the vault in the sidebar and choose Edit Vault. Enter a new name or description, then click Save.

To permanently remove a vault and all its items from your account and your devices, right-click the vault in the sidebar and choose Delete Vault.

When you delete a shared vault, it will also be removed from the devices of everyone you were sharing it with. The built-in Personal, Private, or Employee vault can’t be renamed or deleted. The name of this vault varies depending on your account type.

The pop-up to edit a vault in the 1Password app

Instructions for Android

To change a vault’s name or description in 1Password for Android, tap Items, then tap the vault. Tap the ellipsis  and choose Edit Vault. Enter a new name or description, then tap Save.

If you're using a tablet, tap the vault in the sidebar.

To permanently remove a vault and all its items from your account and your devices, tap Items, then tap the vault. Tap the ellipsis  and choose Delete Vault.

If you're using a tablet, tap the vault in the sidebar.

When you delete a shared vault, it will also be removed from the devices of everyone you were sharing it with. The built-in Personal, Private, or Employee vault can’t be renamed or deleted. The name of this vault varies depending on your account type.

The pop-up to edit a vault in the 1Password app

Instructions for Linux

To change a vault’s name or description in 1Password for Linux, right-click the vault in the sidebar and choose Edit Vault. Enter a new name or description, then click Save.

To permanently remove a vault and all its items from your account and your devices, right-click the vault in the sidebar and choose Delete Vault.

When you delete a shared vault, it will also be removed from the devices of everyone you were sharing it with. The built-in Personal, Private, or Employee vault can’t be renamed or deleted. The name of this vault varies depending on your account type.

The pop-up to edit a vault in the 1Password app


On 1Password.com

To make changes to a vault on 1Password.com, click Vaults in the sidebar and choose the vault you want.

To change a vault’s name or description, click Edit Details. Enter a new name or description, then click Save.

To permanently remove a vault and all its items from your account and your devices, click More Actions > Delete Vault.

When you delete a shared vault, it will also be removed from the devices of everyone you were sharing it with. The built-in Personal, Private, or Employee vault can’t be renamed or deleted. The name of this vault varies depending on your account type.

The view to edit a vault on 1Password.com

Share a vault

In the 1Password apps

Instructions for Mac

To share a vault with someone in 1Password for Mac:

  1. In the sidebar, right-click the vault you want to share and choose Manage Access.
  2. Click Add People.
  3. Select the family members you want to share the vault with, then click Next.
  4. Click Share.
The pop-up to share a vault with people in the 1Password app 

Instructions for iOS

To share a vault with someone in 1Password for iOS:

  1. Tap Items, then choose the vault you want to share.

    If you’re using an iPad, tap the vault you want in the sidebar.

  2. Tap the ellipsis  and choose Manage Access.
  3. Tap the plus  button and select the family members you want to share the vault with, then tap Next.
  4. Tap Share.
The pop-up to share a vault with people in the 1Password app

Instructions for Windows

To share a vault with someone in 1Password for Windows:

  1. In the sidebar, right-click the vault you want to share and choose Manage Access.
  2. Click Add People.
  3. Select the family members you want to share the vault with, then click Next.
  4. Click Share.
The pop-up to share a vault with people in the 1Password app

Instructions for Android

To share a vault with someone in 1Password for Android:

  1. Tap Items, then choose the vault you want to share.

    If you’re using a tablet, tap the vault you want in the sidebar.

  2. Tap  and choose Manage Access.
  3. Tap  and select the family members you want to share the vault with, then tap Next.
  4. Tap Share.
The pop-up to share a vault with people in the 1Password app

Instructions for Linux

To share a vault with someone in 1Password for Linux:

  1. In the sidebar, right-click the vault you want to share and choose Manage Access.
  2. Click Add People.
  3. Select the family members you want to share the vault with, then click Next.
  4. Click Share.
The pop-up to share a vault with people in the 1Password app

On 1Password.com

To share a vault with someone on 1Password.com:

  1. Click Vaults in the sidebar, then click the name of the vault you want to share.
  2. Click Share Vault, then enter the email address of person you want to invite.

    If you want to share with an existing 1Password user, enter their name.

  3. Select the email address of your family member in the dropdown menu.

    If you want to share with an existing 1Password user, select their name in the dropdown menu.

  4. Repeat the previous steps for each person you want to share the vault with, then click Save.
The pop-up to share a vault with people on 1Password.com

After you’ve shared the vault, any new users must accept their invitations before they can access it. Existing users can view and edit items in the vault immediately.


Manage access

Everyone with access to a vault can view, print, and copy the items in it. When you first share a vault with someone, they can also create, edit, archive, and delete the items in it.

If you allow someone to manage a vault, they can change the vault’s name and description, or delete the vault. This permission doesn’t include any item viewing or editing permissions.

Tip

To allow a team member to view or make changes to items in a vault, make sure to give them the appropriate permissions, even if they already have permission to manage the vault.

In the 1Password apps

Instructions for Mac

To manage access to a vault in 1Password for Mac:

  1. In the sidebar, right-click the vault you want to manage and choose Manage Access.
  2. Click the person’s name and choose the permissions you want them to have.
The pop-up to manage access to a vault in the 1Password app

Instructions for iOS

To manage access to a vault in 1Password for iOS:

  1. Tap Items, then choose the vault you want to manage.

    If you’re using an iPad, tap the vault you want in the sidebar.

  2. Tap the ellipsis  and choose Manage Access.
  3. Tap the gear button  beside the person’s name and choose the permissions you want them to have.
  4. Tap Done.
The pop-up to share a vault with people in the 1Password app

Instructions for Windows

To manage access to a vault in 1Password for Windows:

  1. In the sidebar, right-click the vault you want to manage and choose Manage Access.
  2. Click the person’s name and choose the permissions you want them to have.
The pop-up to manage access to a vault in the 1Password app

Instructions for Android

To manage access to a vault in 1Password for Android:

  1. Tap Items, then choose the vault you want to manage.

    If you’re using a tablet, tap the vault you want in the sidebar.

  2. Tap the ellipsis  and choose Manage Access.
  3. Tap the person’s name and choose the permissions you want them to have.
  4. Tap Done.
The pop-up to share a vault with people in the 1Password app

Instructions for Linux

To manage access to a vault in 1Password for Linux:

  1. In the sidebar, right-click the vault you want to manage and choose Manage Access.
  2. Click the person’s name and choose the permissions you want them to have.
The pop-up to manage access to a vault in the 1Password app


On 1Password.com

To manage access to a vault on 1Password.com:

  1. Click Vaults in the sidebar, then click the name of the vault you want to manage.
  2. Click the gear button  to the right of the person’s name and choose the permissions you want them to have.
The dropdown menu showing the permissions that can be granted to a family member for a specific vault

Manage app access

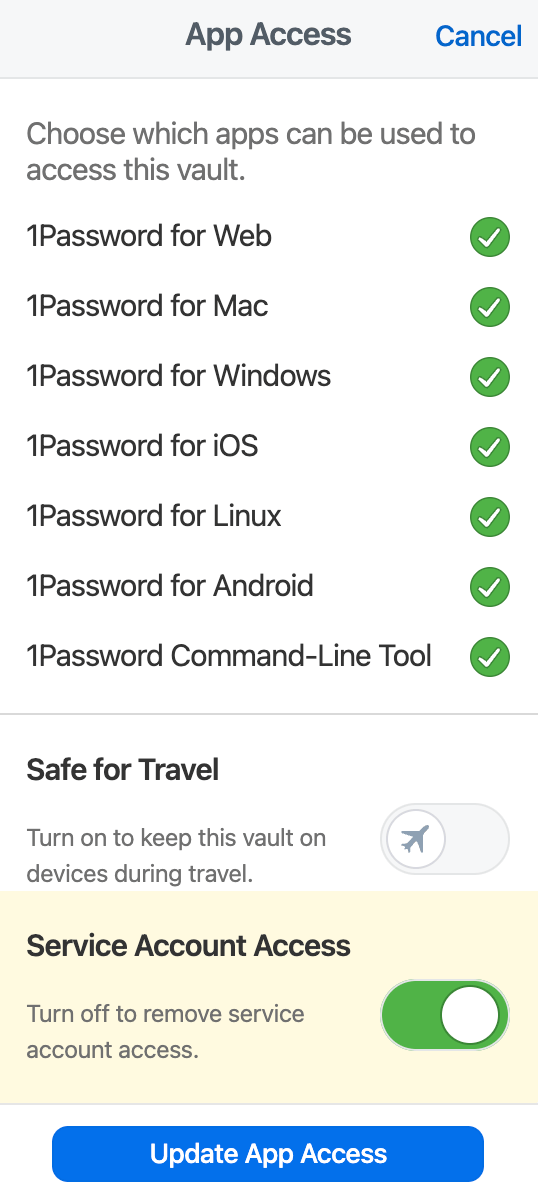
By default, your team members will be able to access vaults in the 1Password apps on their computers and mobile devices.

To restrict an app from being used to access a vault, select Manage next to App Access.

You can also mark a vault as safe for travel and manage service account access.

When you’re done, select Update App Access.

The app access setting in a vault on 1Password.com, with 1Password for Web, Mac, Windows, and Linux selected.

Manage permissions

To change the permissions for a person or group, click the gear button to the right of a person or group. Permissions include:

  • View Items
  • Create Items
  • Edit Items
  • Archive Items
  • Delete Items

Client settings provide additional control:

  • View and Copy Passwords: View concealed passwords and copy them to the clipboard.
  • View Item History: View and restore previous versions of items in the vault.
  • Import Items: Move or copy items into the vault.
  • Export Items: Save items in the vault to an unencrypted file that other apps can read.
  • Copy and Share Items: Copy items between vaults, or share them outside of 1Password.
  • Move Items: Move items to another vault.
  • Print Items: Print the contents of items in the vault.

Manage Vault allows a team member or group to grant and revoke access to the vault, change permissions for others, and delete the vault. This permission doesn’t include any item viewing or editing permissions.

Tip

To allow a team member or group to view or make changes to items in a vault, make sure to give them the appropriate permissions, even if they already have the “Allow Managing” or “Manage Vault” permission.


If you need to share an item with someone you don’t share a vault with or who doesn’t use 1Password, learn how to securely share an item with anyone.


Keywords:
1Password, vaults, sharing, password manager, share, create, manage 
Doc ID:
144295
Owned by:
Peter V. in Cybersecurity
Created:
2024-11-04
Updated:
2024-12-11
Sites:
DoIT Help Desk, Office of Cybersecurity