Kaltura - Choosing a Microphone and Setting Levels for Recording Quality Audio [UW-Madison]
Recording quality audio is often overlooked when creating instructional materials. Poor audio can negatively impact student engagement and is very difficult to fix. This document provides the basics of recording quality audio.
Choosing a microphone
If at all possible try to use a dedicated microphone when recording instructional materials. The built-in microphone on your laptop will record extraneous noise which will be distracting to your students. Even a basic headset mic will be much better than the built in microphone on your laptop.

To demonstrate we've embedded the following examples which progress from a noisier recording to better quality:
MacBook Pro internal microphone recorded in an office with air conditioning on - notice the background noise
Logitech ClearChat consumer headset microphone recorded in a quiet office
Shure SM7B professional microphone recorded in a quiet office
Choosing where to record
Creating your instructional materials in a dedicated recording studio isn't an option for everyone. What can you do? Some simple preparation will go a long way to helping you get a good recording. If you are preparing to do a recording and have an office, close the door and put on a "do not disturb sign" to reduce interruptions. Check for ambient sound and either turn it off (a fan for example), or relocate to a quieter space if you can't control the background noise (street noise or the hum of air handling, for example).
Do a short test recording before doing a longer recording
Due to the number of variables when recording audio, it is strongly recommended that you a perform small test recording prior to each time you record. This way you can review and adjust your audio settings prior to doing a more extended recording. Small test recordings can save you lots of time.
Microphone selection and audio level adjustments
There are so many microphones in the world and we cannot show how to adjust input levels on all of them. Please refer to the documentation which came with your microphone. Below are some resources which may help you adjust microphone levels within OS X and Windows 10. (Specific Google searches of your microphone and OS may also prove useful.)
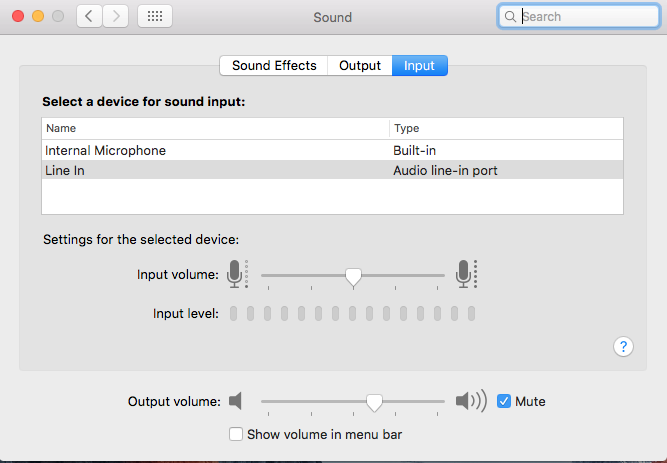
Microphone selection and level adjustments within Mac OS X:- Click on the Apple logo in top left of your screen and select System Preferences.
- Click on the Sound system preference.
- Click on the Input tab.
- Click on the microphone you want to record with.
- Set the Input volume slider bar.
- Speak into your microphone at a comfortable level. The input level monitor should fluctuate according to the audio levels from the microphone. Move the slider to the right until the input level generally rises approximately 3/4 of the width of the input bar. If the levels consistently reach 100% of the width you are likely clipping the audio and will record poor audio. The input level will not fluctuate if your computer doesn't detect audio coming from the selected source. Make sure you haven't muted your microphone.
- Once you are confident you have your source and levels set, you can close the Sound preference window.
In addition, you may also be able to adjust the recording level on your actual microphone depending on your setup.
Microphone selection and level adjustments within Windows 10:- Click the Windows button on your keyboard and type in Sound.
- The Sound control panel should display in the list of available options:

Click the Enter key to load the Sound control panel. - Click the Recording tab.
- If the microphone you want to record with isn't set as the "Default Device" right click on it and select Default Device.
- Right click on the microphone you want to record with and select Properties:

- A Microphone Properties window will open. Move the window so it is next to the Sound control panel.
- Click on the Levels tab.
- Speak into your microphone at a comfortable level. The input level monitor (1) in the Sound window should fluctuate according to the audio levels from the microphone. Move the Microphone level slider (2) in the Microphone Properties window to the right until the input level generally rises approximately 3/4 of the height of the input monitor in the Sound window. If the levels consistently reach 100% of the width you are likely clipping the audio and will record poor audio. The input level will not fluctuate if your computer doesn't detect audio coming from the selected source. Make sure you haven't muted your microphone:
 and the microphone level slide (2).")
- Once you are confident you have your source and levels set, you can click OK on both the Microphone Properties and Sound windows.
A more detailed tutorial on adjusting microphone settings for Windows 10 can be found on Win10faq.
Selecting a microphone in Kaltura Capture
 option.")