
An index to CAE filespace articles
You can click on the panels below to expand the related article. Links to each individual article are included below.
Filespace
Remote Access to your CAE Files on the web
Important: If you are connected to WiscVPN or Engineering VPN, ensure that no other VPN software (such as McAfee VPN or other third-party VPN clients) is active at the same time. Multiple VPN connections may interfere with authentication and prevent access to CAE services.
Files located on a CAE account can be accessed remotely through https://myfiles.cae.wisc.edu . When accessing this site, you will be prompted to log in using your CAE username and password.
- Navigate to my.cae.wisc.edu
- Log in using your CAE username and password
- Select Disk Space
- Click the File Manager link
Alternatively, you can map your CAE Filespace as a Network Drive on your computer.
Mapping Your CAE Network Drive
When you are in a CAE Windows lab, your files can be found on your I drive. In CAE Linux labs, this same space will be your default home directory.
How to map your CAE home directory
Windows
- Open "File Explorer" (Folder Icon in taskbar, otherwise under start menu)

_LI.jpg)
![4. In "Folder:" enter \\userspace.drive.cae.wisc.edu\homes\[login_name].](/images/group28/5937/image_20260615110931.png)

Mac OS
- From Finder, press Command+K
- Enter the path to your directory: smb://userspace.drive.cae.wisc.edu/homes/[login_name]. (For example, for the account johndoe, the path is //userspace.drive.cae.wisc.edu/homes/johndoe.)
- Click "Connect"
- Enter your CAE login and password, with the ENGR domain specified, e.g. ENGR\johndoe, and click "OK"
- The drive is now mounted, however it will disappear when you reboot. To enable persistence do the following:
- Go to System Preferences from the Apple menu
- Click on "Accounts" then "Login Items"
- Click the + button to add another login item
- Locate the CAE drive you just added, and select "Add"
- Exit out of system preferences
Linux
The addresses of CAE smb shares are smb://groupspace.cae.wisc.edu for CAE Groupspace and smb://files.cae.wisc.edu/<FirstLetterOfCAEUsername>/<CAEUsername> for CAE Filespace. You also need the domain to be ENGR and you will use your CAE credentials
Option 1: File manager
In your desktop file browser (eg. Thunar, Dolphin), use the navigation bar and enter in smb://<servername>/<sharename>.
Depending on which distribution of Linux you are using, you may need to click on "Other Locations" and use the "Connect to Server" field instead of just entering the address into the navigation bar. Example screenshots of both Debian and Ubuntu are included below.
Debian:

Ubuntu:

You should get a prompt asking for your credentials. Be sure to specify the Domain as ENGR and sign in with your CAE credentials. You can choose how long the password will be saved, but we would recommend selecting Forget Password Immediately, as shown in the Debian image below. Depending on your distribution of Linux, you may need to specify you are connecting as an Authorized User, instead of an Anonymous one.
Debian:

Ubuntu:

Option 2: Command line
The following command will mount the filesystem in a sub-directory of /run/user/${UID}/gvfs:
$ gio mount smb://<servername>/<sharename>
Make sure the domain is ENGR, and to use your CAE credentials. You can then symlink that somewhere more convenient ie: $ ln -s /run/user/${UID}/gvfs ~/gvfs. Note that gio mount is not persistent and must be run each time the computer is rebooted.
NOTE: You may need to install packages for the commands to be available, including libfuse3 and gvfs-fuse (for Debian/Ubuntu based machines).
Here is an example of creating a mount:

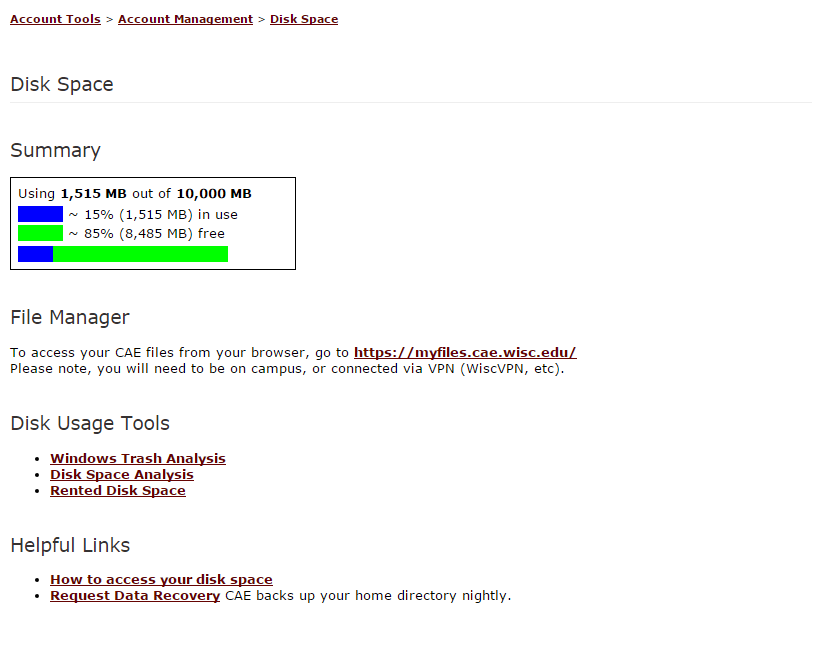
You can see how much disk space you have available, and view a detailed analysis of the files in your Unix/Windows home directory, on the CAE My Account page under "Disk Space".
Checking Disk Quota - available and maximum
Maximum allowed disk space
- When a CAE account is created, it is given a base allotment of 10 GB.
- College of Engineering undergrads and grad students are given additional 15 GB (25 GB total).
- CoE faculty/staff get an additional 40 GB to the base allotment (50 GB total).
- Other factors that affect allotment include special course requirements and purchased disk space.
Checking current vs. maximum disk usage
Although there are a few ways to check your disk space from Windows and Linux machines, CAE suggests checking from your CAE account page.
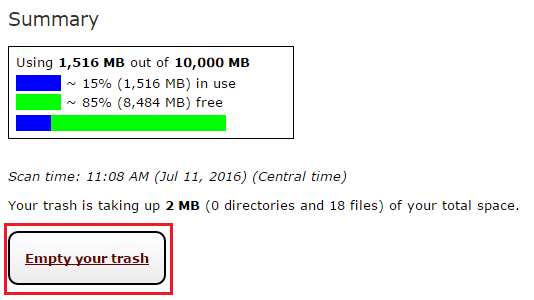
Emptying Trash
CAE Filespace Over Quota
Checking Disk Quota and Managing File Storage
There are several methods available for reviewing your current disk usage and available quota. For complete instructions and additional details, please refer to the CAE knowledge base article on disk quota and space usage .
Reducing Disk Usage
If your account is approaching or exceeding its storage limit, use one or more of the following methods to remove unnecessary files from your CAE file space.
- Delete files from a CAE Windows computer.
Sign in to a CAE-managed Windows workstation and remove any files you no longer need from your file space. - Delete files through MyFiles.
Go to https://myfiles.cae.wisc.edu and sign in using your CAE credentials to manage and delete files directly.
Note: If you are accessing this service off campus, you must first connect to the campus VPN. - Delete files from a CAE Linux system.
Open a Terminal session and remove files using standard Linux commands such asrm filename.
After deleting files, be sure to empty the Recycle Bin or Trash. Storage updates are not always immediate; please allow up to 30 minutes for the system to reflect the changes before checking your quota again.
If you need to retain files but free up space, consider moving them to DoIT Box , or to approved external storage such as a flash drive or other secure media.
Reducing Disk Usage After the Grace Period
Users are typically provided a 7-day grace period to bring their account back under quota while maintaining access to their files. Once this grace period has expired, file movement may be restricted. In cases where an account is significantly over quota, file movement may be blocked immediately and the grace period may not apply. In these situations, files must be deleted until the account returns below quota.
Before taking further action, empty the Recycle Bin or Trash and then verify whether your account has returned below the quota threshold. If additional cleanup is needed, use one of the options below.
- Use a CAE Linux system.
Empty the Trash through the graphical interface, or open Terminal and permanently remove files using commands such asrm filename. - Use permanent deletion in Windows File Explorer.
Select the files you want to remove, then pressShift + Deleteto permanently delete them without sending them to the Recycle Bin.
If you are still unable to reduce your disk usage sufficiently or continue to experience issues deleting files, please contact the CAE Help Desk for assistance.
Mapping Your CAE Network Drive
When you are in a CAE Windows lab, your files can be found on your I drive. In CAE Linux labs, this same space will be your default home directory.
How to map your CAE home directory
Windows
- Open "File Explorer" (Folder Icon in taskbar, otherwise under start menu)
Mac OS
- From Finder, press Command+K
- Enter the path to your directory: smb://userspace.drive.cae.wisc.edu/homes/[login_name]. (For example, for the account johndoe, the path is //userspace.drive.cae.wisc.edu/homes/johndoe.)
- Click "Connect"
- Enter your CAE login and password, with the ENGR domain specified, e.g. ENGR\johndoe, and click "OK"
- The drive is now mounted, however it will disappear when you reboot. To enable persistence do the following:
- Go to System Preferences from the Apple menu
- Click on "Accounts" then "Login Items"
- Click the + button to add another login item
- Locate the CAE drive you just added, and select "Add"
- Exit out of system preferences
Linux
The addresses of CAE smb shares are smb://groupspace.cae.wisc.edu for CAE Groupspace and smb://files.cae.wisc.edu/<FirstLetterOfCAEUsername>/<CAEUsername> for CAE Filespace. You also need the domain to be ENGR and you will use your CAE credentials
Option 1: File manager
In your desktop file browser (eg. Thunar, Dolphin), use the navigation bar and enter in smb://<servername>/<sharename>.
Depending on which distribution of Linux you are using, you may need to click on "Other Locations" and use the "Connect to Server" field instead of just entering the address into the navigation bar. Example screenshots of both Debian and Ubuntu are included below.
Debian:
Ubuntu:
You should get a prompt asking for your credentials. Be sure to specify the Domain as ENGR and sign in with your CAE credentials. You can choose how long the password will be saved, but we would recommend selecting Forget Password Immediately, as shown in the Debian image below. Depending on your distribution of Linux, you may need to specify you are connecting as an Authorized User, instead of an Anonymous one.
Debian:
Ubuntu:
Option 2: Command line
The following command will mount the filesystem in a sub-directory of /run/user/${UID}/gvfs:
$ gio mount smb://<servername>/<sharename>
Make sure the domain is ENGR, and to use your CAE credentials. You can then symlink that somewhere more convenient ie: $ ln -s /run/user/${UID}/gvfs ~/gvfs. Note that gio mount is not persistent and must be run each time the computer is rebooted.
NOTE: You may need to install packages for the commands to be available, including libfuse3 and gvfs-fuse (for Debian/Ubuntu based machines).
Here is an example of creating a mount:
You can see how much disk space you have available, and view a detailed analysis of the files in your Unix/Windows home directory, on the CAE My Account page under "Disk Space".
Recovering files from /filespace home directories and group shared space.
Recovering in Windows
File Recovery in Windows:
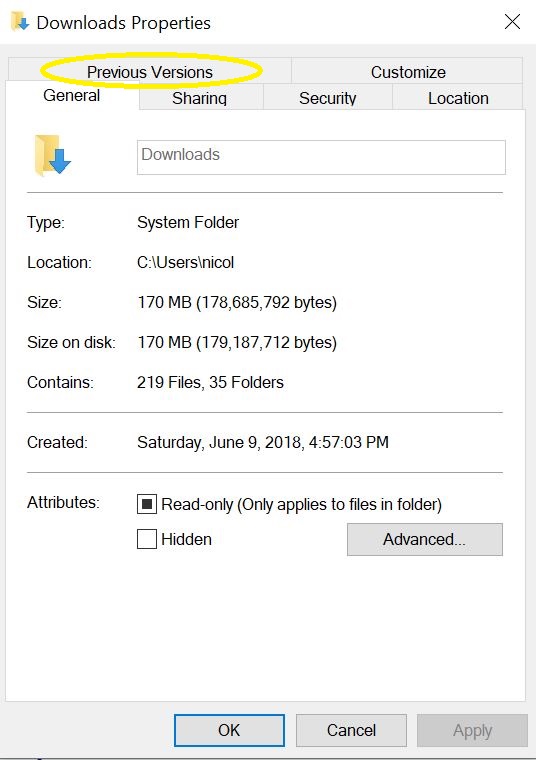
The CAE uses a Windows utility called "Previous Versions" which is used for file recovery in case of accidental loss or deletion. To restore from these stored files, follow these directions:
- Select the folder where the file used to be. Right-click and select "Properties."

- Click on the tab labeled "Previous Versions"
From here, there are 2 ways to restores your files:
Option 1: Here, click on the date you want to recover from, and click on "Open."
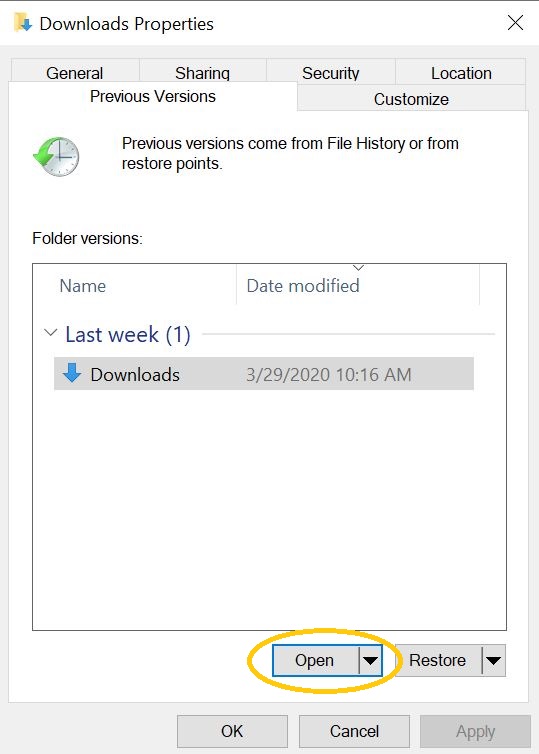
Then, you can find the specific file you want to restore, right click on it, and click "Undo Delete"


Recovering in Linux
Your CAE files, including your home directory, does periodic "check pointing" and makes snapshots. These are kind of like backups, but don't have version control. They can be found in the .ckpt hidden directory in your home directory.
Steps to restore a file.
- Change to your
.ckptdirectory. The command iscd ~/.ckpt - List out directories using the
ls -lacommand
- Change to the most recent with the desired files.

- Copy that file to your home directory. Example command:
cp .bashrc ~/.bashrc
Connecting your Cloud Storage to CAE lab Machines
Kumo: Cloud Storage Integration
Kumo is a program that allows you to map your cloud based storage drive to a lab computer or XenApp. Developed by Indiana University, it is simple to use and eliminates the need for portable storage devices. Setup is easy, just authorize your storage accounts, and they’ll show up just like a network drive within XenApp or on any lab computer station. Unfortunately, this service is only available on lab computers and through XenApp.


Groupspace
Creating, Editing, and Deleting a Personal Group Filespace
Creating a Group Filespace
CAE now offers the option to create your own group filespace on our servers. Students, faculty, and staff with active CAE accounts are eligible to create groupspaces. To check your groupspace quota, and to see all of the groupspaces you already belong to, follow this link.
1. To create a group filespace, you must first create a group that will have access to the filespace. If you already have the desired group created, you can skip this step. You can create a group by following these instructions.
2. Once your group is created, go back to the groupspace page.
3. Click on "Create New Groupspace".
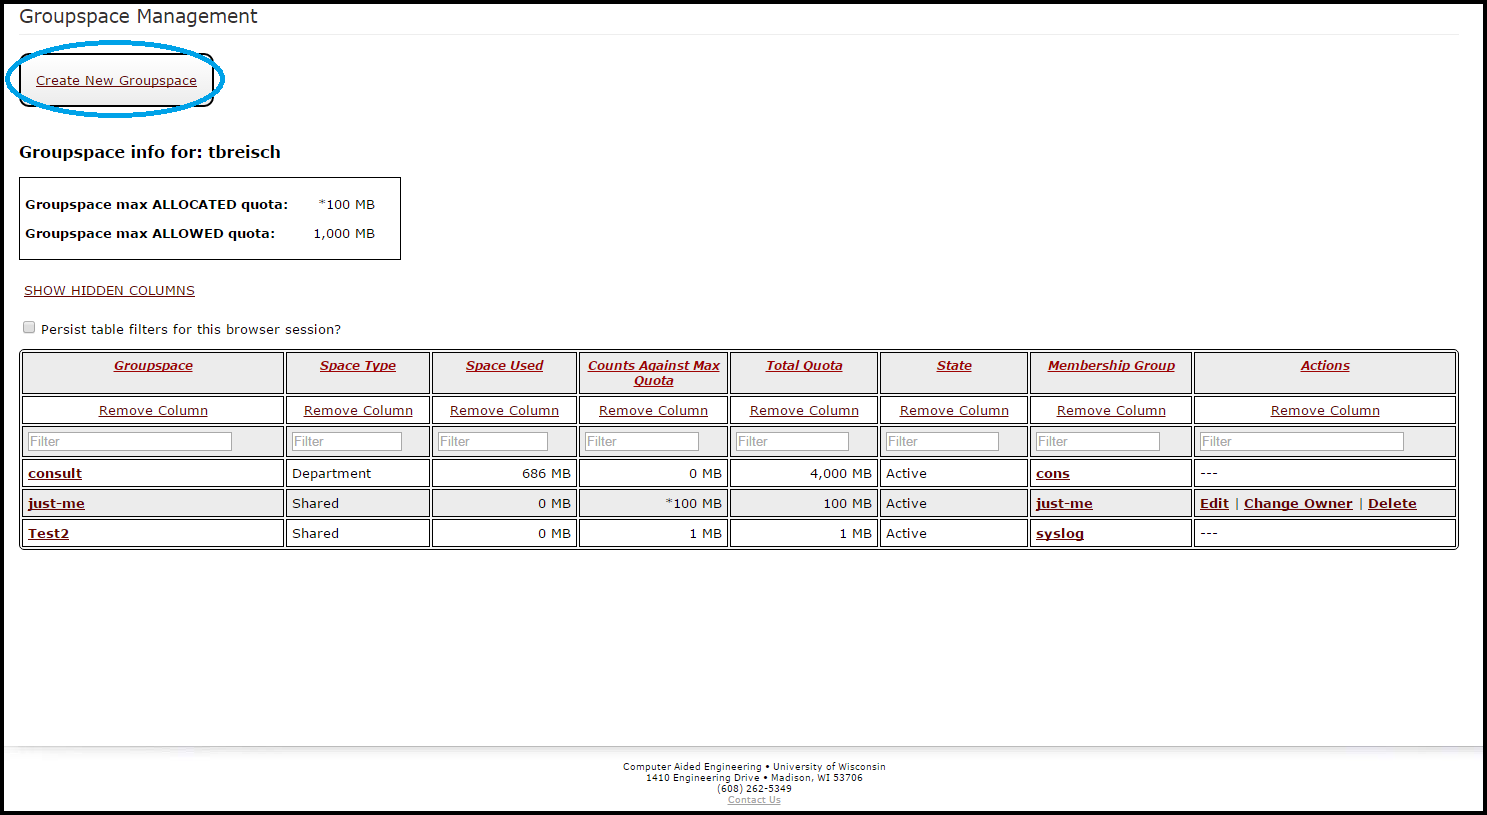

Editing and Deleting Group Filespaces
1. To edit or delete a group filespace, navigate to the groupspace page.
2. You will see a list of all of the groups you are a member of. For groups that you have administrative rights to, you will see links to "Edit" "Change Owner" and "Delete" in the Actions column on the right side of the screen.
3. Click the appropriate link. The "Edit" link will allow you to increase or decrease the allocated quota for the groupspace. "Change Owner" will allow you to transfer ownership to another user in the group. "Delete" will allow you to delete the groupspace entirely.
4. You will now need to log out, then log back in for Windows to recognize the changes to the groupspace (Windows only).
Note: If you need to modify the group that has access to a given groupspace, please see these instructions: Changing Ownership of a Group and Adding members to a Group
Increase Quota Storage for Personal Groupspace
Student orgs
Accessing Student Org Filespace
Note: In order to remotely access groupspace folders, you must be connected to the WiscVPN, License VPN, or CoE VPN (Engineering_full or split).
Shared file space
The CAE lab computer image and the CAE file system have combined to change the way that student organizations can access file space. Now filespace can easily be accessed from anywhere, using the following information. Keep in mind that you must be on either the UW campus WiFi, uwmadisonVPN, or one of the various Engineering VPN portals.
- On a CAE Windows lab computer, look in the H: drive (studentorgs folder) and find your group's file folder. You will only see resources that you are allowed to access, so the list won't be excessively long.
- On a CAE Linux lab computer, go to /groupspace/studentorgs and find your group's file folder.
- To map the drive on computers outside CAE labs, the path is \\groupspace.cae.wisc.edu\studentorgs.
Website
Student Org websites have been transitioned to WiscWeb. For more information, please see: https://it.wisc.edu/services/web-content-management-wiscweb-cms/
Coursespace
Coursespace Management
Getting to your Coursespaces
Login to my.cae.wisc.edu and click the "Groupspace" link in the left navigation.Look for the "View Coursespaces" link (if you do not see this, you do not have access to any coursespaces).

You can also access your coursespaces directly via: https://spaces.my.cae.wisc.edu/coursespace
Managing your Coursespaces
If you have access to any coursespaces, you will see them listed with relevant information. Click on the coursespace's link to view more details.
In the "Groupspaces" information area, you will have the following options if you have management access to the coursespace:

- "Add Groupspaces" - if you have not reached your maximum groupspaces, you may add more here.
- "Membership Mgmt" - you may manage groupspace membership here by adding and removing accounts, including a list of the course roster for selection.
- "Groupspace(s) Quota Mgmt" - you may update the quota for each groupspace here, either individually, or all at once.
See Also
- Remote Access to Your CAE Files on the web
- Checking Disk Quota - available and maximum
- CAE Filespace Over Quota
- Mapping Your CAE Network Drive
- Recovering files from /filespace home directories and group shared space.
- Kumo: Cloud Storage Integration
- Group Filespace on CAE's File Server
- Creating, Editing, and Deleting a Personal Group Filespace
- Accessing Student Org Filespace
- Coursespace Management