Topics Map > Curricular Services
25Live Pro - Creating an Event and Requesting a Room

Overview
From the dashboard, there are two quick ways to create an event. Use the "Event Form" link in the top navigation bar or use the "Create an Event button" in the middle of the dashboard.
Step-by-Step
Step 1: Enter basic information
The first four fields of the form require basic information about the event: Event Name, Event Title, Event Type, Primary Organization, and Expected Head Count.
The event form has a mixture of required and optional fields. Any required field (like the Event Name, Type, and Primary Organization in the image below) will be labeled as such.
Event Title is optional and should generally be left blank since 25Live Pro will simply display the Event Name throughout the system. (If you do enter an Event Title, it will appear on 25Live Pro INSTEAD of the Event Name).
Some fields also have additional information listed to help you fill them out, displayed with an "i" information icon. When you first open the event form, these tips will display automatically and you can click the icon to hide the information.
Tip: You will have to type in your Primary Organization the first time you create an event. If you star it by clicking the star next to the organization name, it will automatically show up first on the list whenever you create an event going forward.

Step 2: Select the date and time of the event
The date and time of the first (or only) occurrence is required. The date field defaults to the current date. To change the date, click into the field and either type in the date or select the date of your event on the calendar that pops up. The next two fields are the start and end times for the event. You can either use the drop-down list to select the times or type in the times.
Important note: Beginning with the implementation of 25Live Pro, special-event schedulers are now required to add additional time before and after the event, with a minimum of five minutes pre-event and five minutes post-event. You can increase the pre-event and/or post-event time as needed, but please don't ask for more than you need in order to keep rooms available for others and make it easier to find rooms yourself. The image below shows the date and time fields along with the five minutes added before and after the event.

Tip: Make sure to leave the "This event begins and ends on the same day" box checked unless your event spans midnight. If you have an event that does span midnight, you will need to get building manager permission to use any General Assignment room overnight.
Step 3: Select repeating pattern or ad hoc event dates
If your event repeats on multiple dates, you will be able to select each date or set a repeating pattern to automatically have multiple dates selected. Clicking the blue "Repeating Pattern" button will open a pop-up that will allow you to define the repeating pattern of your event.
There are four Repeating Pattern options: Ad Hoc, Daily, Weekly, and Monthly.
- Ad Hoc Repeats allow you to select any number of dates from the calendar. To select a date, click on it on the calendar and it will be added to the list of dates below. The Repeating Pattern will always default to Ad Hoc.

Tip: The calendar default start day is a Monday. To change this to Sunday, click the More menu on the top right of your screen. Click on Preferences to expand the menu and select Date/Time Preferences.

Under Calendar Start Day, select the Week start day as Sunday.

Click "Update Preferences" to save.
-
Daily Repeats allow you to select the repeating criteria (every day, every other day, every 3 days, etc) and it allows you to select an end condition. The two choices for end conditions are choosing a date the repeating occurrences will end, or choosing a number of iterations for the event.

- Weekly Repeats allow you to select the repeating criteria (every week, every other week, every two weeks, etc.), the day(s) of the week, and the end condition. Any days that you select will be repeated throughout the length of the event. Similar to the Daily Repeats options, Weekly Repeats allow you to repeat through a certain date or for a specific number of iterations.

- Monthly Repeats allow you to repeat your event based on a few criteria. The first field on the screen allows you to select if the event will repeat every month, every other month, every third month, or so on.
The second field allows you to select if you are planning to repeat by day. This selection allows you to repeat on the first, second, third, etc. day of the month. You can press the plus sign and add more options, so if you want to add repeating events on the third and tenth of every month, you would use this repeating option. The other option is to Repeat by Position. This allows you to select a day of the week, and a position in the month to repeat on. For example, you can choose the third Monday or the last Sunday.

For all of these repeating options, you can go in and individually change individual occurrences by clicking the View All Occurrences button below the calendar. A pop-up will open allowing you to remove individual occurrences or change the time of any single occurrence. The image below shows the occurrences of an event that occurs every Tuesday and Thursday from October 8, 2019 - October 31, 2019, with Tuesdays set from 9 a.m.-10 a.m., and Thursdays set to 9 a.m.-10:30 a.m.

Step 4: Find a location
The final step to creating an event is selecting a room. This step is optional. If you do not have a specific room in mind for your event, you can skip this step and leave a comment with any instructions for the Office of the Registrar staff member who will assign a room for your event.
The Saved Searches drop-down menu allows you to select from previously created searches. The Office of the Registrar has already created searches for each building, a search for all GA rooms, and a search for Technology Rooms under the heading "Public Searches." You can also create your own location search to add to this list. There are two boxes at the top of the Location Search: "Hide Locations with Conflicts" and "Enforce Headcount." Make sure to check these boxes to only view rooms that are available for all dates and that have at least as many seats as the headcount entered at the top of the form. The image below shows the Public Location Searches and those two boxes checked.

You can also use the "More Options" drop-down criteria selection process to narrow your room search. You can select multiple categories and/or features, along with specifying a room capacity. Our campus primarily uses features, so if you are looking for rooms with certain room characteristics, you should check the list of features. The image below shows the feature selection screen with "technology room" and "movable tablet-arm chairs" selected. If you use a specific search in the menu above, the More Options drop-down will no longer be available to use.

Now that you have narrowed down your search, you can select one or more locations for your event. Once you run a search you'll get a list of rooms, some of which may not be available for all dates of the event. If an event isn't available for all dates, it will show the number of dates it is available under the "Availability" column, and it will have a button that says "Request Available" under the "Add" column. The image below shows a list of rooms that were pulled when selecting the Social Sciences Building search and limited the results to those that met the headcount of 40.
Tip: If your search yields No Results, click "Reset" to start over. It may default to Starred Locations or have saved any capacity limiters. Be sure to clear those out to start again.
Note: If you are searching for rooms with Lecture Capture capabilities, navigate to the "Locations" section of the Event Form. Click the "More Options" drop-down menu, select categories, and then check "Lecture Capture."

To select a room, click the "Request" box next to the room in the leftmost column labeled "Add." If you click on a room that is not available for all dates, it will only request the room for the dates it is available. To see which event occurrences have conflicting events, click the "Conflict Details" in the rightmost column. The image below shows the conflict information for a room where two events conflict with the event time.

You can select multiple rooms for your event and have multiple rooms selected on the same date. Any rooms that you select will show up below your room search, as shown in the image below.

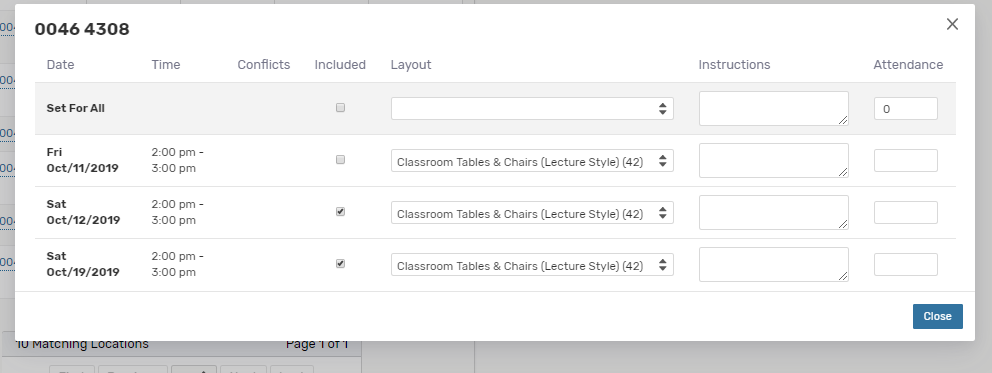
If a location is selected for only a few of the event dates, it will list them as "Included dates;" otherwise, if all dates are included, then it doesn't show any information. To select or deselect certain dates, click on the blue "View Occurrences" box, which will bring up a list of occurrences. It will only have the dates without conflicts checked automatically, and if you check one with conflicts, that information will populate in the "Conflicts" column. The image below shows the Occurrences for Soc Sci 4308. One is unchecked because there is a conflict.
Note: If the event goes beyond the regularly scheduled building hours, you will not be able to select a GA room. If requesting a GA classroom outside of regular building hours, please list the room in the Comments section of the event form. Curricular Services also requires written approval from the building manager to use the building after hours. You may forward an email with the approval to your Curricular Services team member.
Step 5: Comments
Leaving a comment is optional. If you didn't select a room, you should leave a comment with any room characteristics you need. You can also leave a comment to give the person who assigns a room for your event more information about where you want to be assigned in case your first choice room isn't available. For instance, a common comment is "If the room I selected isn't available, please assign a room near Humanities with technology."

Step 6: Submit
When you are finished, click "Save" to submit your event. You can also click the "Preview" button to review a snapshot of your event.

Step 7: Canceling an Event
Once an event has been saved, only Curricular Services is able to update the status of the event. To request an event be canceled, contact your Curricular Services representative.