
KB User's Guide - Documents Tab - Create a Table of Contents
Add content and create headings
To begin, create content as you normally would. If you want to create a section heading, highlight the text that you want to set as a heading and choose the heading value either from the formatting drop down in the icon bar:

Or from the Format menu:

Continue to do this throughout your document. Remember: be certain to adhere to accessibility guidelines when creating document headings.
Add table of contents
Once you have added all of your content and specified the headings within, add the Table of Contents shortcode into your document where you want.
Place your cursor where you want the Table of Contents to appear. Make sure your cursor is a full line above your content. Choose Table of Contents from the Insert dropdown menu:

This will place a shortcode into your document and tell the document to populate it based on the headings used in your document.

The code you would see in the Source code view of your document is <aside id="kb-doc-toc">[A table of contents will be populated here based on headings used]</aside>.
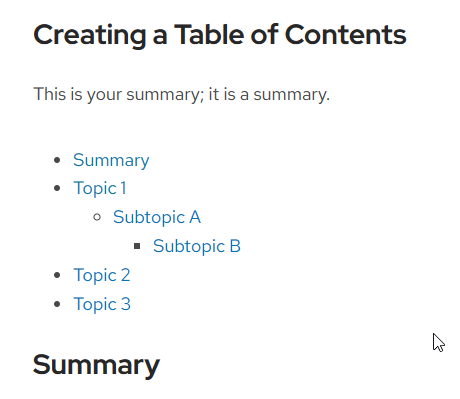
To check the status of your Table of Contents, click the Save Draft button, and then click on the Preview button. A preview of what your document will look like will appear, you should see the bulleted Table of Contents links list displayed (the image below the Table of Contents was inserted at the top of the document).
Be sure to Publish your document as you normally.
Additional Information
In the past, document editors could used Javascript to automatically create a Table of Contents. This option will continue to work, however the KnowledgeBase team encourages users to implement the TOC feature from the menu to generate the desired output.