WiscWeb - Optimizing images using Photoshop
In this document:
- Purpose
- Accessing Photoshop
- Resizing an image
Purpose
Optimizing images for websites is one of the simplest, most impactful improvements you can make for speed, accessibility, SEO, and user experience. Optimization of those images can lead to faster page load times, better SEO and improved user experience (especially on mobile). It's also important to note that file size requirements within the WiscWeb service mean that any image or file that you upload must be 24 MB or smaller. There are many software applications that can assist with this, but this document will speak to using Adobe Photoshop to meet those needs.
Accessing Photoshop
If you don't already have Photoshop installed, please review the following document to download Adobe Creative Cloud and log in: Adobe Creative Cloud - Logging in with Your UW-Madison Account Once you're signed in to Creative Cloud, you should see the option to install Photoshop.
Optimizing an image for web
You can use Photoshop to export an image that has been optimized for the web. This process will reduce the image size as well as ensure that the image will display correctly across multiple devices. There's no need to upload an image that is 7857 x 5238 pixels, when you only need it to be 1600 x 500 pixels.
In Photoshop, after you have done any editing to the image you might need, follow these steps:
- Click File → Export → Save for Web (legacy)

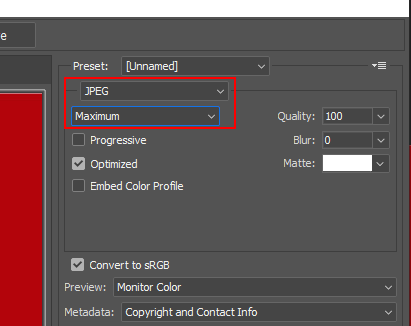
- At the top right of the menu, select JPEG as the file type
- To decrease the file size of the image, you can change the quality from "Maximum" or "Very High" to "High"
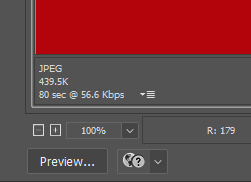
- At the bottom left of the pop up menu, you will see the size of the file change under "JPEG".
- Once you have the desired settings, select Save at the bottom right.


