
Protocol for cerebellar battery: experimental procedures
Session 1
Before the participant arrives
- Gather assessment materials
- CCAS form and instructions
- MOCA form and instructions
- Motor speech instructions (record with AUDACITY)
- Start up AUDACITY
- Participant history (Qualtrics)/ participant history for people with ataxia (Qualtrics)
- Music questionnaire link
- Hearing screening
- Panera link or other business providing lunch
- Get two copies of the UCSF consent form (one for us, one for them)
- In case of patient:
- Get three copies of MRI consent form; one for participant, one for us and one for MRI technician
- get MRI eligibility form
- get filled out form eligibility MRI
- Gather special hardware
- ¼ to ¼ cord
- Open back headphones
- Run general audio check to ensure that the levels are approximately accurate
- forms used to check progress patient: https://docs.google.com/document/d/1KMdlwgu2uj5zhLK2xYFrtU_HfWoLFfDW/edit
- forms used to check progress control: https://docs.google.com/document/d/1o-wLWNNR47R9s5pnzTr-XeDgyOyvkcsqAziG8v6gh7k/edit
- checking forms used when two people participate simultaneously: https://docs.google.com/document/d/1KMdlwgu2uj5zhLK2xYFrtU_HfWoLFfDW/edit
General preparation information
***NOTE*** this is generic information for running participants; this may not entirely apply for cerebellar battery. Use discretion.
Before the participant arrives
Enter check_audioLevels and follow on-screen instructions to check the participant's headphones and the experiment mic.
Put headphone covers on the participant's headphones.
Set out a paper copy of the appropriate consent form (highlighted above) on the participant's desk.
Set out a water bottle.
Set the experiment mic gain (on the red Focusrite) to the 3:00 position.
Open the lab email and monitor for participant's arrival.
How to access the lab email
- In the web browser, open your personal UW email inbox through Outlook. You can do this through MyUW if needed.
- In the top right corner, click the circle with your profile picture/initials.
- Click Open another mailbox
- Enter speechmotor@waisman.wisc.edu and click Open
If it's the appointment time but the participant hasn't called/emailed yet
- Find the participant's phone number.
- If you have access to Qualtrics (ie if you're on this list), use the Finding Experiment Running Info KB page to find the participant and phone #
- If you don't have Qualtrics access, Slack the lab manager and ask for the phone number
- Wait 5 minutes past the scheduled appointment time, then call the participant.
- If they are at the building, on their way, or can arrive really soon, continue with the appointment
- If we have back-to-back participants such that them arriving late is going to mess up another participant, just tell them that the lab manager will email to reschedule
- You don't need to leave a message
When the participant arrives
They're supposed to either calling the phone in 544 or email speechmotor@waisman.wisc.edu
If they call, confirm they're in the Waisman Center lobby. If they email, send back a short reply like, "Be right there!"
Parking passes are available from the 2nd floor business office (by KeyWatcher)
Meet the participant downstairs
Greet them in the lobby, go upstairs, and direct them to 544A.
Participants can wear a mask anywhere in the building, but they MUST remove their mask during speaking tasks.
Hardware checks for reaching studies
These should not have any occasion to change between studies, but it is good to check anyway. Note that you should run these checks on the REACHING computer, which is on the cart (not Quiberon).
Check sampling rate of tablet:
- Windows start button
- Wacom tablet properties
- Click on device
- Needs to be in "Recognition Data" mode
Check refresh rate of monitor:
- Control panel
- Display
- Adjust resolution
- Advanced settings
- Monitor-144
Consent
Obtain consent using the UCSF consent form.
"This is a consent form for participation in our study. It tells you about our research and what you will be doing today. In this study you will be doing some brief assessments, some experiments where you use a joystick to make reaching movements, some experiments where you speak into a microphone and listen to your own speech over headphones, and some experiments where you listen to different sounds and answer questions about them.
If at any time you would like to stop participating in the study, that is okay. You will still be compensated for the time you have spent here today. All of your information will be kept confidential, and if you have any questions, you can ask me today or contact our lead researcher, Dr. Benjamin Parrell at the number listed on the consent form. I will give you some time to look this over now. You can sign this copy, which we will keep with us, and the second copy here on the desk is yours to keep."
Patient: Obtain consent MRI
Assessments
-
- How to conduct a hearing screening (simplified) (we are not excluding people with mild-moderate hearing loss, but we are collecting the data)
- for controls:
- for patients:
- CCAS assessment (cerebellar cognitive affective syndrome---use paper assessment)
- MoCA: items that do not have equivalents in CCAS
- Motor speech task
- Music questionnaire: https://uwmadison.co1.qualtrics.com/app/distributions/surveys/SV_6lHuC9FBlGi4bHM/anonymous-links
Experiments
At the beginning of this session:
- Open-back headphones should be connected at the speech computer
- Microphone should be connected at the speech computer
1. Reaching adaptation
Special consideration
This experiment is part of the cerebellar battery run in 2022-2023. For controls and patients, it is in the FIRST session.
In this battery, participants come in for multiple sessions and do multiple experiments in a row. As such, this is a bare bones document on how to run the experiment. Procedures for consent, hearing screening, awareness surveys, general equipment set up, and payment are not included in this document. See the documents below for how these procedures are implemented in this multi-study session:
- Protocol for cerebellar battery: controls
- For patients
What's special about this experiment
This is a reaching experiment, with a separate interface computer.
The lights should be OFF for this experiment so the participant can only see the cursor, not their actual hand.
Prepping for participant
These should not have any occasion to change between studies, but it is good to check anyway. Note that you should run these checks on the REACHING computer which is on the cart (not Quiberon).
Check sampling rate of tablet:
- Click on Windows start button
- In the search at the bottom, type in Wacom tablet properties, and click on it when it appears
- Double click on the Intuos4 XL under "Device"
- Make sure it is in to be in "Recognition Data" mode
Check refresh rate of monitor:
- Click on the Windows Start button
- Type in settings, click when it appears
- Go to System > Display > Advanced Display Settings
- There should be two monitors in the dropdown to choose your display. Select Display 2: VG248
- The refresh rate is at the bottom. It should be 144.001 Hz
Pre-experiment instructions
Start the experiment by typing in run_cerebReachAdapt_expt and hitting enter. Enter the required responses. Then place the pen on the tablet.
Tell the participant:
“The point of this experiment is to better understand how the brain controls reaching movements. We will be measuring how accurately you can reach to targets in different locations. Your data will be used as a normative baseline for future comparisons with neurological patients. So, please try your best to pay attention and follow all instructions.”
“In this experiment, you will be playing a game where you’ll be trying to make quick and accurate reaches to different target locations. For each trial, you will move the cursor to a home location in the center, which will be indicated with a circle. Then you'll make a quick reach to a target that appears somewhere on the screen. You should reach as quickly and accurately as you can, and slice through the targets rather than stopping at the target”
“Please take some time now to adjust the seat height and scoot in close to the work station. You will be making many reaches towards the edges of the tablet, and I want you to be able to do that without moving any parts of your body other than your arm. Keep the same posture throughout the experiment, and rest your other hand in your lap. Be sure to not swirl around in the chair.”
You will hold this pen at the red base with your dominant hand – maintain the same grip throughout the experiment. (demonstrate)
There are no pre-planned breaks, but if you need to rest for a bit, just wait before moving the cursor to the center for the next trial.
“Do you have any questions?”
“I’ll give you a minute to get comfortable before turning out the lights.”
After they are comfortable, turn off the lights, then press SPACE to start the experiment
Baseline phase
Tell the participant: “Move your hand to the start circle and wait for the target to appear. Your goal is to move your hand to the target. Reach through the target as accurately as possible in a quick straight line. Once you start moving, follow all the way through. If you hear a knocking sound, that means that you moved fast enough and far enough for a good trial.”
Throughout the experiment, you should monitor how they are performing their reaches. You may have to issue corrections. Common issues:
-
When they get “Too Slow” message: “The too slow message means that you did not move fast enough for a valid trial. Remember to slice through the targets with your hand.” This is related to movement time, not reaction time
-
If participant gets “slice through the target" message: “Remember to move accurately through the target in a quick, straight line.”
- If they are picking up paddle: Please don’t pick up the paddle and just slide it along the table.
Rotation phase
Instructions will appear on the screen for the participant. In this phase, the cursor will move as they move their hand, but the direction that it moves will not correspond to where they are reaching. Their goal in this section is to move your hand directly to the target, ignoring the cursor. They should still reach as accurately as possible in a quick straight line and slice through the target. Be sure to give them this instruction verbally to make sure they understand.
If they have any questions, answer them. Press space when they are ready to begin.
Washout
There are three washout phases. Participants will see instructions on the screen before each phase. Answer any questions they may have. When they are ready to continue, press space.
Washout without feedback: In this block they will no longer see the cursor. They should continue to move their hand directly through the target.
Washout with feedback: In this block they will see the cursor again. They should continue to move their hand directly for the target.
Anti-rotation washout with feedback: In this phase, the cursor will move as they move their hand, but the direction that it moves will not correspond to where they are reaching. Their goal in this section is to move your hand directly to the target, ignoring the cursor. They should still reach as accurately as possible in a quick straight line and slice through the target.
If Matlab crashes during the experiment
There is no restart script. This is a relatively short experiment, and can be restarted if necessary.
No special equipment setup needs to be completed between the two reaching studies.
2. Reaching compensation
Special consideration
This experiment is part of the cerebellar battery run in 2022-2023. For controls and patients, it is in the FIRST session. This is after cerebReachAdapt so you do not need to re-deliver general instructions on how to reach.
In this battery, participants come in for multiple sessions and do multiple experiments in a row. As such, this is a bare bones document on how to run the experiment. Procedures for consent, hearing screening, awareness surveys, general equipment set up, and payment are not included in this document. See the documents below for how these procedures are implemented in this multi-study session:
- Protocol for cerebellar battery: controls
- For patients
What's special about this experiment
This is a reaching experiment, with a separate interface computer.
The lights should be OFF for this experiment so the participant can only see the cursor, not their actual hand.
Prepping for participant
These should not have any occasion to change between studies, but it is good to check anyway. Note that you should run these checks on the REACHING computer which is on the cart (not Quiberon).
Check sampling rate of tablet:
- Click on Windows start button
- In the search at the bottom, type in Wacom tablet properties, and click on it when it appears
- Double click on the Intuos4 XL under "Device"
- Make sure it is in to be in "Recognition Data" mode
Check refresh rate of monitor:
- Click on the Windows Start button
- Type in settings, click when it appears
- Go to System > Display > Advanced Display Settings
- There should be two monitors in the dropdown to choose your display. Select Display 2: VG248
- The refresh rate is at the bottom. It should be 144.001 Hz
Pre-experiment instructions
Start the experiment by typing in run_cerebReachComp_expt and hitting enter. Enter the required responses. Then place the pen on the tablet.
General instructions (not needed if running after cerebReachAdapt)
Tell the participant:
“The point of this experiment is to better understand how the brain controls reaching movements. We will be measuring how accurately you can reach to targets in different locations. Your data will be used as a normative baseline for future comparisons with neurological patients. So, please try your best to pay attention and follow all instructions.”
“In this experiment, you will be playing a game where you’ll be trying to make quick and accurate reaches to different target locations. For each trial, you will move the cursor to a home location in the center, which will be indicated with a circle. Then you'll make a quick reach to a target that appears somewhere on the screen. You should reach as quickly and accurately as you can, and slice through the targets rather than stopping at the target”
“Please take some time now to adjust the seat height and scoot in close to the work station. You will be making many reaches towards the edges of the tablet, and I want you to be able to do that without moving any parts of your body other than your arm. Keep the same posture throughout the experiment, and rest your other hand in your lap. Be sure to not swirl around in the chair.”
You will hold this pen at the red base with your dominant hand – maintain the same grip throughout the experiment. (demonstrate)
There are no pre-planned breaks, but if you need to rest for a bit, just wait before moving the cursor to the center for the next trial.
“Do you have any questions?”
“I’ll give you a minute to get comfortable before turning out the lights.”
After they are comfortable, turn off the lights, then press SPACE to start the experiment
Baseline phase
Tell the participant: “Move your hand into the start circle and wait for the target to appear. Once the target appears, reach in a smooth motion to hit the target. Make sure that you slice through the target without stopping. You will see a cursor representing your hand position during the reach.”
“The knock just means you reached far enough, but it doesn’t mean that you hit the target.”
Throughout the experiment, you should monitor how they are performing their reaches. You may have to issue corrections. Common issues:
-
When they get “Too Slow” message: “The too slow message means that you did not move fast enough for a valid trial. Remember to slice through the targets with your hand.” This is related to movement time, not reaction time
- When they get "Too Fast" message: Try to make a smooth sweeping movement through the target.
-
If participant gets “slice through the target" message: “Remember to move accurately through the target in a quick, straight line.”
- If they are picking up paddle: Please don’t pick up the paddle and just slide it along the table.
No feedback + jump
Instructions will appear on the screen for the participant. In this phase, they will continue reaching in a smooth motion to hit the target. They will not see the cursor representing their hand position and the target may move.
Participants may anticipate the jump by starting slow and get messages about their movement speed. Encourage them to keep moving in one smooth sweep.
If Matlab crashes during the experiment
There is no restart script. This is a relatively short experiment, and can be restarted if necessary.
Before typical production, participant will change computers to the speech computer.
3. Typical production (VOT)
What's special about this experiment
This is a straight production experiment with no auditory feedback manipulations or anything special. Participants will see words on the screen and read them out loud. They do not need headphones. The study is meant to record typical productions of word-initial vocieless stops.
This experiment is part of the cerebellar battery being run at multiple sites. Participants will be coming for full-day visits. As such, they will likely have completed consent forms and participant histories at a different time, not after this individual experiment (at some future point there will be a document on how to wrangle a full- or multi-day participant visit at each site).
Initial practice
To run the experiment, type in the command run_cerebTypicalProduction_expt. When prompted, enter in the participant code and their height.
The participant will see the instructions on the screen.
The participants will first do a practice phase to get the first-time production of the word out of the way, and to get familiar with the words and the pacing of the experiment. You can also use this time to fine-tune the gain on the microphone.
At the end of practice, ask the participant: "The rest of the experiment will go just like that. Are you feeling okay to move onto the task, or would you like to practice again?" Make sure that the speed is okay for them.
If they would like to redo the practice, they can, but there is no benchmark they need to pass in order to move on.
Note: if they are having a hard time with how fast the trials are going, you can type 'redo' when prompted, and then type 'yes' when asked if the participant would like slower trials. This will slow the trial down by 0.5 seconds, and then run through practice again with the slower pace.
Main Phase
"We'll now continue with the main experiment, which will take 5-10 minutes. Do you have any questions before we start?"
If no questions, "Whenever you're ready, you may begin."
Things to keep an eye on:
- Monitor the amplitude level. You may need to adjust the microphone gain if the participant starts talking too loudly or too quietly. If the participant loses a lot of oomph in their voice, you can encourage them to take a break or drink some water.
Note: there is no pause function in this script, only the automatic breaks (every 20 trials).
Data transfer
- If running at UW: the data will be saved in
C:\Users\Public\Documents\experiments\cerebTypicalProduction\acousticData\. Copy the participant's folder into:\\wcs-cifs\wc\smng\experiments\cerebTypicalProduction\acousticData - If NOT running at UW: the data will be saved into the folder generated by
get_acoustSavePath('cerebTypicalProduction'). Copy the participant's folder into the path generated byget_acoustLoadPath('cerebTypicalProduction')
If Matlab crashes during the experiment
As of 9/26/2022 there is no restart script for this function. However, the entire experiment takes about 5 minutes so you can just rerun it.
Before paced VOT:
- Put open-back headphones on participant
- Connect the output amp to the second input of the Scarlett
- Adjust volume to about 40% on the headphone channel going to the participant
4. Paced VOT production
Special running circumstances
This experiment is part of the cerebellar battery run in 2022-2023. For controls and patients, it is in the FIRST session.
In this battery, participants come in for multiple sessions and do multiple experiments in a row. As such, this is a bare bones document on how to run the experiment. Procedures for consent, hearing screening, awareness surveys, general equipment set up, and payment are not included in this document. See the documents below for how these procedures are implemented in this multi-study session:
- Protocol for cerebellar battery: controls
- For patients
What's special about this experiment
This is an unusual experiment in that it is not an altered auditory feedback study. In this study, participants will first see a word that they will use in that trial. They will then hear a series of clicks through the headphones. The clicks will start relatively slow but get faster through the trial. There will be a countdown for the first 3 clicks, so they can get used to the pace and prepare. Then the word will appear on the screen. At that point, they will repeat the word in time with the clicks.
---
This experiment is conducted using PTB so there is not the usual duplicated experimenter display. Instructions to the experimenter are displayed in Matlab's command window.
Hardware prep
Special hardware requirements:
- Open-back headphones, or headphones that do not excessively muffle normal auditory feedback.
- A Scarlett with two input ports. Both Scarlett 2i2 and Scarlett Solo will support this experiment. On a Scarlett 2i2, both input ports are dual XRL+1/4". On a Scarlett Solo, the first input is XLR and the second is 1/4".
- 1/4" to 1/4" (6.3 mm) male to male connector cord. This experiment will work with a single stereo cord or using one side of dual input/output cords. If you are using a dual-dual cord, be sure to connect the same side on each end (red to red or black to black).
Before the experiment begins:
- Change out the headphones in the experiment room for open-back headphones. These headphones have a mesh on the back of the earpieces rather than solid plastic.
- Connect the fourth output port of the headphone amp to the second input port of the Focusrite using the 1/4" to 1/4" cord. (There will be one labeled "cerebPacedVot" near Burnham.)
- Turn the gain of the fourth output port to 50%. Turn the gain of the second input port to 50%. Note: This is NOT the volume that participants will hear the metronome at. That volume will be controlled by the second headphone amp (the one that goes to the participant).
To test the connection between the headphone amp and the Focusrite, in the Matlab command window, type:
test_outInputGain;
The metronome channel should run up to amplitude of between +/- 0.1 to 0.2 or so. If you get any warnings about either channel, check that the gain is set to 50% on both the headphone and the Focusrite ports. If your figure shows clipping in the line labeled channel 2, turn down the gain on the headphone side if possible. If not, turn the gain down on the Focusrite side if possible. Then run the test again.
Setup diagram:

Experiment prelude
run_cerebPacedVot_expt in the command window and hitting enter.
Hardware check
You will first run through equipment checks and will have to answer a few questions about the equipment setup:
- Is the participant wearing OPEN BACK headphones? (answer should be yes)
- Is there a 1/4" to 1/4" cord connecting the output amp back to the Focusrite second input? (answer should be yes)
Then, tell the participant: "You will hear some clicks shortly. This is just a check to make sure our equipment is working properly."
After the automatic check is done, check the output plotted in the figure. You should be able to clearly see the clicks in the signal, with a max amplitude of about +/- 0.2. If either channel is not receiving input, Matlab will inform you which channel is wrong. Double check that everything is connected and powered on and redo the hardware check.
Volume check
After the hardware checks, you will do a volume check. Tell the participant: "We'll start with a volume check to make sure the metronome is at a good loudness. You'll want to be able to comfortably hear this while you are talking."
- If you are in the same room as the participant or can see them while the clicks are ongoing:
- tell them: "I'm going to play the metronome that you'll hear for the rest of the study. As it is playing, tell me if you want the volume lower or higher by pointing with your finger and I'll adjust it as we go. If it is okay, give me a thumbs up."
- If you are in a separate room and can't see them:
- Err on the side of caution and turn down the gain on their headphone output before starting.
- Wait for the entire stimulus to play through.
- After the stimulus is done, ask the participant: "Is the volume of the metronome okay, or would you like it to be adjusted?"
The command window will then ask you if you would like to repeat the volume check. If you have to adjust the volume at all, press 1. If the volume was good, press 0. Note: The PTB screen is listening for this input, not Matlab, so you do not have to actually type in the command window.
Matlab will then prompt you to press the spacebar when you are ready to repeat. Repeat as many times as is necessary.
Practice
This experiment will then move onto a practice phase so that participants can get used to the task, and so that you as the experimenter can see if the pacing clicks need to be slowed down.
Tell the participant: "We'll start with a practice section so you can get used to the task." The remainder of the instructions will be on the screen.
When they finish the practice, the experiment will ask you if it seems like they need to go slower. This is a provision for the cerebellar patients, who often have a hard time repeating one syllable at speed. We do expect that people will have difficulty towards the end of the clicks, when they are speaking the fastest. However, if people consistently had difficulty near the beginning of the task (i.e., in within the first 5 clicks that they were speaking for), you can type in "slower" and the practice will repeat with a slightly slower pace.
If it seems that the participant runs out of breath too early, encourage them to try again, but this time take a deep breath before they start speaking.
If the participant did not have difficulty, ask them: "Are you comfortable with the task, or would you like to practice again?" If they express hesitation that the clicks are too hard at the end, you can tell them that that is okay, and they should just try their best. You can repeat practice as many times as they like.
Main Phase
"We'll now move onto the main experiment, which will take about 10 minutes. You will be doing the same task you just practiced for the rest of the experiment. Do you have any questions before we start?"
If no questions, "Whenever you're ready, you may begin."
Things to keep an eye on:
- Monitor the amplitude level. You may need to adjust the microphone gain if the participant starts talking too loudly or too quietly.
- Make sure the participant is not running out of breath midway through.
This is a self-paced experiment, in that participants have to press the spacebar to start the next trial. So if participants need a little break, they can always stop at a trial. There is no additional pause function.
After the experiment
"Great job! You are finished with the speaking portion of the experiment. I will be in to take off your headphones."
After the participant leaves
- Take in "experiment in progress" sign from hallway
- Copy participant data from local drive to smng server. Further instructions are under step #8
- If you completed a hearing screening, copy the results from the local drive to the smng server
- There are folders on the desktop called "audiometer - local" and "audiometer - server". Drag the participant's audiometer results file from the "local" to the "server" folder.
- Fill out Lab Notebook, located in
\\wcs-cifs\wc\smng\admin\ - If they got extra credit, fill out the extra credit register, located in
\\wcs-cifs\wc\smng\admin\ - Erase only the participant's name from Experiment Running Sheet
- Clean the participant's keyboard, mouse, desk, chair, and hearing screening headphones and clicker
- Return the Experiment Running Sheet and the Checklist to the lab manager
The data will be saved in C:\Users\Public\Documents\experiments\cerebPacedVot\acousticData\. Copy the participant's folder into: \\wcs-cifs\wc\smng\experiments\cerebPacedVot\acousticData
If Matlab crashes during the experiment
[[ Gotta figure out what to do for this experiment. RK]]
This is a suggested time for a break, since you will have to do some equipment setup, and it is approximately the middle of the experiments.
- Disconnect the output amp from the Scarlett
- Change out open-back headphones for closed-back headphones
- Run check_audioLevels with noise alone and with sustained speech to adjust for speech experiment levels.
5. Formant adaptation and compensation
Special circumstances: part of battery
This experiment is part of the cerebellar battery run in 2022-2023.
- For controls, it is in the FIRST session (adaptation and compensation together).
- For patients at UW, it is in the SECOND session (adaptation and compensation together).
- For patients at UCSF, it is in the THIRD session (compensation only; adaptation is a separate experiment with MEG).
In this battery, participants come in for multiple sessions and do multiple experiments in a row. As such, this is a bare bones document on how to run the experiment. Procedures for consent, hearing screening, awareness surveys, general equipment set up, and payment are not included in this document. See the documents below for how these procedures are implemented in this multi-study session:
- Protocol for cerebellar battery: controls
- For patients
What's special about this experiment
This experiment has the option to run just 'adapt' (adaptation experiment), just 'comp' (compensation experiment), or 'both' (adaptation followed by compensation). The adaptation experiment can also be run by itself with the option 'adapt_short', which has 80 trials instead of 200, and stops before the passage reading portion. At UW, we will use the option 'both'. At UCSF, session three will use 'comp'.
You will need the RAINBOW PASSAGE for this experiment if you are doing the adaptation portion. (You don't need this if doing 'adapt_short'.) In the adaptation portion, participants do one run, then take a break to read the rainbow passage, and then do a second run.
Prepping for participant
This experiment uses:
- Audapter
- Focusrite Scarlett
- Closed-back headphones
- Microphone (head-mounted or stand)
- Rainbow passage (adaptation experiment only)
Before running this experiment, you need to check the audio levels of the noise over the headphones, as well as the noise + participant speech (if at UW, see this document for more details.)
- Controls at UW: You will have to recheck the levels after running the previous experiment (pacedVOT)
- Patients at UW: this is the first experiment of session 2, so conduct the equipment checks as part of session preparation.
Pre-experiment instructions
Tell the participant: "In this experiment, you will be speaking and listening. When you see the word on screen, read it out loud, just like you would normally say it. You will be speaking into the microphone on the desk, and you will hear your own voice and some noise played back through these headphones. Do you have any questions?"
- If adapt: "This experiment will have four different sections."
- If adapt_short: "This experiment will have two different sections."
- If comp: "This experiment will have three different sections."
- If both: "This experiment will have six different sections."
Type run_cerebAAF_expt into the command window and hit enter. You will be prompted to type in adapt, adapt_short, comp, or both. Type in the appropriate experiment for your site and hit enter.
Pretest phase: LPC order
In all cases, the first task that will come up is an LPC order check.
"For this first section, you will see one word at a time appear on the screen."
Use the check_audapterLPC GUI to find an appropriate LPC for this participant. If you need to fix the vowel boundaries, use the Change OSTs button.
Adaptation section
If you are running "adapt" or "both" or "adapt_short", the adaptation section will be next.
Tell the participant: "This next speaking section lasts about 10 minutes. Read each word when it appears on screen."
For adapt_short: After 80 trials, the experiment will conclude.
For both or adapt: Run first 120 trials. After trial 120, there will be a message on screen saying “Time for a break,” and the command window will say “Pausing experiment for passage reading.”
Tell the participant: "In this next section, you'll be reading a short passage. Please pick up the sheet of paper on the table in front of you titled 'The Rainbow Passage'. You'll be reading the text on this paper out loud. While you speak, you will hear your own voice and noise through the headphones. Do you have any questions before we start?
Great. When you are ready, let me know and I will start our recording system. When you hear the noise start through the headphones, you can go ahead and read the passage out loud.."
Follow the command window prompts to start the Audapter feedback and stop it once they’ve read the passage.
Tell the participant: There are a few more speaking trials with single words again.
Start the “adaptation run 2”.
Compensation section
If you are running "comp", this will be first. If you are running "both", this will be second.
This experiment starts with duration training to get the participant saying the vowel at an optimal duration where feedback can be used, but is not too unnaturally slow.
Tell the participant:
Next, we will do some practice speaking trials where we will try to get you to talk at a particular speed. Read the words aloud as they appear, just as you did previously. Try to speak in a way that is a bit more stretched out than how you would normally talk, but still somewhat natural. For example, instead of saying “head” I might say “heeeead.” After you say each word, you will get some feedback about the speed of your speech. The computer may tell you to speak slower or faster. If you spoke at a good speed, you will see a green circle.
If the participant had trouble, give them some tips. This tasks is challenging for many people. Just remember that the most important part is that their vowel is long enough that they can hear their own vowel formants and compensate for them.
You should try to have them get 4 out of 6 or better. If they’ve got the gist but the automated system isn’t cooperating, you can tell them, “you’re doing great – just keep doing that and ignore what the computer says.”
If they got less than 4/6, choose redo. Once they got 4/6 or better, tell the participant: You’ll now be doing the same task with more trials. You will still get feedback about the speed of your speech. This section lasts about 10 minutes.
Choose move on.
If Matlab crashes during the experiment
As of 10/21/2022 RK is unaware of a restart script for this experiment.
No equipment adjustments are needed before the formant JND study; adjust the sound level, if too loud.
6. Formant JND
- Run check_audioLevels with noise alone
- You will need to take the participant's headphones off to start the pitch compensation study. The first section in pitch compensation is a calibration phase and the participant can hear themselves in free field. Have the participant put the headphones back on when they start the main phase of the study. (Note: this is to avoid the participant having to hear you listen to various different samples of the pitch shifting algorithm; nothing bad will happen if you accidentally leave the headphones on. It is much worse to not put them back on afterwards)
7. Pitch adaptation (pitchAdaptTwoWords)
Special circumstances: part of battery
This experiment is part of the cerebellar battery run in 2022-2023. For controls and patients, it is in the SECOND session.
In this battery, participants come in for multiple sessions and do multiple experiments in a row. As such, this is a bare bones document on how to run the experiment. Procedures for consent, hearing screening, awareness surveys, general equipment set up, and payment are not included in this document. See the documents below for how these procedures are implemented in this multi-study session:
- Protocol for cerebellar battery: controls
- For patients
Prepping for the participant
- closed back headphones
- microphone
- Audapter
- FocusRite
What's special about this experiment
This study examines how speakers adapt their pitch in the upward opposite direction in response to downward pitch shifting of their own voice during production of the word "bod" and the vowel "ah".
The study consists of 4 sessions that are in a fixed order:
1. pitch shifting producing the word "bod", 2. control session producing the word "bod" (unperturbed feedback), 3. pitch shifting producing the vowel "ah", 4. control session producing the vowel "ah".
Pre-experiment instructions
RESTART MATLAB
"In this experiment, there will be 4 sections. Brief breaks between all these sections are included while the experimenter initiates the next part. During each of the sections, you will be reading words off the computer screen and listening to your speech over the headphones."
Don’t hesitate to ask questions or raise concerns at any point."
Enter run_pitchAdaptTwoWords_expt in the command line and press "enter".
Enter the ID of the participant and their height.
Calibration
Before the start of the first session, there is a calibration phase where the f0 of the speaker is extracted and during which the correct pitch shift paradigm is selected (the pitch shift paradigm is only selected once and is not selected if this participant has already done session 1 or pitchComp ). f0 is calculated before each session.
"In this section, you will see a word appear on the screen. Read it out loud once, just like you would normally say it, only slightly longer. Try to keep the pitch of your voice constant. After you speak, there will be a short break while I calibrate our equipment.
Do you have any questions?"
Calibration instructions
-
Press "enter" to start the recording after the instructions on the screen of the participant.
-
Calculate the f0 of the speaker: You see the waveform in a figure on the experiment computer. You will be prompted ‘Is the recorded sample good?’ at the command line.
-
If the recording looks okay and there is no clipping visible in the figure (see below for an example), press ‘y’ and hit enter.
-
If there is clipping visible in the figure (see below), reduce the microphone gain, then press ‘n’ and hit enter. The whole process will repeat. Repeat as needed until the audio looks good and no clipping is visible in the figure.
-
If there is a problem with the audio signal (participants didn’t speak, said the wrong thing, coughed, etc.), press ‘n’ and hit enter. The whole process will repeat. Repeat as needed until the audio looks good and no clipping is visible in the figure.
-
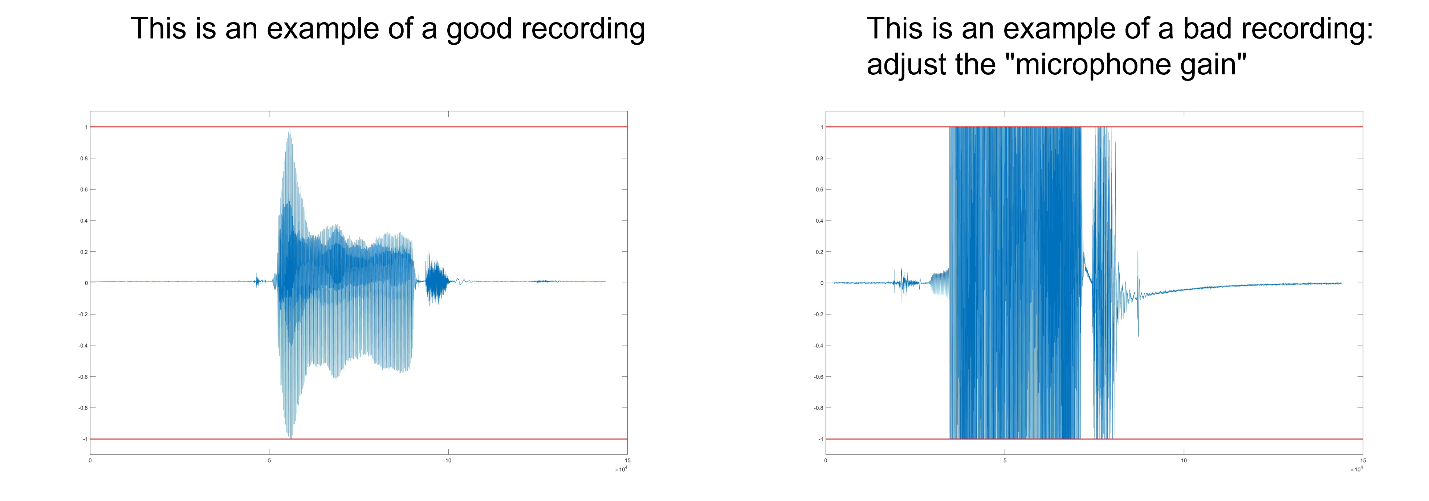
Fig 1: Two examples of speech waveforms. In the image on the left, the waveform falls between -1 and 1 (indicated by the red lines). This is an example of an appropriately set microphone gain. In the image on the right, the waveform is “clipped”—it is cut off by the -1 and 1 boundaries. In this case, the microphone gain needs to be reduced. If the microphone gain is too low (not shown), the waveform will have a very small range. Aim to use most of the range between -1 and 1 without any clipping.
-
Enter a percentage value for upper and lower boundaries for pitch tracking: this value will be used to calculate the upper and lower boundaries for tracking the vocal pitch. The closer the boundaries are to the f0, the better the estimate of the pitch and the better the shifting algorithm works. However, there will be problems if the actual pitch goes outside these boundaries. The exact boundaries that work best depend on the speaker. The default value is 20%, and will work well for most speakers. In this next section, we will set the pitch boundaries. After inspecting 3 figures with this percentage (see below), you can change the value. In most cases, the 20% value is the right one. There might be pitch contours that are not as steady as in the given example and the green and blue lines touch the red lines ones in a while. In this case, the boundaries should be a little bit larger, such as 25% or 30%.
-
You will see a figure pop up like this: IMPORTANT: WHEN THE TOP PANEL DOESN'T SHOW UP/ IS EMPTY, RESTART MATLAB:
-

-
Click “enter” for the next figure that shows the pitch contour, shifted up (green line). Press ENTER again
-
The next slide is the pitch contour, shifted down.
-
Press “enter” again.
-
Confirm percentage: Both the green and blue lines should be contained within the red horizontal borders in all the three figures. if the participant said 'bod,' it's OK if a portion at the end is outside the red borders. If this is the case, enter ‘y’ in the command line, after prompted: 'Is the percentage good?', {'y', 'n'}.
-
Examples of boundaries: In the figures below, you see two bars: one bar shows the pitch shifting output of Audapter; the lower bar shows the extracted pitch from the waveform. These can differ slightly but should not differ to a large extent. The default boundary value is 20% (example pitch shifted up first figure); the 10% boundaries in the example below are too narrow. In case the speaker has an unstable pitch and 20% is too narrow, the boundaries must be adjusted to a larger value, e.g., 25% or 30%. In general, 20 % is the lowest value, and boundaries need only be adjusted to a larger value. The 10% figure is for demonstrating how a too-narrow band looks like. The final disturbances are caused by the ‘d’ in the word “bod” and can be ignored.

-
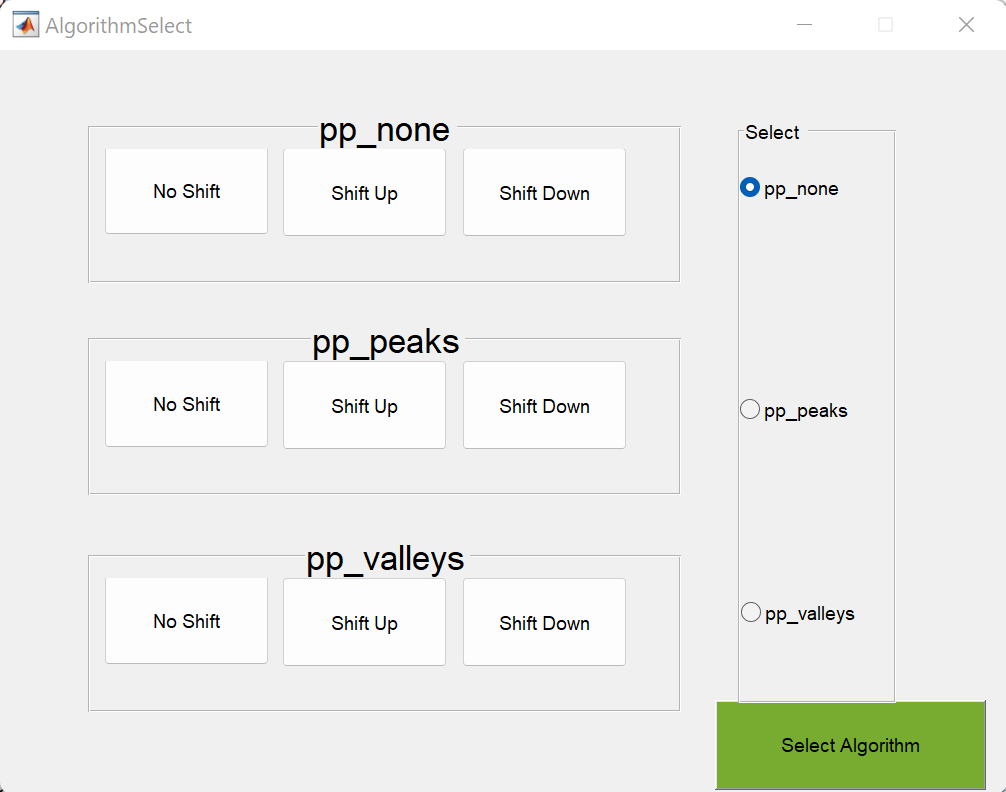
Select pitch shifting manner: Next, the AlgorithmSelect window opens. Here, you select one of three algorithms that Audapter can use to shift the pitch of the voice. There are nine buttons on the left of the screen. When you click on one of these buttons, it will play back an audio sample demonstrating how the participant’s voice will sound with that combination of pitch shifting direction (up, down, none) and pitch shifting algorithm on the right (pp_none, pp_peaks, or pp_valleys). It’s not important to understand the differences in the pitch shifting algorithms; they just indicate certain ways to shift a pitch up and down. Listen to the different algorithms to see which one sounds the most natural. In most cases, this will be pp_none. Then click the radio button on the right corresponding to the best algorithm and click “Select Algorithm”.
Main experiment
Check if the speaker is wearing the headphones. If not wearing:
"Please put the headphones on now." [make sure they are on correctly]
First two sessions, producing "bod":
"When you see the word "bod" appear on the screen, read it out loud, just like you would normally say it. Keep the pitch of your voice as constant as possible, so it sounds monotone."
Experimenter can show this by saying "bod" with no pitch fluctuations/monotone.
You will be speaking into the microphone, and you will hear your own voice played back to you through the headphones. There will be a break every 14 trials. If you need to take a break at some other time, like to cough or take a drink of water, you can press "p" on the keyboard. You will get some trials to practice."
"Do you have any questions before we start?"
Last two sections, producing "ah":
"On each trial, you will see the vowel "ah" appear on the screen, just like before. When you see the word on the screen, start reading the word out loud. Keep the pitch of your voice as constant as possible, so it sounds monotone. Keep producing the vowel until the word disappears from the screen. You will get prompted when the vowel is too short, you start too late or when your voice is not loud enough."
Experimenter can show this by saying "ah" with no pitch fluctuations/monotone.
Things to keep an eye on:
- Monitor the amplitude level. You may need to adjust the microphone gain if the participant starts talking too loudly or too quietly. You or the participant can press "p" to pause the study and talk to the participant or take an extra break.
- Monitor the upper and lower boundaries indicated by the red horizontal lines: The boundaries can be adjusted mid-session by pressing the button (b) on the display and entering a new percentage (right arrow in the figure below).
- Monitor if speakers starts the vowel consistently too late. You can check this by monitoring the length of the vowel, indicated by the green vertical lines in the display figure. If the right line is frequently at the utmost right side of the figure, the production starts too late and you can adjust the length of the trial by pressing the button (e) on the display (left arrow in the figure). This way, it is avoided that the speaker hears their own actual voice without the feedback.
- If the speaker has difficulty producing the correct vowel length, you can adjust the time that the stimulus is shown on the screen. Make the stimulus presentation on the screen longer if the speaker makes the vowel consistently too short, so the speaker is forced to lengthen the vowel.

If Matlab crashes during the experiment
As of 10/24/2022 there is no restart script for this experiment.
After the participant leaves
- Copy data from all experiments to their respective folders on the server
- Fill out patient_database for assessments (on the Waisman server in \\smng\admin\recruitment\ataxia\)
- Fill out lab notebook for each experiment
- File consent form and assessments
Session 2
Before the participant arrives
- BoDyS instructions
- patients:
- INAS form
- SARA form
- Check audio levels for general level accuracy
- Need tapping interface for this session
- Only closed-back headphones
- Unplug speakers from amp output 3
- Signed check
General preparation information
Before the participant arrives
Enter check_audioLevels and follow on-screen instructions to check the participant's headphones and the experiment mic.
Put headphone covers on the participant's headphones.
Set out a paper copy of the appropriate consent form (highlighted above) on the participant's desk.
Set out a water bottle.
Set the experiment mic gain (on the red Focusrite) to the 3:00 position.
Open the lab email and monitor for participant's arrival.
How to access the lab email
- In the web browser, open your personal UW email inbox through Outlook. You can do this through MyUW if needed.
- In the top right corner, click the circle with your profile picture/initials.
- Click Open another mailbox
- Enter speechmotor@waisman.wisc.edu and click Open
If it's the appointment time but the participant hasn't called/emailed yet
- Find the participant's phone number.
- If you have access to Qualtrics (ie if you're on this list), use the Finding Experiment Running Info KB page to find the participant and phone #
- If you don't have Qualtrics access, Slack the lab manager and ask for the phone number
- Wait 5 minutes past the scheduled appointment time, then call the participant.
- If they are at the building, on their way, or can arrive really soon, continue with the appointment
- If we have back-to-back participants such that them arriving late is going to mess up another participant, just tell them that the lab manager will email to reschedule
- You don't need to leave a message
When the participant arrives
They're supposed to either calling the phone in 544 or email speechmotor@waisman.wisc.edu
If they call, confirm they're in the Waisman Center lobby. If they email, send back a short reply like, "Be right there!"
Parking passes are available from the 2nd floor business office (by KeyWatcher)
Meet the participant downstairs
Greet them in the lobby, go upstairs, and direct them to 544A.
Participants can wear a mask anywhere in the building, but they MUST remove their mask during speaking tasks.
Assessments
- BoDyS (record with Audacity)
- Music and dance experience questionnaire
- patients:
- SARA
-
INAS
Experiments
1. Pitch compensation
Special circumstances: part of battery
This experiment is part of the cerebellar battery run in 2022-2023. For controls, it is in the FIRST session. For patients, it is in the SECOND session.
In this battery, participants come in for multiple sessions and do multiple experiments in a row. As such, this is a bare bones document on how to run the experiment. Procedures for consent, hearing screening, awareness surveys, general equipment set up, and payment are not included in this document. See the documents below for how these procedures are implemented in this multi-study session:- Protocol for cerebellar battery: controls
- For patients
What's special about this experiment
This is a experiment examining compensation to upwards and downwards pitch shifting of the speaker's own voice. Three different pitch compensation studies test the ability to compensate for pitch shifting:
- run_pitchComp_expt.m: the pitch is suddenly shifted up or downward 1 semitone in the window 200-500 ms after onset of the vocalization
- run_pitchCompOnset_expt.m: the pitch is already shifted 1 semitone at the onset, but the perturbation is removed during the 200-500 ms window
- run_pitchComp400_expt.m: the pitch is suddenly shifted up or downward 1 semitone in the window 200-500 ms after onset of the vocalization, and the perturbation is removed after 400 ms
The study requires a calibration part before the session starts, during with the f0 of the speaker is calculated and the correct shifting paradigm is selected. If the participant has already run the pitch adaptation version of this experiment (pitchAdaptRetest), the experiment will take the stored information about the algorithm and not run the calibration phase again. This calibration part is included in the pitch adaptation and compensation scripts: run_pitchAdaptRetest_expt.m, run_pitchAdaptTwoWords_expt and run_pitchComp_expt.m , run_pitchCompOnset_expt.m, run_pitchComp400_expt.m
The instructions for all three versions are identical.
Prepping for participant
- closed back headphones
- microphone
- Audapter
- FocusRite
Pre-experiment instructions
Tell the participant: "During this experiment, you will be reading the vowel "ah" from the computer screen and listening to your speech over headphones.
Don’t hesitate to ask questions or raise concerns at any point."
Phase 1: Calibration
Instructions for calibration
-
Calculate the f0 of the speaker: The participant is instructed to say “AH” (The instructions also appear on the screen of the participant). You see the waveform in a figure on the experiment computer. You will be prompted ‘Is the recorded sample good?’ at the command line.
-
If the recording looks okay and there is no clipping visible in the figure (see below for an example), press ‘y’ and hit enter.
-
If there is clipping visible in the figure (see below), reduce the microphone gain, then press ‘n’ and hit enter. The whole process will repeat. Repeat as needed until the audio looks good and no clipping is visible in the figure.
-
If there is a problem with the audio signal (participants didn’t speak, said the wrong thing, coughed, etc.), press ‘n’ and hit enter. The whole process will repeat. Repeat as needed until the audio looks good and no clipping is visible in the figure.
-
Fig 1: Two examples of speech waveforms. In the image on the left, the waveform falls between -1 and 1 (indicated by the red lines). This is an example of an appropriately set microphone gain. In the image on the right, the waveform is “clipped”—it is cut off by the -1 and 1 boundaries. In this case, the microphone gain needs to be reduced. If the microphone gain is too low (not shown), the waveform will have a very small range. Aim to use most of the range between -1 and 1 without any clipping.
-
Enter a percentage value for upper and lower boundaries for pitch tracking: this value will be used to calculate the upper and lower boundaries for tracking the vocal pitch. The closer the boundaries are to the f0, the better the estimate of the pitch and the better the shifting algorithm works. However, there will be problems if the actual pitch goes outside these boundaries. The exact boundaries that work best depend on the speaker. The default value is 20%, and will work well for most speakers. In this next section, we will set the pitch boundaries. After inspecting 3 figures with this percentage (see below), you can change the value. In most cases, the 20% value is the right one. There might be pitch contours that are not as steady as in the given example and the green and blue lines touch the red lines ones in a while. In this case, the boundaries should be a little bit larger, such as 25% or 30%.
-
You will see a figure pop up like this: NOTE: IF THE UPPER PANEL IS EMPTY, RESTART MATLAB BECAUSE PITCH SHIFTING IS NOT WORKING.
-
-
Click “enter” for the next figure that shows the pitch contour, shifted up (green line). Press ENTER again.
-
The next slide is the pitch contour, shifted down.
-
Press “enter” again.
-
Confirm percentage: Both the green and blue lines should be contained within the red horizontal borders in all the three figures. if the participant said 'bod,' it's OK if a portion at the end is outside the red borders. If this is the case, enter ‘y’ in the command line, after prompted: 'Is the percentage good?', {'y', 'n'}.
-
Examples of boundaries: In the figures below, you see two bars: one bar shows the pitch shifting output of Audapter; the lower bar shows the extracted pitch from the waveform. These can differ slightly but should not differ to a large extent. The default boundary value is 20% (example pitch shifted up first figure); the 10% boundaries in the example below are too narrow. In case the speaker has an unstable pitch and 20% is too narrow, the boundaries must be adjusted to a larger value, e.g., 25% or 30%. In general, 20 % is the lowest value, and boundaries need only be adjusted to a larger value. The 10% figure is for demonstrating how a too-narrow band looks like. The final disturbances are caused by the ‘d’ in the word “bod” and can be ignored.
-
Select pitch shifting manner: Next, the AlgorithmSelect window opens. Here, you select one of three algorithms that Audapter can use to shift the pitch of the voice. There are nine buttons on the left of the screen. When you click on one of these buttons, it will play back an audio sample demonstrating how the participant’s voice will sound with that combination of pitch shifting direction (up, down, none) and pitch shifting algorithm on the right (pp_none, pp_peaks, or pp_valleys). It’s not important to understand the differences in the pitch shifting algorithms; they just indicate certain ways to shift a pitch up and down. Listen to the different algorithms to see which one sounds the most natural. In most cases, this will be pp_none. Then click the radio button on the right corresponding to the best algorithm and click “Select Algorithm”.
Main experiment
"Please put the headphones on now." [make sure they are on correctly]
"On each trial, you will say the word “ah” like you just did. Start when the text prompt appears on the screen and keep going until the text prompt disappears. Try to keep the pitch of your voice at a constant, monotone level. So, try not to raise your pitch or lower your pitch. You will be given feedback on the screen if you say “ah” for less than the required time or speak too quietly. Just continue with the task and try to adjust your speech accordingly. Before the actual session starts, we will do some practice so you can get used to the task. You will have several breaks throughout the experiment.
Do you have any questions?
Practice trials:
After the practice trials, the experimenter can make
- the trial duration (from onset to end of trial) longer if the speaker has difficulties to start on time, (default is 2 seconds)
- the display time a bit longer than 1 second (the duration the word is on the screen): if the speaker takes a long time to start speaking, the recorded word is often too short. In this case, add the value of the time before onset (displayed in the command line during the study as: time before onset) to the duration of the display time (1.4 second is the default). So, if the speaker always starts to produce the word after 0.6 seconds, the new display time is 1.6 seconds.
The experiment starts after you press "enter".
What to monitor for:
- During the study, monitor for correct loudness in the figures that appear for each trial. In case the signal is too loud, adjust the microphone gain.
- Monitor the boundaries indicated by the red horizontal lines: The boundaries can be adjusted mid-session by pressing the button (b) on the display and entering a new percentage (see figure below).
- Monitor if speakers make the vowel consistently too short or starts too late to fit in the trial duration time. You can check this by monitoring the length of the vowel, indicated by the green vertical lines in the display figure. If the right line is frequently at the utmost right side of the figure, the production started too late and you can adjust the length of the trial. Press the button (e) on the display to enter a new value (see left arrow in the figure below).This way, it is avoided that the speaker hears their own voice without the feedback after the trial.
- If the speaker has difficulty producing the correct vowel length, you can adjust the time that the stimulus is shown on the screen. Make the stimulus presentation on the screen longer if the speaker makes the vowel consistently too short, so the speaker is forced to lengthen the vowel.
If Matlab crashes during the experiment
As of 10/24/2022 there is no restart script for this experiment.
2. Pitch JND
See section 6, session 1 (formant JND; use option f0).
Run check_audioLevels with noise alone
3. Time adaptation
Special running circumstances
This experiment is part of the cerebellar battery run in 2022-2023. For controls, it is in the SECOND session. For patients, it is in the THIRD session.
In this battery, participants come in for multiple sessions and do multiple experiments in a row. As such, this is a bare bones document on how to run the experiment. Procedures for consent, hearing screening, awareness surveys, general equipment set up, and payment are not included in this document. See the documents below for how these procedures are implemented in this multi-study session:
- For controls
- For patients
Pretest phase: setting the OST and PCF files
"This experiment has one short section and then one long section.There will be breaks between sections while I set up the next part.
For this first section, you will see one word at a time appear on the screen. When you see the word on screen, read it out loud, just like you would normally say it. You will be speaking into the microphone on the desk, and you will hear your own voice and some noise played back through these headphones. Do you have any questions?"
MATLAB command: run_cerebTimeAdapt_expt
The first phase of this experiment both gets the participant used to how the study is going to go, and also records some initial tokens so that you can set the OST file (see this article for information on how OST files work). The OST file in this experiment has three OST transitions:
- 0 to status 2: detects the onset of the vowel
- 2 to status 4: detects the onset of /s/ in "best"
- 4 to status 6: detects the onset of silence, here the /t/ of "best"
The participant should say the word like it is the answer to something, "Best." or "Best!" If they are saying it like it is an item in a list ("best..."), or like a question, encourage them to change how they say it by demonstrating. You may have to correct them again during the experiment. The key is that the vowel should not be too drawn out.
The initial pretest phase has 9 trials. After the trials are over, the GUI audapter_viewer (see LINKS below) will open with the trials. Use audapter_viewer to tweak the OST file (see LINKS below) if necessary (see LINKS below for info on OST files and how to use audapter_viewer). These segment transitions are quite robust so you will likely not need to change much; you may need to tweak parameters, but it is highly unlikely that you will need to tweak heuristics.
LINKS
See this video on how to generally use audapter_viewer
See this guide on how to set OSTs
KB on using audapter_viewer: [Link for document 116418 is unavailable at this time]
Important notes about OST status setting
- For this experiment, the most important OST status is 2, which is the onset of the vowel.
- This is the event that triggers the time warping event, so it should be accurate.
- It is better to have it slightly late than too early.
- The default heuristic looks for RMS intensity to surpass a certain threshold, so this should be fairly reliable, since the participant is not saying anything before the target word.
- Status 6 is the next most important.
- It must be reliably detecting the silence in the /t/ closure. It is better to err on the side of late than early.
- This event is important because the interval between status 2 and status 6 is what gets fed into the PCF file so that the time warping event does not end too soon.
- The default heuristic looks for RMS intensity to go below a certain threshold, which should also be fairly reliable. However, it cannot be all the way at the end of the trial because the time warp event has to end before the end of the trial otherwise Matlab will crash.
- Status 4 is not directly used in the experiment, but you should try to have it relatively accurate.
- OST statuses must occur linearly, so if the tracking never hits status 4, status 6 will also never occur.
- The default heuristic for this looks for a rise in the RMS ratio, i.e. high intensity in higher frequencies.
When you are satisfied with the OST tracking, click "Continue/Exit". You will get a dialog asking if you want to save; click "Save and Exit". This will ensure that the new parameters are saved both into the OST file and into the experiment file for that participant. Then a dialog will pop up to make sure it is being saved in the right place. The automatically selected option should be the local folder for that participant/experiment; if it is not, you can find another folder instead.
- If you changed the OST at all, you will automatically redo the practice. If this is the case, tell the participant, "We're going to try that one more time." If you need to provide any additional guidance, such as speaking more naturally, you can tell them that as well.
- If you did not change the OSTs, you will be able to move onto the next phase.
Segmentation (information for PCF)
After the OSTs are set, another GUI will pop up for you to segment the most recent practice trials. There will be two user events (denoted by cyan lines): one corresponding to where OST status 2 was for that trial, and one corresponding to where OST status 6 was for that trial. They will be labeled as "vStart" and "tBurst" respectively. Click and drag on the lines to adjust these events to correspond with the actual location of the start of /E/ and the start of the /t/ burst for the trial, then press 'continue' to continue to the next trial.
If you messed up on one of the events, you can click "previous" to go back to that trial (unless it was the last trial).
The information about the interval between vStart and tBurst will be automatically fed into the PCF file (configures perturbation).
(For more detailed instructions on how to use audioGUI, see this article.)
When you are done with the last trial, a figure will pop up and you will be asked if you want to accept that duration of durHold. The dots in the figure should be roughly below the line. If not, click "no" and redo the practice phase again.
Main Phase
"We'll now begin the main section, which will probably take about 10 minutes. Just like in the practice phase, you'll see a word on the screen, and then say that word like you normally would. Do you have any questions before we start?"
If no questions, "Whenever you're ready, you may begin."
Things to keep an eye on:
- The experiment controller screen will show you the OST statuses for each trial. Keep an eye on these. If they start looking consistently off, you can adjust the OSTs in the middle of the experiment. To do this, press 'a'. At the top of the next iteration of the trial loop, audapter_viewer will open again and you can adjust the statuses by looking at the last trials from the experiment. Because the statuses are relatively robust for this word, you will probably not have to do this, but if the speakers are particularly variable you may have to.
- In addition, keep an eye on the participant's loudness. You may have to adjust the gain a bit over the course of the experiment. However, if their voice strength fades dramatically, they may need to take a bit of a break instead.
If you need to pause for any reason (other than adjusting OSTs), press the 'p' key on the keyboard. The experiment will pause at the top of the next trial loop.
When the experiment is done
- Move the experiment data from the local computer to the server
- If running at UW: the data will be saved in
C:\Users\Public\Documents\experiments\cerebTimeAdapt\acousticData\. Copy the participant's folder into:\\wcs-cifs\wc\smng\experiments\cerebTimeAdapt\acousticData - If NOT running at UW: the data will be saved into the folder generated by
get_acoustSavePath('cerebTimeAdapt'). Copy the participant's folder into the path generated byget_acoustLoadPath('cerebTimeAdapt')
- If running at UW: the data will be saved in
(At UW) Fill out the Lab Notebook on the server, located at \\wcs-cifs\wc\smng\admin\
If Matlab crashes during the experiment
As of 10/14/2022 there is no restart script for this experiment.
4. Reaching adaptation (VMR)
5. Time compensation (taimComp)
Special circumstances: part of battery
This experiment is part of the cerebellar battery run in 2022-2023.
- Patients (UW and UCSF): Session 3
- Controls (UW): Session 2
In this battery, participants come in for multiple sessions and do multiple experiments in a row. As such, this is a bare bones document on how to run the experiment. Procedures for consent, hearing screening, awareness surveys, general equipment set up, and payment are not included in this document. See the documents below for how these procedures are implemented in this multi-study session:
- Protocol for cerebellar battery: controls
- For patients
What's special about this experiment
This experiment uses formant clamping to simulate acceleration, deceleration, undershoot, and overshoot of the vowel /ai/.
This is very reliant on accurate OST tracking from Audapter. For this, we individualize OST parameters for each participant using an in-house GUI called audapter_viewer. Here is a video guide for how to use audapter_viewer. If you would like more information about the particular heuristics that are used for OST tracking, see this guide.
Note: You MUST use UW's version of Audapter (and accompanying Matlab code) for this!! Other versions do not have formant clamping. The experiment code does a hard check for the formant clamping before starting so you will find out quickly if your Audapter is not set up right.
Prepping for participant
Before running the participant, determine if they are a speaker with monophthongization of the target vowel or not. Speakers with monophthongization cannot participate in this experiment because it renders the manipulations null!
-
Monophthongization of /ai/ is a typical feature of Southern American English and Black English, though not all speakers of these dialects will necessarily have it (depending on their other linguistic experiences)
-
Monophthongization means the vowel in “buy” or “guide” will sound more like “bah” or “gahd”
-
If you cannot hear this specifically without looking at a spectrogram, you will get the opportunity to do that during the LPC order check.
Pre-experiment instructions
Tell the participant: “This experiment has three shorter sections and then one long section. There will be breaks between sections while I set up the next part.”
- Type run_taimComp_expt into the command window and hit enter.
- You will be asked for participant number. It is important to use the right kind of prefix so that the trials are the right duration (for patients, they are longer/slower with more time between trials)
-
UW:
-
if control, spXXX
-
If patient, caXXX
-
-
UCSF, UC-Berkeley:
-
Currently, the code looks for the substring ‘ca’ to identify patients. This can be changed to look for an additional condition if you have some other identifier in your own system
-
-
- You will then be asked about the participant’s height. This is how we determine the starting value for LPC order.
Preparation phase 1: LPC order
-
In this phase, participants will see words on the screen and say them out loud.
-
Tell the participant: “For this first section, you will see one word at a time appear on the screen. When you see the word on the screen, read it out loud, just like you would normally say it. You will be speaking into the microphone on the desk, and you will hear your own voice and some noise played back through the headphones. Do you have any questions?"
"Please put on your headphones now." -
The participant will complete 30 trials, 10 trials per word (bod, bead, bide).
-
If you have not yet determined if the speaker has monophthongization, look at the formant trajectories in “bide” as they show up on the control screen.
- Examine the Audapter-tracked formants as they are coming up on the control screen. Note if the tracking seems to indicate that the LPC order should be changed. Indications that something might be off:
- F2 transition from a to i in /ai/ might be extremely jumpy or jittery, in a way that does not follow the underlying spectrogram (some speakers may be smoother or more stable than others, so be sure to look at how the colored formant track corresponds with the spectrogram, not just the characteristics of the colored line alone).
- F2 for /a/, especially near the /b/ transition, is questionable
- F2 for /i/ might jump down and back up
-
-
The check_audapterLPC GUI will then come up. Use the GUI to find an appropriate LPC order for the participant (if you want more general information, see this primer on LPC order, with explanations and examples). Some general guidelines for this experiment:
- If you are still unsure about monophthongization, you can use this time to take a good look at those formant trajectories. Monophthongization should look very obvious: formants will not move at all across the entire vowel (see example below, this is someone from Duck Dynasty saying "sideline" [saidlain] with F1 and F2 highlighted)

- You do NOT need to include/exclude trials. This button is used to pick out vowels that should be used to calculate a mean F1/F2 value for a particular vowel. We do not use that information in this study.
- Look at several different vowels by clicking on different points in the vowel map to be sure that you are getting an overall impression of how formant tracking is going, not just looking at a single trial. Since people have some natural variability in their productions from trial to trial, you need to make sure that their general formant range is tracking well.
- The most important vowel to check for accuracy is the /ai/ in "bide", because this is the vowel that is actually used in the experiment. It is also the one with the most movement over the course of the formants, which can interact with LPC order to produce a formant track that jumps away from the actual resonances.
-
If the formant trajectory seems to be pushed lower than where the actual formant is (e.g., the formant track is overall too low, or there are small patches or spikes where the formant is being pushed down), this is an indication that the LPC order is probably too high (the formant tracking algorithm is assuming that the person has a longer vocal tract than they do, and thus that formants should be lower/closer together). LOWER the LPC order (e.g., from 15 to 13).
- If the formant trajectory seems to be pushed higher than where the actual formant is, this is an indication that the LPC order is too low (the formant tracking algorithm is assuming that the person has a shorter vocal tract than they do, and thus that formants should be higher/further apart). RAISE the LPC order (e.g., from 15 to 17).
- If you've done another experiment with this participant that checked LPC order, the value you use there may be suggestive as to what you should do in this experiment. However, it may not necessarily be exactly the same, since different vowels are being used, and thus different formant values.
- This is the first chance you have in this experiment to get to know the participant's vocal tract, which will come into play in the upcoming OST setting. People with a shorter vocal tract (LPC order = 15 or lower) will likely have higher RMS ratio values overall. People with a longer vocal tract (LPC order = 17 or higher) will likely have lower RMS ratio values overall. This is because vocal tract length affects how much energy there is in higher frequencies, and the amount of energy in higher frequencies affects Audapter's calculation of RMS ratio.
- If you are still unsure about monophthongization, you can use this time to take a good look at those formant trajectories. Monophthongization should look very obvious: formants will not move at all across the entire vowel (see example below, this is someone from Duck Dynasty saying "sideline" [saidlain] with F1 and F2 highlighted)
Pretest phase 2: OST setting for "BUY donuts" and "GUIDE voters"
- Tell the participant: “For this section, you will see a phrase and read it out loud. Try to read it in a clear voice, putting emphasis on the capitalized word, like this: BUY donuts now. Can you say those phrases for me?”
-
You should coach them until they say the phrase in the right way: [sound examples of good productions: buy donuts example; guide tutors example]
-
It is important to use focus (emphasis) on the capitalized word so that it is long enough without being a very unnatural speech rate.
- Many people can produce prosody more accurately to the target when you give them conversational examples where the target prosody would be used. For example, "pretend that you are an elementary school teacher and you are trying to calmly correct a young student. For example, they might ask you, should we make donuts now?? And you would say, no, BUY donuts now."
-
They should NOT put pauses between words, because they will be confounding the experimental conditions (and making it difficult to automatically track the segments). It should be a smooth, slow-ish speech rate. People are more likely to put pauses in "guide voters" (likely due to the /dv/ sequence) than in "buy donuts" but there is a tendency for both to happen if they are really trying to emphasize BUY or GUIDE.
- Although duration will not be tracked in this phase, you should try to get them to say it at a speech rate similar to what will be used in the full experiment. That way, the landmarks for the vowels will be consistent (people may have different proportions of [a] to [i] at different speech rates), and the OST setting will be valid for the rest of the experiment.
-
-
-
When they have gotten comfortable with saying the phrases, press the space bar to advance to the screen that gives them the general instructions. Tell them: “Okay, you can start whenever you are ready.”
-
They will read each phrase 9 times in random order
-
When they finish, tell them: “I am just going to make some measurements, so you can relax for a few minutes.”
-
After they have finished, audapter_viewer will open. Use audapter_viewer to set the OST parameters for the participant. (See section below for taimComp-specific guidance on OSTs)
-
When you are satisfied with the parameters:
- Click "Recalculate ALL trials" using the set of parameters that you are satisfied with. This makes sure that there is no conflicting information about what the OST parameters will be going forward.
-
Click “Continue and Exit”.
-
Click “Save and Exit”.
-
Verify the folder you would like to save into
-
If you had to change anything from the default, it is HIGHLY RECOMMENDED to run the OST setting phase again to make sure that they work with new data (and thus that they can generalize to the participant’s speech)
-
If you have to repeat, tell the participant: “We’re just going to do that one more time so I can make sure everything is set up correctly.”
taimComp-specific guidance for OST setting
For more general guidance on setting OSTs, see: guide on Audapter’s OST capabilities or how to use audapter_viewer
- Status 2: onset of /ai/
- This is the most important status! This is the status that finds beginning of the target vowel and thus, the beginning of the perturbation
- This status should be rather robustly tracking the very beginning of the vowel, but if you need it to be a touch late to avoid accidental triggers at other points, that is okay. It should not be more than 50 ms late or so, however.
- The default heuristic is INTENSITY_AND_RATIO_ABOVE_THRESH, which allows more precise tracking of vowel onset separately from prevoiced /b/ onset, which is VERY common in the older population.
- This heuristic is by far the most reliable to detect vowels after stops (prevoiced or otherwise), but if for some reason it is not working due to really weird ratio values (likely a voice quality issue), INTENSITY_RISE_HOLD_POS_SLOPE is an okay substitute.
- This heuristic is by far the most reliable to detect vowels after stops (prevoiced or otherwise), but if for some reason it is not working due to really weird ratio values (likely a voice quality issue), INTENSITY_RISE_HOLD_POS_SLOPE is an okay substitute.
- Values for the first parameter, which is RMS intensity, will likely be in the 0.035 range. However, this will vary from person to person, or from trial to trial. Factors that may affect the threshold you use are:
- How loud the person is talking.
- Loud talkers will reach 0.035 very quickly
- Quiet talkers will reach 0.035 slowly/further into the vowel;
- How close they are to the mic (affects recorded loudness, so same effects as loudness).
- Which mic you are using (we chose this threshold based on our setup at UW, so your mileage may vary)
- How loud the person is talking.
- Values for the second parameter, which is RMS ratio, defaults to 0.17. Any adjustment will likely be in the 0.15 - 0.22 range. Factors that may affect the threshold you use are:
- Vocal tract length (take note from LPC order):
- People with longer vocal tracts will tend to be fine with the default or lower values.
- People with shorter vocal tracts may need higher values
- Loudness/effort and voice quality
- Being very loud and forceful can increase the energy in higher frequencies, and thus boost RMS ratio, such that you reach the threshold early. You might not have to address the threshold in this case, unless they are triggering the status before the vowel (in /b/ or /g/).
- Being very quiet or breathy can decrease the energy in higher frequencies, and lower RMS ratio, such that you don't reach the threshold until too late. In this case you may need to lower the threshold so that the vowel can be detected in time.
- Vocal tract length (take note from LPC order):
- Values for the third parameter, which is time, defaults to 0.008 (8 ms). This is largely to make sure that the speaker is well and truly beyond the thresholds, and not just randomly shimmering.
- This is the most important status! This is the status that finds beginning of the target vowel and thus, the beginning of the perturbation
- Status 4: start of /d/ in “guide” or “donuts”
- This is also the most important status! This is the status that finds the end of the vowel and thus the end of the perturbation.
- You should try to get this status as close to the end of the vowel as possible, since /d/ usually has enough voicing such that Audapter tries to track formants through it. You should NOT cut off the vowel.
- The default heuristic is INTENSITY_AND_RATIO_BELOW_THRESH, which allows more precise tracking of vowel offset without including a fully voiced /d/. This is a new heuristic introduced by UW on 4/17/2023 so you will need to update your Mex file!
- If this heuristic is not working for some reason, one you can try is NEG_INTENSITY_SLOPE_STRETCH_SPAN or INTENSITY_FALL but both of these will be extremely prone to error if there are dips in RMS in the middle of the vowel (which is very common).
- Similarly to status 2, values for the first parameter, which is RMS intensity, will likely be in the 0.035 range, with some variation from person to person, or from trial to trial. The same factors will affect this threshold as for status 2, but with opposite effects (because you are trying to be below the threshold now, not above):
- Loudness:
- Louder talkers might get back down below 0.035 too late (in the /d/), or potentially not even at all; in this case you might have to increase the threshold to, say, 0.05.
- If there is a REALLY quiet talker, they might dip below 0.035 in the middle of the vowel so you may need to lower the threshold so they don't trigger it early. (However, usually speakers still don't satisfy the ratio requirement in the middle, so RMS dips alone do not mean you'll need to change threshold)
- Voicing/loudness during /d/ can make the RMS take a long time to go down, so you may need to raise the threshold
- Loudness:
- Values for the second parameter, which is RMS ratio, will likely be around 0.15-0.22, with the same effects from speaker variation as status 2.
- If a speaker had a naturally higher ratio (due to short vocal tract, extra loud voice/lots of energy in high frequencies), they may not go below the default ratio threshold in time. In that case, you'll have to raise this parameter.
- If a speaker had a naturally higher ratio (due to short vocal tract, extra loud voice/lots of energy in high frequencies), they may not go below the default ratio threshold in time. In that case, you'll have to raise this parameter.
- Values for the third parameter, which is time, defaults to 0.008 (8 ms). This is largely to make sure that the speaker is well and truly beyond the thresholds, and not just randomly shimmering.
- This can be particularly helpful for the end of the vowel because there is frequently some short-scale change in loudness in the middle of the vowel that you don’t want to let trigger this status, particularly if they are a quiet talker.
- This can be particularly helpful for the end of the vowel because there is frequently some short-scale change in loudness in the middle of the vowel that you don’t want to let trigger this status, particularly if they are a quiet talker.
- This is also the most important status! This is the status that finds the end of the vowel and thus the end of the perturbation.
- Note on the symmetry of heuristics: because the heuristics for Status 2 and Status 4 are mirror images of each other, if you make adjustments to 2, you will likely have to make similar adjustments to 4 or risk status 4 happening immediately after status 2. This is because the heuristics only check for the values being ABOVE or BELOW the thresholds; they do not check for direction of change (rise vs. fall).
- Example: if you set the thresholds for status 2 very low, say 0.01 for RMS ratio, the speaker will quickly move above those thresholds, say to 0.02.
- Then, if the threshold for status 4 is higher, say 0.05, the speaker will immediately satisfy the requirement to be below status 4 thresholds as well (because 0.02 is already below the threshold, even though it is rising).
- Example: if you set the thresholds for status 2 very low, say 0.01 for RMS ratio, the speaker will quickly move above those thresholds, say to 0.02.
- Note about trial-to-trial variability: When you are setting the OSTs, keep in mind that you are trying to set them for the entire experiment.
- Don’t fixate on a single trial that isn’t perfect. The OST section gives you 18 trials to work with; you want it to be good for at least 15 of them, with the remaining ones pretty close. If the remaining three are egregious (not triggering at all, triggering far too late or far too early), you should try to find a better set.
- Don’t “overfit” the data. Sometimes, you may try so hard to get the alignment perfect that you choose thresholds that just BARELY trigger the statuses on exactly this set of productions. You want to find thresholds that are robust to natural variability that occurs in a speaker when they produce 200 trials of these two phrases. One good way to make sure that your statuses are robust is to choose to redo the OST setting phase after you change anything and see if you still get the same success.
- Don’t fixate on a single trial that isn’t perfect. The OST section gives you 18 trials to work with; you want it to be good for at least 15 of them, with the remaining ones pretty close. If the remaining three are egregious (not triggering at all, triggering far too late or far too early), you should try to find a better set.
Segmentation
If everything was okay, audioGUI will then pop up for you to hand-correct four landmarks on all 18 trials. [See example of how to segment: buy donuts; guide tutors --- the full phrases are slightly different than the current version, but the segmentation of /ai/ is the same.]
Note: the segmentation can take a while so if you are comfortable with multitasking and you have the technological means (e.g. you are in the same room as them), you can make chitchat with them while you make adjustments
-
aiStart: beginning of vowel
-
Move this event to the beginning of the /ai/ in “buy”
-
-
a2iStart
-
Move this event to when F2 starts moving up towards the second quality in /ai/ in earnest.
-
-
iPlateauStart
-
Move this event to where F2 starts to reach the plateau (do not mark the peak—mark where the F2 trajectory starts to flatten out)
-
-
dStart
-
Move this event to where the /d/ closure starts. This should be where formant energy reduces; some voicing will almost certainly still be there.
-
Preparation phase 3: Duration training
-
Tell the participant:
-
“In this section, you will practice saying the phrases at a good speed. When you say each phrase, you will get some feedback about how fast you were talking. If you see a BLUE circle, it’ll tell you to speak a little faster. If you see a YELLOW circle, it will tell you to speak a little slower. If you see a GREEN circle, that means you were speaking at a good speed.”
-
Pause to confirm
-
“So if you are told to speak a little slower or a little faster, you don’t have to really change how you are speaking drastically. Keep speaking smoothly and clearly, and just adjust a little. So like if you said [speak quickly] “BUY donuts now” and have to slow down, you can just say [speak more slowly] “BUY donuts now”, you don’t have to put any extra pauses in or anything.”
-
Pause to confirm
-
-
They will do 10 trials (5 of each phrase).
-
Keep general track of how they do (usually too fast, usually too slow, usually good, etc.)
-
Keep an eye on the OSTs. The duration feedback is based on the OST values, so if they are not tracking correctly, the feedback will be off.
-
-
You will be given the option to repeat.
-
If you need to adjust the OSTs, you can do that, and then run again
-
Give general guidance on how fast to speak to the participant if necessary (referring to if they were generally fast/slow)
-
Main experiment
-
Tell the participant: “This is the last section. It will be just like the section you just did, but will last longer, about 20 minutes. There will be breaks every 20 trials. If you need to pause at another time, like to cough or to drink water, you can press p on the keyboard. Do you have any questions?”
-
During the experiment:
- Keep an eye on their OST tracking. You can adjust mid-experiment if necessary by pressing ‘a’. Common triggers of adjustment:
- Changes in loudness: Many people will talk more quietly as the experiment wears on, with accompanying changes in RMS and RMS ratio. You can sometimes address RMS changes by adjusting the gain, but if the ratio gets really out of whack, you may have to adjust the ratio threshold.
- Changes in proximity to microphone: Some speakers may sit back in the chair after a while, which mostly affects RMS. This again can be helped by changing the gain or by asking them to sit forward again, but if that isn't possible you may need to adjust.
- Changes in loudness: Many people will talk more quietly as the experiment wears on, with accompanying changes in RMS and RMS ratio. You can sometimes address RMS changes by adjusting the gain, but if the ratio gets really out of whack, you may have to adjust the ratio threshold.
- There are a few other settings that you can adjust mid-experiment by pressing 'e'
- trial duration: If participants (particularly patients) are having a hard time completing the utterances before the end of the trial, you can increase the trial duration.
- target vowel duration boundaries: if participants (particularly patients) are having a hard time getting the right duration feedback (not due to OST issues), you can loosen the boundaries for what is considered to be a good duration. Ideally you should only increase the maximum; participants must go slow enough for them to be able to react to the perturbation
- LPC Order: if you notice that the formants are not tracking the way they should be, the LPC order may be off. Formants that are not being tracked well will be overly jittery, and may have sudden dips or spikes. Specifically, these dips and spikes do not follow the underlying formant structure---some people (particularly patients) may have less smooth formants. An example of a trial with LPC order too high (that is, assuming a too-long vocal tract) is below, with the suspect areas underlined in red. Very bad LPC orders may even have whole patches where the shape of the formant is preserved, but is out of line with the rest of the formant (similar to octave doubling/halving in pitch tracking).
- Sudden downward dips below where the actual formant is (such as in the example below) indicate that the formant tracking algorithm is preferring candidates in frequencies that are lower than the actual formant---in this case it is also interacting with the rapid change in formants, basically penalizing candidate formant values for being much higher than the previous values. In this case, you should LOWER the LPC order (e.g., from 15 to 13). This will ultimately give a little more preference to higher formant candidates.
- Sudden upward spikes above where the actual formant is indicate that the formant tracking algorithm is preferring candidates in frequencies that are higher than the actual formant. In this case, you should RAISE the LPC order (e.g., from 15 to 17). This will ultimately give a little more preference to lower formant candidates.

- RMS ratio threshold: this is the parameter that limits when formants can be tracked relative to how much energy there is in the high frequencies. This is most useful for avoiding tracking formants during sibilants. The default value is 1.7, which should be pretty permissive. Higher values are more restrictive (i.e., if you increase it enough, even vowels won't track anymore), lower values will allow tracking through higher-ratio segments (like /s/).
- Problems with the RMS ratio threshold will result in full dropouts in BOTH formants at the same time. That is, both formants will drop to 0 at the same time. This is because Audapter simply isn't tracking the formants there and essentially providing no value for any formant.
- NOTE 1: It is not uncommon for people with shorter vocal tracts (i.e., higher formants) to need the threshold to be adjusted downward. If you see dropouts, that is an indication that the RMS ratio threshold should be adjusted DOWN. An example of such dropouts is below (threshold set to 3.7; should be lower than 3.2 for this speaker). There are multiple dropouts in the formant tracks that are in the red circle---note the gap between the first and second halves of each formant's contour.
- NOTE 1: 2.5 is 1/0.4. Audapter's coding uses 0.4 as the actual ratio value, but has it inverted for the threshold.

- trial duration: If participants (particularly patients) are having a hard time completing the utterances before the end of the trial, you can increase the trial duration.
- Keep an eye on their OST tracking. You can adjust mid-experiment if necessary by pressing ‘a’. Common triggers of adjustment:
If Matlab crashes during the experiment
To restart taimComp in the event of a crash:
- Type in run_taimComp_expt and hit enter
- Type in simple/hard (depending on what version you have been doing)
- Type in the participant code
- You will then be asked if you want to load in their expt file (which should exist already from the first attempt at running). Type y
- You will be asked if you want to OVERWRITE their expt file. Click CANCEL
- The script will then look for which modules have already been done. If a data file already exists in each module (LPC order, OST testing, duration training), it will let you know and ask if you want to redo that phase anyway. If there is NOT a data file in one of those modules, that means that you didn't complete that module and will automatically redo it
- Note: if you didn't get to segmentation in OST pretest, you should redo it anyway
- If you were in the middle of the main experiment, it will start you back where you were
- Note: if you didn't get to the first trial of the perturbation phase, it will start over from trial 1.
6. Time JND (cerebDurJND)
Special running circumstances
This experiment is part of the cerebellar battery run in 2022-2023. For controls, it is in the SECOND session. For patients, it is in the THIRD session.
In this battery, participants come in for multiple sessions and do multiple experiments in a row. As such, this is a bare bones document on how to run the experiment. Procedures for consent, hearing screening, awareness surveys, general equipment set up, and payment are not included in this document. See the documents below for how these procedures are implemented in this multi-study session:
Stimuli
This is a perceptual experiment, using prefabricated tokens.
- For people running this study at UW: the tokens are located on the server.
- For people running this study at UCSF: the tokens were shared via Google drive. They should be copied into the folder that is returned when you run
fullfile(get_exptLoadPath, 'cerebDurJND', 'stimuli')
Practice phase
Matlab command: run_cerebDurJND_expt
"In this experiment, you will be listening to three words, which will differ mainly in the duration of the vowel. You will then press a button on the keyboard to indicate if the second word sounded more similar to the first sound or the third sound. If you are not sure, just make your best guess."
At this point you can answer any questions they might have (there are also task reminders in each trial).
"You will start first with a practice phase, where we can make sure that the volume is okay and to get you used to the task. In order to move onto the full task, you will need to get at least 5 of the 6 practice trials correct."
This experiment starts with a practice phase so that participants can get used to how the task is run. The practice phase uses stimuli with very large intervals, so participants should be able to hear the difference. During practice, the participant will get feedback on if their answers were right or not. They will automatically move onto the full phase of the experiment once they get at least 5/6 practice trials correct.
After the practice, check with the participant to make sure the volume is okay.
Note: this experiment assumes that 100 ms is larger than the biggest JND among cerebellar patients, based on data from a different study (for these particular stimuli, it is 100 ms vs. 200 ms, so it is a very large proportional difference). However, if you get a participant that cannot complete the practice because they cannot hear the differences, please contact Robin right away so additional stimuli can be made, and adjustments to the code installed. There will not be an infinite loop---if the participant fails practice more than 5 times, you will be able to manually override.
Main Phase
Once they have passed the practice, they will go automatically to the main phase of the experiment. They will complete either 100 trials or until they get to 30 reversals, whichever is first. This will last about 10 minutes.
After the participant leaves
- If running at UW: the data will be saved in
C:\Users\Public\Documents\experiments\cerebDurJND\acousticData\. Copy the participant's folder into:\\wcs-cifs\wc\smng\experiments\cerebDurJND\acousticData - If NOT running at UW: the data will be saved into the folder generated by
get_acoustSavePath('cerebDurJND'). Copy the participant's folder into the path generated byget_acoustLoadPath('cerebDurJND')
If Matlab crashes during the experiment
As of 9/23/2022 there is no restart script to start the experiment over in the middle of the experiment.
7. Compensation Onset perturbation (pitchCompOnset)
Run: run_pitchCompOnset_expt
Same instructions as 1. Pitch compensation
Suggested time for break.
Equipment setup:
- Move tapping apparatus to one of the three velcro spots. Make sure that it is comfortable for the participant to reach
- Plug in tapping apparatus (uses mini USB)
- Plug in speakers amp output 3 and check audio levels (appr. 50 dBA with audiometer placed in between speakers and running check_audioLevels)
8. Coordinative tapping
[Doc 122181 content is unavailable at this time.]
-
Fill out Music Questionnaire: https://uwmadison.co1.qualtrics.com/jfe/form/SV_6lHuC9FBlGi4bHM
Equipment setup:
- Remove tapping apparatus
- Unplug speakers from amp output 3
- Place microphone back in circle marked on desk
- check audio levels
9. Compensation to transient perturbation
run: run_pitchComp400_expt
Same instructions as 1. Pitch compensation
Pay participant
After the participant leaves
- Copy data from all experiments to their respective folders on the server
- Copy starred data to Globus server (from both sessions)
- If MRI was done for this participant, copy MRI data from brain study drive to Globus
- Fill out patient_database for assessments (on the Waisman server in \\smng\admin\recruitment\ataxia\)
- Pay participant with Advarra: [Link for document 155000 is unavailable at this time]
- Fill in lab notebook for each experiment - \\smng\admin\Lab Notebook Cerebellar Battery.xlsx
- Fill out: https://docs.google.com/spreadsheets/d/1WPoCJtOTIAEC3NZxKxOPsEtsEazRJZpD-nK_ookoZSY/edit#gid=0