
Transfer Evaluation System (TES) - Evaluation Tracker Directions

Overview
Transfer Evaluation System (TES) provides course descriptions for routing to department evaluators for review through the evaluation tracker. Evaluation Tasks are routed with optional syllabus attachments to assigned department evaluators for their review and approval. This process is tracked within the TES database, eliminating the need for a paper or an e-mail trail. See below for step-by-step instructions for department evaluators to review courses assigned to them.
Steps
Step 1
Log in to TES by selecting the "Log In" icon in the upper right.
The username is the UW email address used for your TransferologyLab account. The password is the same as TransferologyLab.com if you use that product. If you forgot your password, select "forgot your password," and you will receive an email to reset it. If it states that your account is not available, please try another one of your UW emails or email crediteval@registrar.wisc.edu and we can notify you which email is used.


Step 2
The standard homepage includes the Search, Track, Match, and Manage options.

Step 3
Change your homepage to default to "My Evaluations." This is optional; however, it will make it easier to view the courses assigned to you when you log in.
From the toolbar at the top of the page, select "Manage," then select "User Preferences." On the right-hand side "Set my Home Page," change to "My Evaluations." Select "Submit." The new homepage will show evaluations assigned to you. If you do not select this as your homepage, navigate to your evaluations by selecting "Track" on the homepage or select "Track" at the top menu, and "My Evaluations."


Step 4
In "My Evaluations," select the blue button for the institution to view the courses for that institution. If there are multiple courses for that institution to be reviewed, they will all appear. Select the blue arrow for the course.

Step 5
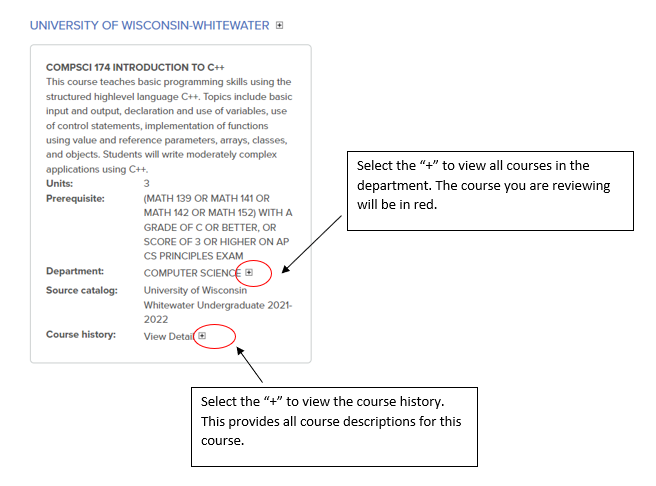
The Evaluation page for each course will show the course description, proposed UW–Madison course or electives, notes from the CES team, and syllabus or supporting documents. Select the support files to download.

Additional details about the department and course can be found by selecting the "+" sign.
Step 6
After reviewing the course information, select an option:
- Approve: Course listed for UW–Madison is correct equivalency.
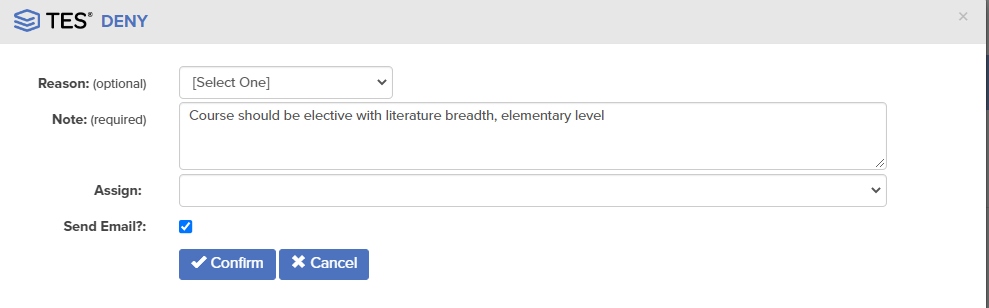
- Deny: Course listed for UW–Madison is not the correct equivalency. Add notes including appropriate equivalency and any reason why the course is not a direct equivalent. You do not need to choose a reason (subject, level, lab, sequence, other) if you do not want to.
- Need More Information: Request additional information if syllabus did not contain all necessary information or you would like additional information. In the notes section, indicate the information you are seeking.
- Re-assign: Send to another user in TES. Select this option to send to another staff member in your department, who is also in TES. You do not need to re-assign to CES staff if you chose one of the above options.
- Add/Edit Course: Change the proposed course equivalency to a different UW-Madison course or elective. Evaluation will remain assigned to you. CES team does not expect you to use this feature.
- Add/Edit Support File: Add a PDF to the evaluation. Evaluation will remain assigned to you.
After you have selected an option, it will be routed to the CES staff member who assigned it to you. It is no longer in your queue. Leave the send email alert checked so that the CES team receives an email.

Step 7
Once you have selected your action, re-assign the evaluation to the creator by choosing the appropriate person under the assign drop-down. Leave the "Send Email?" box checked. Select Confirm once you've selected an individual. The creator can be viewed on the right-hand side under "Evaluation Detail" as Created By: or on the bottom as the first person in the "Evaluation Log."


Step 8
If you have additional courses to review, navigate to My Evaluations by selecting "Track" and then "My Evaluations" from the top menu bar.
Video demonstrating the evaluation tracker tool
Video Transcript
This is a demonstration on how to use the evaluation tracker workflow in the Transfer Evaluation System, also known as TES.
If you are a reviewer for your department, this is how you will review syllabi and let the CES team know if the equivalency should be the same or changed.
So you will receive an email that will look like this once you have something to be reviewed in your queue. So it will come on behalf of the CES team or your colleague in your department. There will be information that the team has put in there, any comments, and then you can see the transfer institution, the transfer course and then a link to go directly to TES.
You can also go to tes.collegesource.com and click in the login, and then you'll put in your email and your password. It is the same login information if you use Transferology, the same username and password. If you forgot your password, click on this “Forgot your password?” and it will send you an email to reset that password.
So click login. This is how I have my home screen set up. So when I log in I see all of my evaluations. If you would like that to be your home screen, you’ll click on Manage, User Preferences, and then on the right hand side, set my homepage to “My Evaluations” and click Submit. If you do not want that to be your homepage, this is the homepage how it will always appear for you, and then you would go into Track, My Evaluations.
So this will have everything that is assigned to you that is still waiting for review. So each institution that is assigned, how many courses from that institution, the city where it's located, and the state where it's located. So we'll look at University of Wisconsin-Whitewater. So I have these five in my queue, and so however many you have in your queue, it will show up here. You'll click on the blue button to review the course that you would like to review. So it will have the course description, from the transfer institution. And so you can read the course description. It will have -- this plus sign here links to the department, so you can open it to view all of the courses in the department. So if it has a prerequisite for a course or you would like to see the course that comes after it, you can do that, and then it will have the course that you are reviewing in red. So you can see which course you're looking at and then any prerequisites, or if you want to see all of the courses in the department, that is how you would do that. Just click on this plus sign here. If you're interested in seeing the course history, you can click on this “View Detail," and so that will show you all of the iterations of the course. So if the course description changed at all, it would show it in here.
And then this would be the proposed UW–Madison course. And then on the right hand side is who it's assigned to, when it was created, who created it, and then comments. So in the comments field is where the CES [team] will include the information about if it's a reevaluation request or a course equivalency request, the rule that the student received, the course that the student received, if there is a rule in SIS and when and who it was reviewed by, and then what course the student is seeking, or what elective credits they're seeking, and then the additional comments are our internal comments.
So then to view the syllabus, you'll click on this support files, and it will download so that you can open up and view the syllabus. And then once you've reviewed that and reviewed the course description, you will click on “Select an Action.” Then you can approve. So if you would like to approve the course that is listed under UW–Madison, you'll click approve and that will send it back to the CES team.
If you would like to deny the course, you can click deny. They do have these broken up: subject, level, labs, sequence, other reason for denying. If you would like to include that, you can; you do not have to. And then if you need more information, if the syllabus doesn't include all of the information that you would like, you can ask for more information. You can also reassign it. So if there's a colleague that you would like to have review it, you can reassign it to someone else that is also using TES. So for this course as an example we'll say we're going to deny it. Any of the actions -- the approve, deny, reassign, need more information -- will have the option to include some comments if you would like to include comments. If you are denying a course, we would ask that you would put comments in. So you could say “Not equivalent to History 130. Should be humanities at the elementary level.” So then we know what course to award for the student and then to build that equivalency for all future students. If there's additional information that you would like to say, you know, doesn't cover X, Y, and Z, you can include that in that as well. We ask that you always keep the send email alert on, so that the CES team is aware that they have something in their queue for review.
So you would click confirm. And then it is out of your queue. You would need to go back to My Evaluations and then -- it's probably actually still in my queue because it was assigned to me, but it would not appear in your queue anymore. So then it would be out of your queue, and you could start working on the next course in your queue. Then once you're done reviewing, click log out.
And that is all that you would need to do to review these courses.
More Information and Support
If you need assistance with TES, please send an email to crediteval@registrar.wisc.edu.
If you have questions about how to review a course, please reference the Undergraduate Transfer Credit Advisory Group (UTCAG) Recommendations for Department Evaluation of Transfer Credit. You will need to be logged into your UW Google account.