
Campus Network (Windows Vista, 7, 8, 10, and 11) - Connectivity Troubleshooting
If UWNet is not working for you, try configuring and using eduroam on your computer—eduroam is the preferred wireless network on the UW-Madison campus. See the following article for instructions on how to connect to eduroam: Connect to Campus Wi-Fi.
If you cannot connect to eduroam, or you are still experience connectivity issues even while connected to eduroam, proceed to the appropriate troubleshooting section below.
Basic Troubleshooting
Follow this list of troubleshooting steps before undergoing more technical and/or advanced steps. After each of the steps below, be sure to check if the connection issue has been solved before proceeding to the next step. If none of these steps yield network access, move forward to the more technical suggestions outlined in the Additional Troubleshooting drop-down section that corresponds to your Windows system.
- If you are connecting using an Ethernet cable, try the following: unplug the cable, wait at least 15 seconds, and then plug the cable back in.
- If you are connecting wirelessly, try the following: disconnect from your current Wi-Fi network, click "Forget This Network," and then rejoin it.
- Note: After forcing your device to "forget" a network, you will have to enter the Wi-Fi network password upon rejoining it.
- Check that you have registered your devices. UWNet requires each device to be registered in order to access the network.
- Make sure your network adapters are enabled. This document shows you how to check for that below.
- Try rebooting your computer.
- Check for viruses that could be prohibiting your use of the internet. Try running a virus scan with an application like Malwarebytes or AVAST Antivirus.
- If you connect to a router either wired or wirelessly, make sure that it is connected to the wall jack.
- Routers also need to be registered with UWNet in order to use them.
- If you are using an Ethernet cable, make sure that the cable is not faulty by either testing your connection with another wall jack or by testing the same jack with a different cable.
Additional Troubleshooting
Windows 10 and 11
- First, verify that your computer is receiving a valid IP address by opening the Start menu.
- In the search bar, type cmd, and then click Command Prompt.

- Type ipconfig, and press Enter.

- Your IP address is located after IPv4 Address. Valid UW-Madison IP addresses start with 128.x.x.x, 146.x.x.x, or 144.x.x.x. In the example above (the information underlined in red at the bottom of the image), the IP address is 146.123.243.12.
- Note: An IP address of 169.254.x.x or 192.168.x.x is a private IP address automatically assigned by Windows when it is unable to locate a DHCP server on the network.
- If you see an invalid or private IP address, you should release and renew your DHCP lease and perform a network reset. Instructions for both of these process can be found in the following articles:
- Now check your network activity statistics by once again opening the Start menu.
- Type Control Panel in the search bar, and select Control Panel from the results.
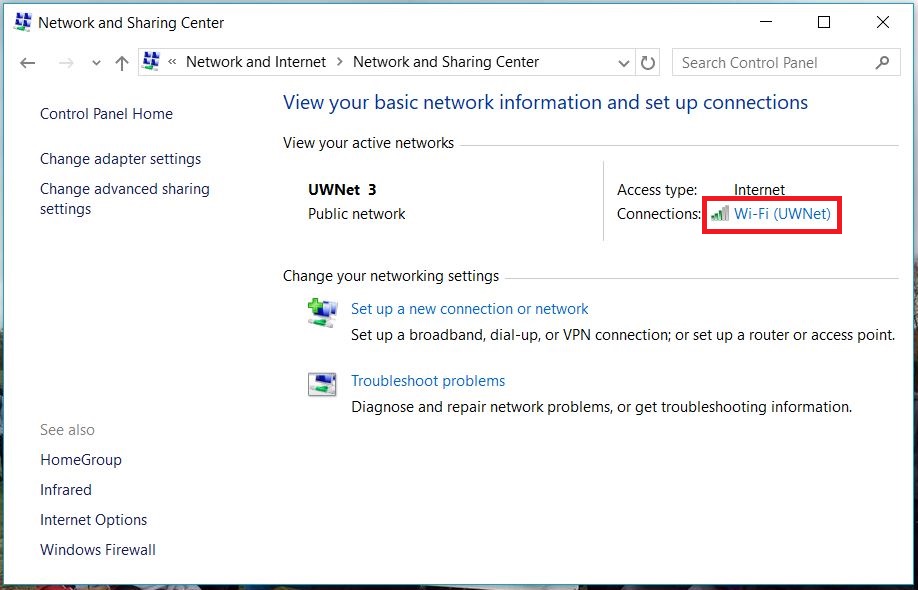
- Under Network and Internet, click on View network status and tasks. This will launch the Network and Sharing Center.
- In the View your active networks section, click on Wi-fi (UWNet) (located after Connections, as shown in the example image below).
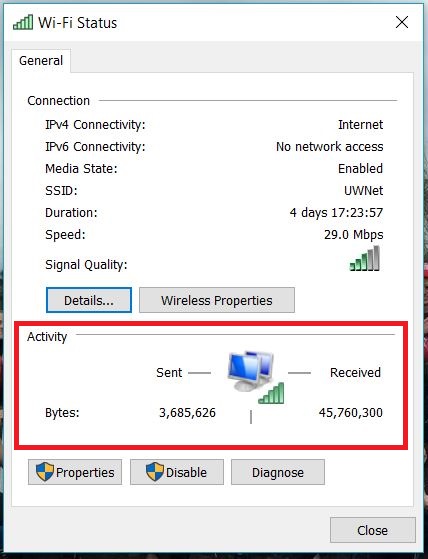
- In the Wi-Fi Status window that appears, locate the Received number (in the Activity subsection, as shown in the example image below). If this number is 0, you may have an issue with your ethernet cable or the network adapter or data jack on your computer.
- To test whether your device can access the server, try pinging a widely used website (such as UW-Madison's home site) by first launching Command Prompt.
- In the Command Prompt window, type ping www.wisc.edu, and then press Enter.
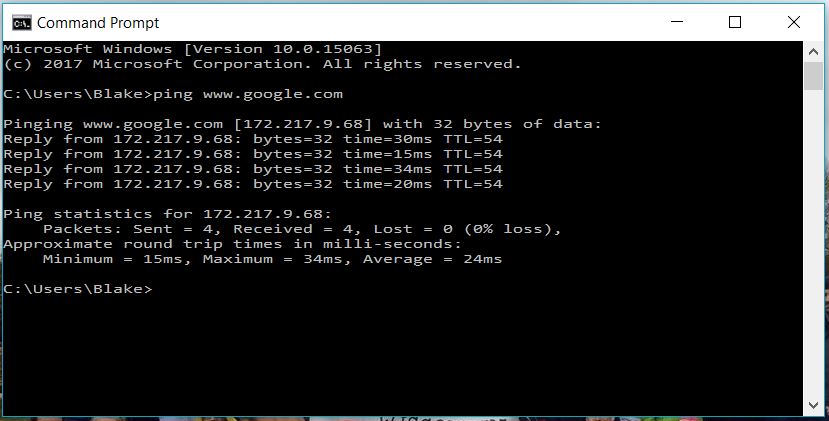
- If the connection is successful, it should appear roughly as shown in the example image below. Otherwise, you may see an Unknown Host or Unable to Resolve error.
- If you are unable to ping UW-Madison's site, try typing ping 144.92.104.243 to test whether the issue is with the DNS servers or a Winsock issue. If the ping connects without error, type or copy and paste the following command as is: netsh int ip reset resetlog.txt
- If that command fails, you should verify the network card is functioning properly by checking the Device Manager. To do so, first open the Start menu.
- Then type Device Manager, and choose the corresponding option from the results.

- Click on the arrow next to Network adapters to expand the subsection, and then confirm that the Ethernet is properly installed.
- If the icon for the network adapter has a yellow exclamation mark, the drivers may need to be reinstalled. If the icon for the network adapter has a downward-pointing black arrow, it may be disabled. To enable the network adapter, right-click on the device, and then select Enable.
Windows 8
- If a user is unable to connect to the network, check for a valid IP address by first opening the Start menu.
- Type Command Prompt in the search bar, and select the corresponding option from the results.
- When the Command Prompt window appears, type ipconfig, and then press Enter.
- If the device is properly configured, this should return a valid IP address (as shown in the example image below).
- Note: Generally, UW-Madison IP addresses begin with a 128.x.x.x, 146.x.x.x, or 144.x.x.x configuration. An IP address of 169.254.x.x or 192.168.x.x is a private IP address automatically assigned by Windows when it is unable to locate a DHCP server on the network.

- If ipconfig returns an invalid or private IP address, the issue may be with the network connection configuration. If so, refer to the following article for more information about properly configuring Windows to connect to the campus network: UWNet - Troubleshooting. If the connection is properly configured, proceed with the following steps.
- Try accessing a common website, such as Google. If the page does not load, go to the next step.
- Check the Activity Statistics by first opening the Start menu.
- Type Control Panel in the search bar, and select the corresponding option from the results.
- Under the Network and Internet section, click on View network status and tasks.

- The Network and Sharing Center window should appear. Under the View your active networks section, click on Ethernet (located after Connections, as shown in the example image below).

- Locate the number of Received bytes in the Activity section, as outlined in red in the example image below. If zero bytes have been received, the issue may be with the network adapter, Ethernet cable, or the jack.

- To test whether your device can access the server, try pinging a widely used website (such as UW-Madison's home site) by first launching Command Prompt.
- In the Command Prompt window, type ping www.wisc.edu, and then press Enter.
- If the connection is successful, it should appear roughly as shown in the example image below. Otherwise, you may see an Unknown Host or Unable to Resolve error.

- If you are unable to ping UW-Madison's website, type ping 144.92.104.243 to test whether the issue is with the DNS servers or Winsock. If this command connects without error, type or copy and paste the following as is: netsh int ip reset resetlog.txt
- Then try renewing the IP address by typing or copying and pasting ipconfig /renew in the Command Prompt and then pressing Enter.
- If the Command Prompt returns with a new and valid IP address, try pinging a common website again.
- If the connection still does not work despite pulling down a valid IP address, see the following article to try commands for Windows: Windows - Quick Fix for Networking Problems.
- If that fails, verify the network card is functioning properly by first opening the Start menu.
- Type Device Manager in the search bar, and select the corresponding option from the results.
- Click on the triangle arrow next to Network Adapters to expand this section (as outlined in red in the example image below). Confirm that the Ethernet is properly installed.

- If the icon for the network adapter has a yellow exclamation mark, the drivers may need to be reinstalled. If the icon for the network adapter has a downward-pointing black arrow, it may be disabled. To enable it, right-click on the device. and then select Enable.
Windows 7
- If you are unable to connect to the network, check for a valid IP address by first opening the Start menu.
- Type command in the search bar, and press Enter.
- When the Command Prompt window appears, type ipconfig, and then press Enter.
- If the device is properly configured, the command should return a valid IP address (as shown in the example image below). See the bullet point notes below for further information about specific IP address formats.
- Generally, UW-Madison IP addresses start with a 128.x.x.x, 146.x.x.x, or 144.x.x.x configuration.
- An IP address of 169.254.x.x or 192.168.x.x is a private IP address automatically assigned by Windows when it is unable to locate a DHCP server on the network.

- If the command returns an invalid or private IP address, the issue may be with the network connection configuration. If so, refer to the following article for more information about properly configuring Windows to connect to the campus network: UWNet - Troubleshooting.
- If the connection is properly configured, try accessing a common website (such as Google). If the page does not load, proceed to the next step.
- Check the Activity statistics by once again opening the Start menu.
- From the menu, select Control Panel from the right-hand side panel.
- Under the Network and Internet section, click on View network status and tasks.
- In the Network and Sharing Center window that appears, locate the View your active networks subsection, and click on Local Area Connection (as outlined in red in the example image below).

- Check the Received number in the Activity section (as outlined in red in the example image below). If zero bytes have been received, the issue may be with the network adapter, Ethernet cable, or the jack.

- Try pinging a common website like Google by opening the Command Prompt once again.
- Type ping www.google.com, and press Enter.
- If the connection is functioning correctly, it should appear roughly as shown in the example image below. Otherwise, you may see an Unknown Host or Unable to Resolve error.

- If you are unable to ping the chosen website, try typing or copying and pasting the following command as is in the Command Prompt window and then pressing Enter to test whether the issue is with the DNS servers or Winsock: ping 144.92.104.243
- If this command ping connects without error, type or copy and paste the following as is in the Command Prompt window, and then press Enter: netsh int ip reset resetlog.txt
- Try renewing the IP address by typing or copying and pasting the following command as is in the Command Prompt window and then pressing Enter: ipconfig /renew
- If the command returns with a new valid IP address, try accessing a common website once more.
- If the connection still does not work despite pulling down a valid IP address, try commands for Windows given in the following article: Windows - Quick Fix for Networking Problems.
- If that fails, verify the network card is functioning properly by first opening the Start menu.
- Right-click on Computer, and select Properties from the pop-up menu options.
- From the System control panel window that appears, click on Device Manager in the left-hand pane (as outlined in red in the example image below).

- Expand the Network Adapters section, and confirm that the Ethernet adapter is properly installed.
- If the icon for the network adapter has a yellow exclamation mark, the drivers may need to be reinstalled. If the icon for the network adapter has a downward-pointing black arrow, it may be disabled. To enable it, right-click on the device, and select Enable from pop-up menu.
Windows Vista
- If a user is unable to connect to the network, check for a valid IP address by first opening the Start menu.
- Type Command Prompt in the search bar, and press Enter.
- Once the Command Prompt window appears, type ipconfig, and then press Enter.
- If the device is properly configured, ipconfig should return a valid IP address (as shown in the example image below). See the bullet point notes below for further information about specific IP address formats.
- Generally, UW-Madison IP addresses start with a 128.x.x.x, 146.x.x.x, or 144.x.x.x configuration.
- Campus Network (Housing) IPs typically use a 10.x.x.x format; see the following article for help with troubleshooting Campus Network Housing issues: [Link for document 76064 is unavailable at this time].
- An IP address of 169.254.x.x or 192.168.x.x is a private IP address automatically assigned by Windows when it is unable to locate a DHCP server on the network.

- If ipconfig returns an invalid or private IP address, the issue may be with the network connection configuration. If so, refer to the following article for more information about properly configuring Windows to connect to the campus network: UWNet - Troubleshooting.
- If the connection is properly configured, try pinging a common website in the Command Prompt (such as Google). If the ping is not successful, proceed to the next step.
- Try accessing a common website, such as Google. If the page does not load, continue.
- Check the Activity statistics by once again opening the Start menu.
- Right-click on Network, and select Properties from the menu.
- From the Network and Sharing Center window that appears, select Manage Network Connections.
- Then double-click on Local Area Connection.
- Under the Activity section, check the number for Received. If zero bytes have been received, the issue may be with the network adapter, Ethernet cable, or the jack.
- Try pinging a common website (such as UW-Madison's site) once more by typing ping www.wisc.edu in the Command Prompt window and then pressing Enter. If the connection is functioning correctly, it should appear roughly as shown in the example image below. Otherwise, you may see an Unknown Host or Unable to Resolve error.

- If unable to ping www.wisc.edu, type or copy and paste the following ping command as is in the Command Prompt window to test whether the issue is with the DNS servers or Winsock, and then press Enter: ping 144.92.104.243
- If this ping connects without error, type or copy and paste the following command as is in the Command Prompt window before pressing Enter: netsh int ip reset resetlog.txt
- Then renew the IP address by typing or copying and pasting the following command as is in the Command Prompt window before pressing Enter: ipconfig /renew
- If the Command Prompt returns with a new valid IP address, try pinging a common website once again
- If the connection still does not work despite pulling down a valid IP address, try commands for Vista given in the following article: Windows - Quick Fix for Networking Problems.
- If that fails, verify the network card is functioning properly by first opening the Start menu.
- Right-click on Computer, and select Properties from the menu that pops up.
- From the System control panel window that appears, click on Device Manager (located under Tasks in the left-hand pane).

- Expand the Network Adapters section, and confirm that the Ethernet adapter is properly installed.
- If the icon for the network adapter has a yellow exclamation mark, the drivers may need to be reinstalled. If the icon for the network adapter has a downward-pointing black arrow, it may be disabled. To enable it, right-click on the device, and then select enable from the pop-up menu.