WiscIT - Example Searches
The Quick Search Builder
In the Quick Search Builder you can create searches that you do frequently and save them so they appear under the "Searching" menu option. Saved searches can be run by clicking on the Searching option and selecting the name of the search that you would like to run. Information on how to create a search can be found here: WiscIT - Creating a New Search. The following are a few useful searches that you can do in Cherwell:
Search Techniques in this Section:
- Creating a basic search in the "Quick Search Builder."
- Writing a "Comparison Clause."
- Changing the sorting order of results.
- Searching open incidents only.
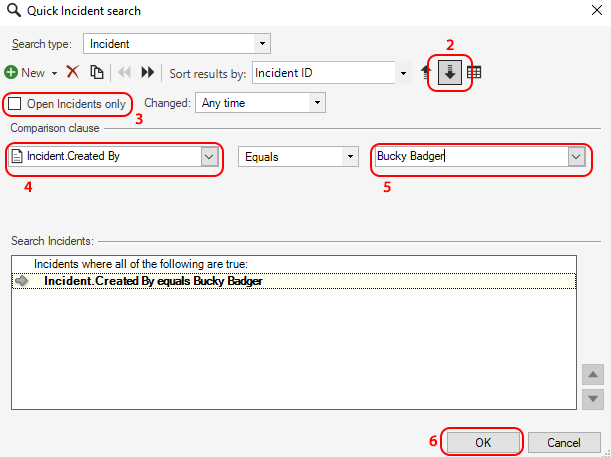
This search finds all incidents that were created by a Technologist. The numbered bullet points correspond to the numbers in the last screenshot.
Creating the search
- Open the "Quick Search Builder."
- Change sorting to descending so that the newest incidents show up first in the search list.
- Have "Open Incidents Only" box unchecked so that closed incidents show up in the search list.
- Change the first empty field under "Comparison clause" to search for incidents that were created by a Technologist. You can do this
by:
- Click on the empty field.
- Expand the Incident fields section.
- Click on Created By.
- The field should contain "Incident.Created By."
- In the next empty field enter the first name and last name of the Technologist that you are looking up.
- Click Ok.
Here are instructions on How to Save Your Created Search in the Quick Search Builder.
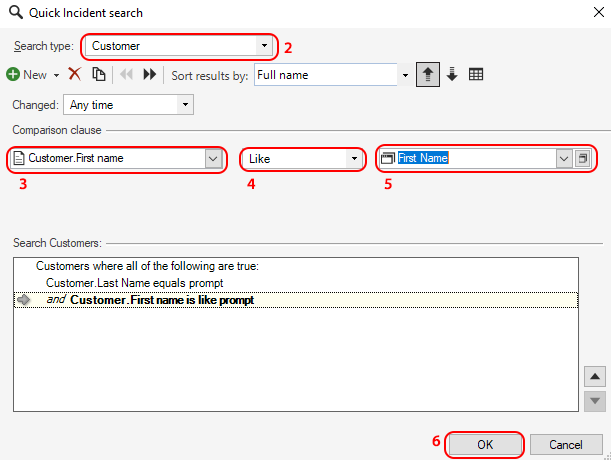
This search creates first and last name prompts that allow the user to search for a customer profile. The numbered bullet points correspond to the numbers in the last screenshot.
Search Techniques in this Section:
- Searching for customer profiles instead of incidents.
- Creating prompts which are useful for saved searches.
- Creating additional comparison clauses.
- Using wildcards as a search parameter.
Creating the search
- Open the "Quick Search Builder."
- Change the "Search type" to Customer.
- Change the first empty field under "Comparison clause" to search for the last name of the customer. You can do this
by:
- Click on the empty field.
- Expand the Customer Fields section.
- Click on Last Name.
Note: Do not click on LAST_NAME or you will not get any results. - The field should now contain "Customer.LastName."
- Change the "Equals" field to Like.
Note: This allows you to use a wild card in your search. - In the empty field just to the right of the "Like" field, you will need to create a prompt that asks for a last
name. You can do this by:
- Click on the empty field.
- Expand the Prompts section.
- Click on New Prompt...
- In the window the pops up, edit the fields as shown in the picture below.
Note: The "%" in the "Default value" field is initially populated in the prompt as a wildcard in case the user does not know part of the customer's name. - Click Ok.
- Then create a new "Comparison Clause" and repeat steps 3 - 5 except use First name in the "Customer Fields" section and change the text
in the prompt to be First Name.
Note: Do not click on FIRST_NAME in the "Customer Fields" section or you will not get any results.
Here are instructions on How to Save Your Created Search in the Quick Search Builder.
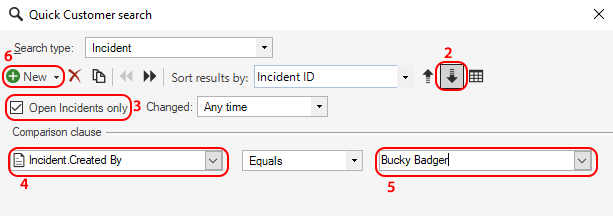
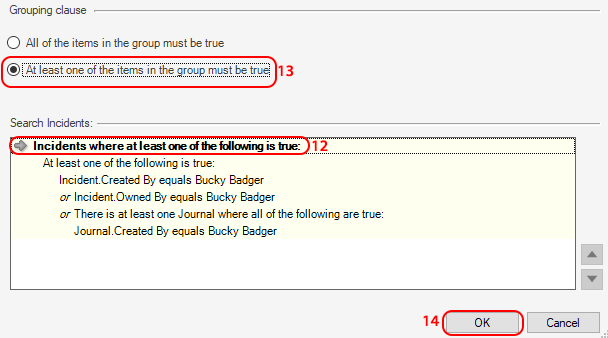
This search finds all incidents that are owned by, were created by, or contain journal notes by a Technologist. The numbered bullet points correspond to the numbers in the last screenshot.
Search Techniques in this Section:
- Creating multiple search clauses.
- Searching journal notes.
- Searching where at least one of the clauses apply instead of all of the clauses.
Creating the search
- Open the "Quick Search Builder."
- Change sorting to descending so that the newest incidents show up first in the search list.
- Select the Open incidents only box if you wish to see cases that are not listed as "closed ."
- Change the first empty field under "Comparison clause" to search for the Technologist who created the incident. You can do this
by:
- Click on the empty field.
- Expand the Incident fields section.
- Click on Created By.
- The field should now contain "Incident.Created By."
- In the next empty field enter the first name and last name of the Technologist that you are looking up.
- Click the New button and select New Comparison Clause.
- Repeat steps 4 and 5 except fill the first empty field with Owned By.
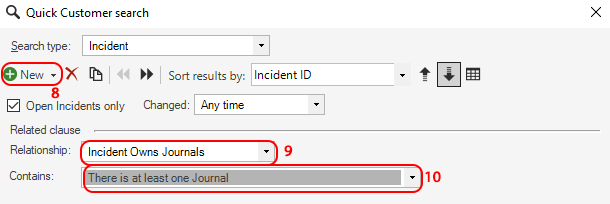
- Click the drop down arrow next to the New button and select Related clause.
- Confirm that the "Relationship" is set to Incident Owns Journals.
- Set the "Contains" field to There is at least one Journal.
- Click the New button and select Comparison clause.
Note: This comparison clause should appear as if it is nested within the previous "Related clause" when viewed within the "Search Incidents" box.- Click on the first empty field.
- Expand the Journal fields section.
- Click on Created by.
- In the second empty field enter the Technologist's name as before.
- Click in the "Search Incidents" box where it says "Incidents where all of the following are true."
- Select At least one of the items in the group must be true.
- Click Ok.
Here are instructions on How to Save Your Created Search in the Quick Search Builder.
Search Techniques in this Section:
- Searching for incidents between a certain date and time.
Creating the search
- Open the "Quick Search Builder."
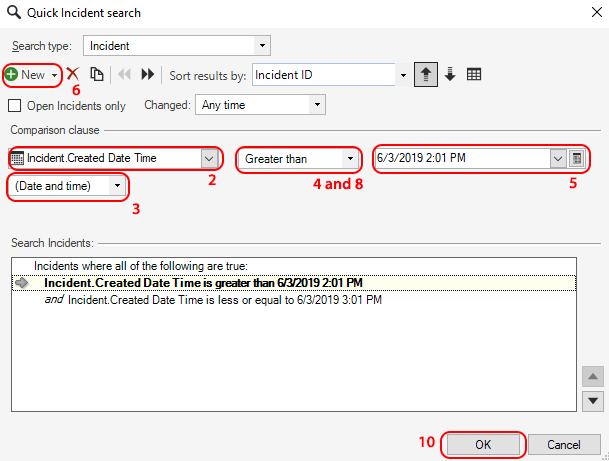
- Change the first empty field under "Comparison clause" to search for incidents that were created at a certain time range. You can do this by:
- Click on the empty field on the left.
- Expand the "Incident fields" section.
- Click on Created Date Time.
- The field should now contain "Incident.Created Date Time."
Note: You can search for date parameters other than "created date." Just look for the calendar icon (as shown below) in the list of options in the "Incident fields" section.
- Change the drop down field beneath "Incident.Created Date Time" to (Date and time).
- Change the "is" field to less or equal .
- Change the empty field on the right so it contains a date and time that is later than the incident that you are looking for. You can do this by:
- Click on the calender icon on the right of the empty field.
- Select the desired date from the calender that popped up.
- Edit the time in the field as you see fit.
- Click the New button and create a new comparison clause.
- Repeat steps 2 and 3.
- Change the "is" field to greater or equal.
- Repeat step 5 except enter a date that is earlier than the incident that you are looking for.
- Click ok.
Here are instructions on How to Save Your Created Search in the Quick Search Builder.
Using the Quick Search Task Pane
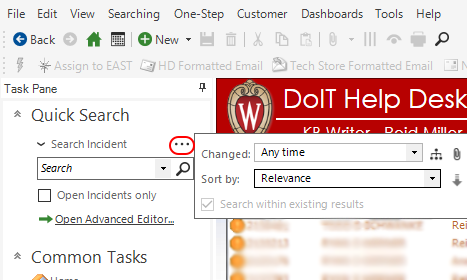
The Quick Search task pane can be used in conjunction with the Quick Search Builder or by itself (only in the desktop client). You can use it to narrow down a search that has already been run by clicking the box called Search within existing results and running a search. The Quick Search task pane; however, can only search the following parameters:
- Incident number
- Customer name
- Description
- Category
When using the Quick Search task pane typically a search parameter will be entered and then searched. Then the Search within existing box is checked and additional parameters are searched until the search provides what the user is trying to find. Additionally, the searches can be sorted by clicking and dragging a column header to the row just above the search results. Searches that require the use of parameters other than the ones listed above will need to be run through the "Quick Search Builder."
How to Save Your Created Search in the Quick Search Builder
- Run a search.
- Click on the Searching menu and choose option Save current search as....
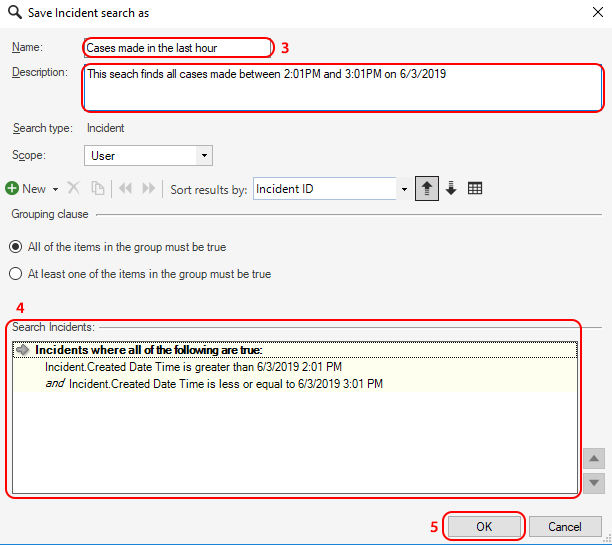
- Fill out the "Name" and "Description" in a way that clearly describes the current search.
- Verify in the "search incidents" box that your search looks correct.
- Click Ok.

