
How to run: pitchAdaptRetest
Special circumstances: part of battery
This experiment is part of the cerebellar battery run in 2022-2023. For controls and patients, it is in the SECOND session.
In this battery, participants come in for multiple sessions and do multiple experiments in a row. As such, this is a bare bones document on how to run the experiment. Procedures for consent, hearing screening, awareness surveys, general equipment set up, and payment are not included in this document. See the documents below for how these procedures are implemented in this multi-study session:
- Protocol for cerebellar battery: controls
- For patients
What's special about this experiment
This is a experiment examining how speakers adapt their pitch in the upward opposite direction in response to downward pitch shifting of their own voice.
At the start of the experiment, there is a calibration phase where the f0 of the speaker is extracted and during which the correct pitch shift paradigm is selected. Extracting the f0 is done before each session and experiment; the latter calibration part is only included before the experiment that is run first; this can either be the adaptation or compensation study, depending on the set_up of the experiment. The algorithm setting is taken from that the first collected data instead, and calibration is not redone.
The adaptation study consists of 1 to 4 sessions that are in a fixed order. In case you select more than one session (4 sessions consists of 1. pitch shifting, 2. control session (unperturbed feedback), 3. pitch shifting, and 4. control session), each phase requires an updated initial f0, because the pitch of the voice often declines or increases naturally, even in the unperturbed sessions.
Prepping for participant
- closed back headphones
- microphone
- Audapter
- FocusRite
Pre-experiment instructions
RESTART MATLAB, because sometimes the pitch shifting paradigm doesn't work correctly if other Audapter scripts have been running.
Enter run_pitchAdaptRetest_expt in the command line and press "enter".
After entering the ID of the participant and their height, there is an option to select the number of sessions.
enter 1: only one session that shifts the pitch downward 1 semitone.
enter 2: first a pitch shifted session followed by a "no shift" session (control).
enter 3: pitch shifted session, control, pitch shifted session.
enter 4: pitch shifted session, control, pitch shifted session, control.
Instructions when running 4 sessions:
"In this experiment, there will be 4 separate sections. Brief breaks between all these sections are included while the experimenter initiates the next part and there will be breaks during the sessions itself.
During each of the sections, you will be reading words off the computer screen and listening to your speech over the headphones.
Don’t hesitate to ask questions or raise concerns at any point."
Instructions when running only 1 session:
"This experiment consists of 1 session. There will be breaks during the session itself.
You will be reading words off the computer screen and listening to your speech over the headphones.
Don’t hesitate to ask questions or raise concerns at any point."
Calibration
Note: part of this calibration section may not occur if this participant has already done pitchComp; in this case, only the initial f0 will be calculated again.
We are first going to adjust our script to match your voice. When you see the word on the screen, read it out loud, just like you would normally say it, only a slightly bit longer. Try to keep the pitch of your voice constant. After you speak, there will be a short break while I calibrate our equipment.
Do you have any questions?"
Calibration instructions
-
The experimenter presses "enter" to start the recording after the instructions on the screen of the participant.
-
Calculate the f0 of the speaker: The participant is instructed to say “Bod” (The instructions also appear on the screen of the participant). You see the waveform in a figure on the experiment computer. You will be prompted ‘Is the recorded sample good?’ at the command line.
-
If the recording looks okay and there is no clipping visible in the figure (see below for an example), press ‘y’ and hit enter.
-
If there is clipping visible in the figure (see below), reduce the microphone gain, then press ‘n’ and hit enter. The whole process will repeat. Repeat as needed until the audio looks good and no clipping is visible in the figure.
-
If there is a problem with the audio signal (participants didn’t speak, said the wrong thing, coughed, etc.), press ‘n’ and hit enter. The whole process will repeat. Repeat as needed until the audio looks good and no clipping is visible in the figure.
-
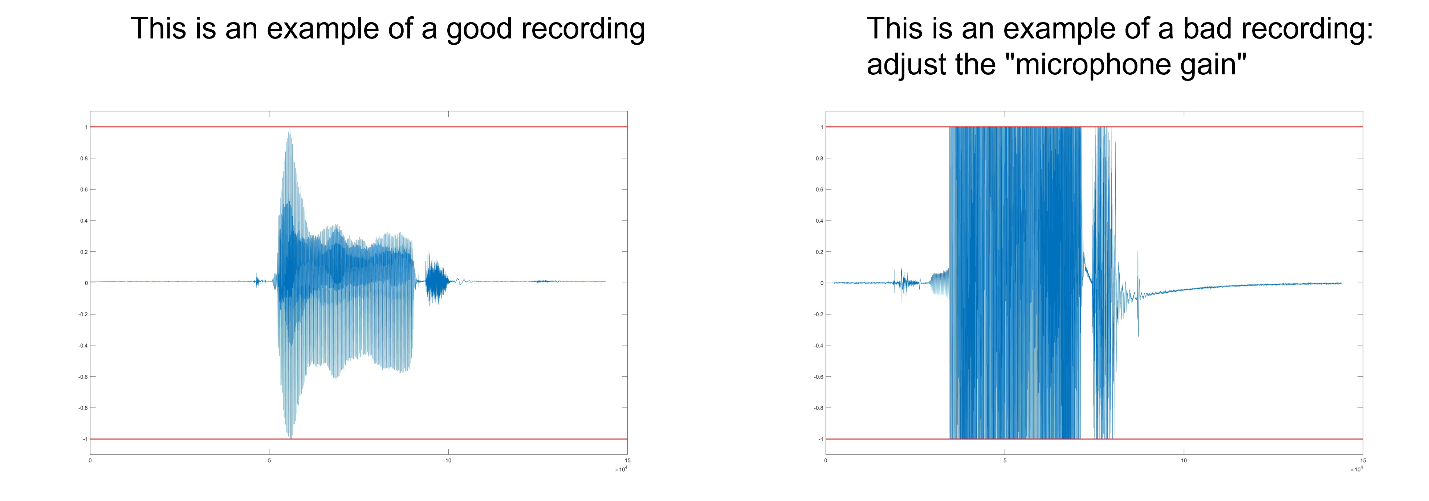
Fig 1: Two examples of speech waveforms. In the image on the left, the waveform falls between -1 and 1 (indicated by the red lines). This is an example of an appropriately set microphone gain. In the image on the right, the waveform is “clipped”—it is cut off by the -1 and 1 boundaries. In this case, the microphone gain needs to be reduced. If the microphone gain is too low (not shown), the waveform will have a very small range. Aim to use most of the range between -1 and 1 without any clipping.
-
Enter a percentage value for upper and lower boundaries for pitch tracking: this value will be used to calculate the upper and lower boundaries for tracking the vocal pitch. The closer the boundaries are to the f0, the better the estimate of the pitch and the better the shifting algorithm works. However, there will be problems if the actual pitch goes outside these boundaries. The exact boundaries that work best depend on the speaker. The default value is 20%, and will work well for most speakers. In this next section, we will set the pitch boundaries. After inspecting 3 figures with this percentage (see below), you can change the value. In most cases, the 20% value is the right one. There might be pitch contours that are not as steady as in the given example and the green and blue lines touch the red lines ones in a while. In this case, the boundaries should be a little bit larger, such as 25% or 30%.
-
You will see a figure pop up like this: IMPORTANT: WHEN THE TOP PANEL DOESN'T SHOW UP/ IS EMPTY, RESTART MATLAB:
-

-
Click “enter” for the next figure that shows the pitch contour, shifted up (green line). Press ENTER again
-
The next slide is the pitch contour, shifted down.
-
Press “enter” again.
-
Confirm percentage: Both the green and blue lines should be contained within the red horizontal borders in all the three figures. if the participant said 'bod,' it's OK if a portion at the end is outside the red borders. If this is the case, enter ‘y’ in the command line, after prompted: 'Is the percentage good?', {'y', 'n'}.
-
Examples of boundaries: In the figures below, you see two bars: one bar shows the pitch shifting output of Audapter; the lower bar shows the extracted pitch from the waveform. These can differ slightly but should not differ to a large extent. The default boundary value is 20% (example pitch shifted up first figure); the 10% boundaries in the example below are too narrow. In case the speaker has an unstable pitch and 20% is too narrow, the boundaries must be adjusted to a larger value, e.g., 25% or 30%. In general, 20 % is the lowest value, and boundaries need only be adjusted to a larger value. The 10% figure is for demonstrating how a too-narrow band looks like. The final disturbances are caused by the ‘d’ in the word “bod” and can be ignored.

-
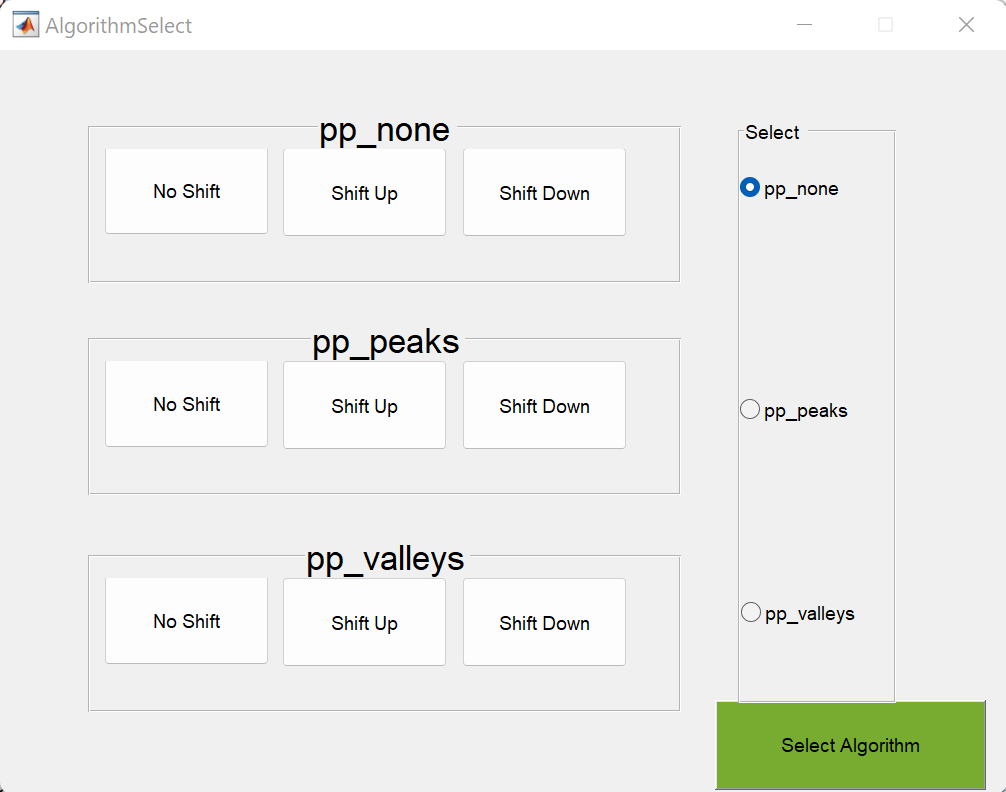
Select pitch shifting manner: Next, the AlgorithmSelect window opens. Here, you select one of three algorithms that Audapter can use to shift the pitch of the voice. There are nine buttons on the left of the screen. When you click on one of these buttons, it will play back an audio sample demonstrating how the participant’s voice will sound with that combination of pitch shifting direction (up, down, none) and pitch shifting algorithm on the right (pp_none, pp_peaks, or pp_valleys). It’s not important to understand the differences in the pitch shifting algorithms; they just indicate certain ways to shift a pitch up and down. Listen to the different algorithms to see which one sounds the most natural. In most cases, this will be pp_none. Then click the radio button on the right corresponding to the best algorithm and click “Select Algorithm”.
Main experiment
Check if the speaker is wearing the headphones. If not wearing:
"Please put the headphones on now." [make sure they are on correctly]
Session 1 and session 2:
"On each trial, you will see the word “bod” appear on the screen, just like before. When you see the word on the screen, read it out loud, just like you would normally say it. Keep the pitch of your voice as constant as possible, so it sounds monotone."
Experimenter can show this by saying "bod" with no pitch fluctuations/monotone.
You will be speaking into the microphone, and you will hear your own voice played back to you through the headphones. During some trials, you will hear only noise and not your own voice. Try to say the word “bod” the same as you would when you can hear yourself. There will be a break every 20 trials. If you need to take a break at some other time, like to cough or take a drink of water, you can press p on the keyboard. You will get some trials to practice."
"Do you have any questions before we start?"
Session 3 and session 4:
"On each trial, you will see the vowel “AH” appear on the screen, just like before. When you see the word on the screen, read it out loud, just like you would normally say it. Keep the pitch of your voice as constant as possible, so it sounds monotone."
Things to keep an eye on:
- Monitor the amplitude level. You may need to adjust the microphone gain if the participant starts talking too loudly or too quietly. You or the participant can press "p" to pause the study and talk to the participant or take an extra break.
- Monitor the boundaries: The boundaries can be adjusted mid-session by pressing "b" and entering a new percentage.
If Matlab crashes
As of 10/24/2022 there is no restart script for this experiment.