
Mass Email Tool Guide - Using the Tool - 1. Setting Up the Worksheet (Excel)
You'll use the 1_MET_Worksheet (Microsoft Excel Macro-Enabled Worksheet) file to set up the contents and settings to be used for the future mail merge and emails. This document will walk you through each step of this file. We'll refer to this file as the MET Worksheet throughout the rest of this guide.
First, open the MET Worksheet from the folder where you saved it in the previous step.

Select image to enlarge - image will open in new tab
You must click the Enable Editing and Enable Content buttons if they're displayed in the top banner after opening the MET Worksheet file. The tool will not work if you do not enable provide this permission!

Select image to enlarge - image will open in new tab

Select image to enlarge - image will open in new tab
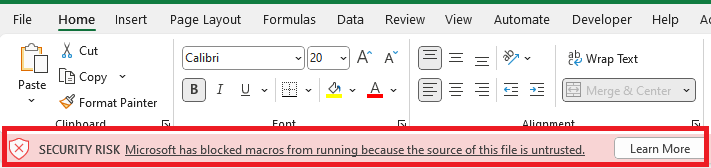
If you see a banner that says "SECURITY RISK Microsoft has blocked macros from running because the source of this file is untrusted":
- Follow the instructions from Microsoft to unblock the file.
- If you don't see the Unblock checkbox, you don't have administrator access for your computer. Please contact your local IT team for help with this step.
- Select the Enable Content button as described above.
Select image to enlarge - image will open in new tab
Overview
The MET Worksheet consists of several tabs that you will use for different parts of the process. Click the tab name to jump to the tab's section on this page.
- Tool Info and Process - this tab contains a summary and basic instructions for using the tool.
- Enter Data - this tab is where you will enter the individual data that will be used to customize memos and emails.
- Email Input - this tab contains the content of the emails that the tool will send.
- Set File Naming - this tab contains the file names and locations for the PDF memos you will create, plus any additional files you want to attach to all emails.
- Mail Merge (read-only) - this tab is populated by the macro in Step 4 and contains the final version of all the information that will be used to create memos and send emails.
- Help - this tab launches this Mass Email Tool Guide in your default Internet browser in case you get stuck. There is no content within the tab itself.
Tool Info and Process
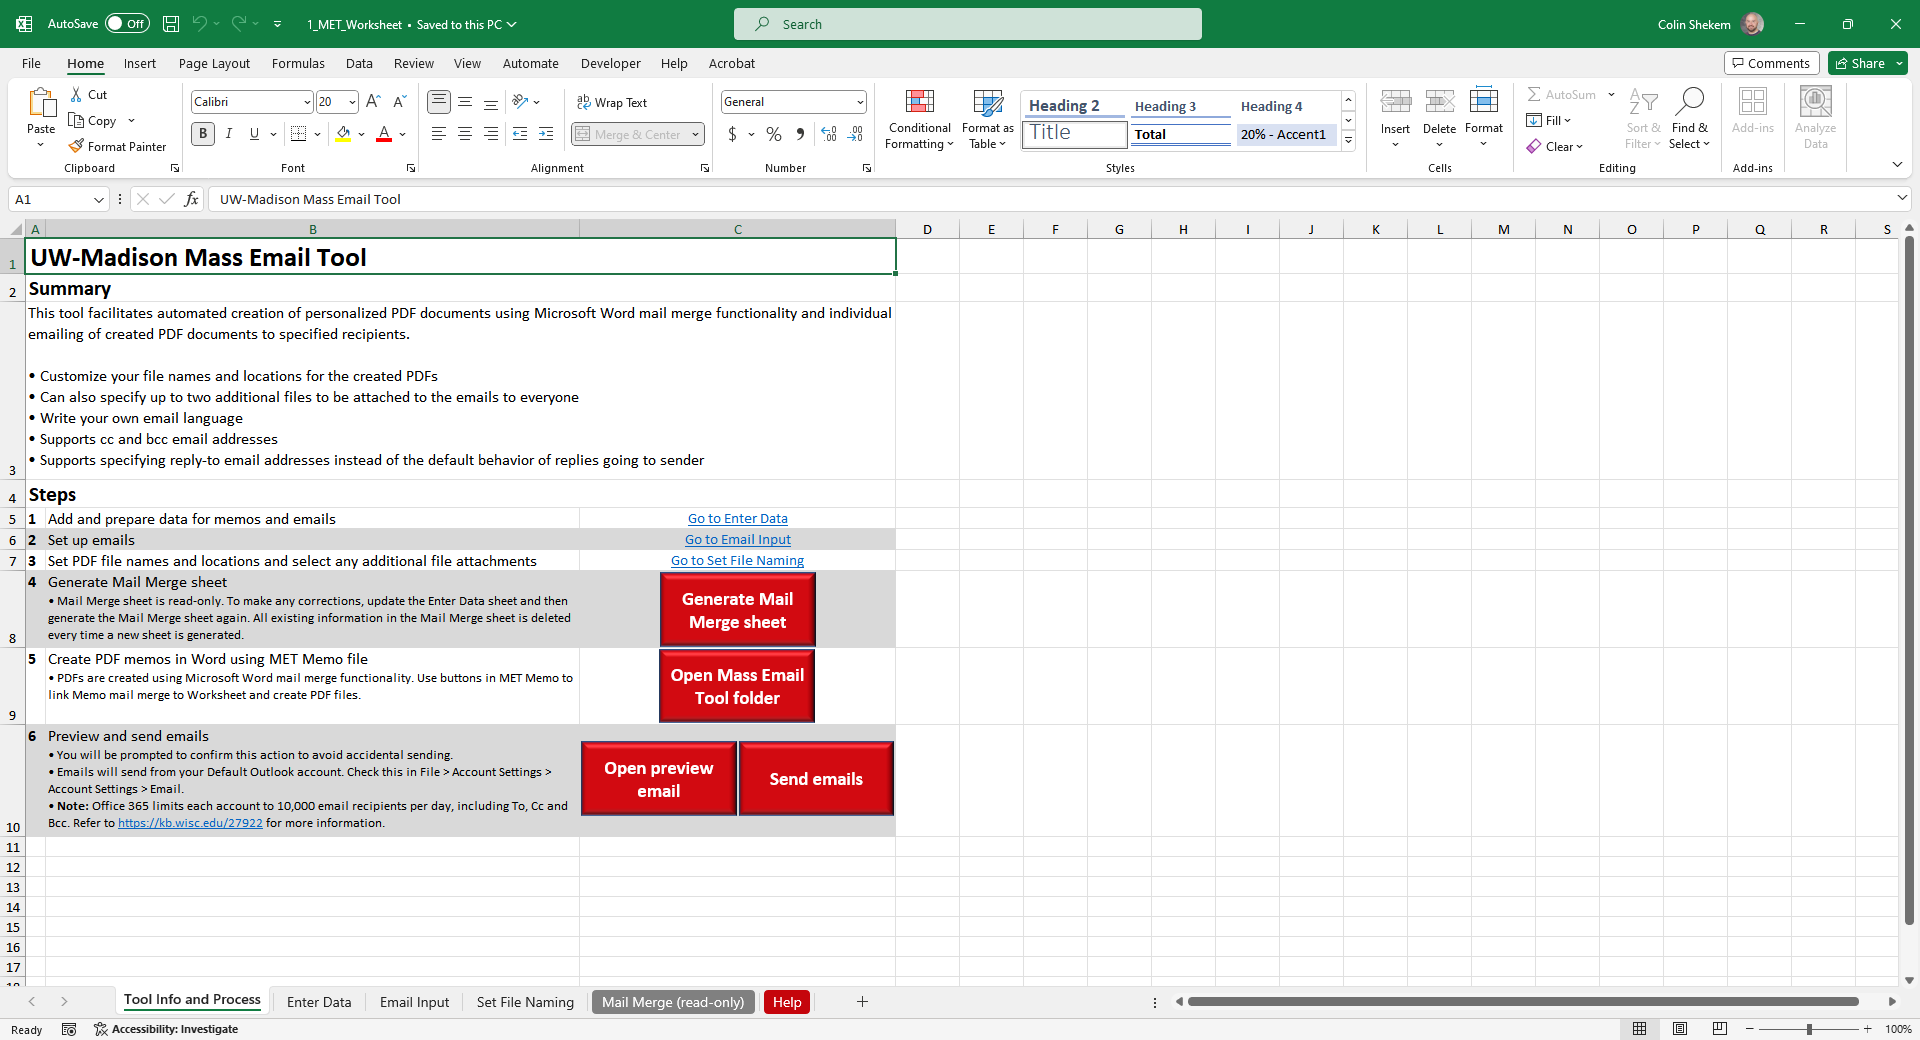
Select image to enlarge - image will open in new tab
The file will open to the Tool Info and Process tab, which provides an overview of the tool and basic steps with links and buttons to complete various tasks.
Enter Data

Select image to enlarge - image will open in new tab
The Enter Data tab is the space for you to organize the data that will be used in the memos and emails you create with the tool. Think of each row as one memo and email. You will determine the exact data used for the memos and emails in future steps.
The Enter Data tab includes several default fields for basic information likely to be used in projects:
- To_Email - email address(es) to be used in the To field for each row's email. Separate multiple email addresses with a semicolon as you would in Outlook - example: HRIS@ohr.wisc.edu; hr_communities_of_practice@ohr.wisc.edu
- CC_Email - email address(es) to be used in the Cc field of the email for each row's email. Separate multiple email addresses with a semicolon as you would in Outlook - example: HRIS@ohr.wisc.edu; hr_communities_of_practice@ohr.wisc.edu
- BCC_Email - email address(es) to be used in the Bcc field of the email for each row's email. Separate multiple email addresses with a semicolon as you would in Outlook - example: HRIS@ohr.wisc.edu; hr_communities_of_practice@ohr.wisc.edu
- Reply_To_Email_1 - email address to direct replies to instead of the sender address. For example, if you will send the emails from your individual email address but you would like replies to be directed to a shared account, enter the shared account address in this field. If the recipient clicks Reply then Outlook will automatically direct the reply to the shared account address. Only enter one email address in this field.
- Reply_To_Email_2 - second email address that will be added for replies in addition to Reply_To_Email_1. Only enter one email address in this field.
- First_Name - the first name of the recipient of the memo/email.
- Last_Name - the last name of the recipient of the memo/email.
- Empl_ID - the Employee ID # of the recipient of the memo/email.
- Empl_Rcd - the Employee Record # of the recipient of the memo/email. If one person will receive multiple memos/emails for different jobs, the Empl_Rcd can be used to ensure unique file names for the memos.
- UDDS - the UDDS (Unit > Division > Department > Subdepartment) code or Department ID of the recipient of the memo/email.
The tool will prevent you from deleting any of the default information to protect the formulas and macros that make the tool work, but you may add additional data fields starting with Column K, Row 4 and hide any of the default columns that you will not use.
Note on formatting
The MET Worksheet places some controls on formatting to make sure data is displayed in PDF memos correctly. Learn more about formatting in the Mass Email Tool.
Email Input
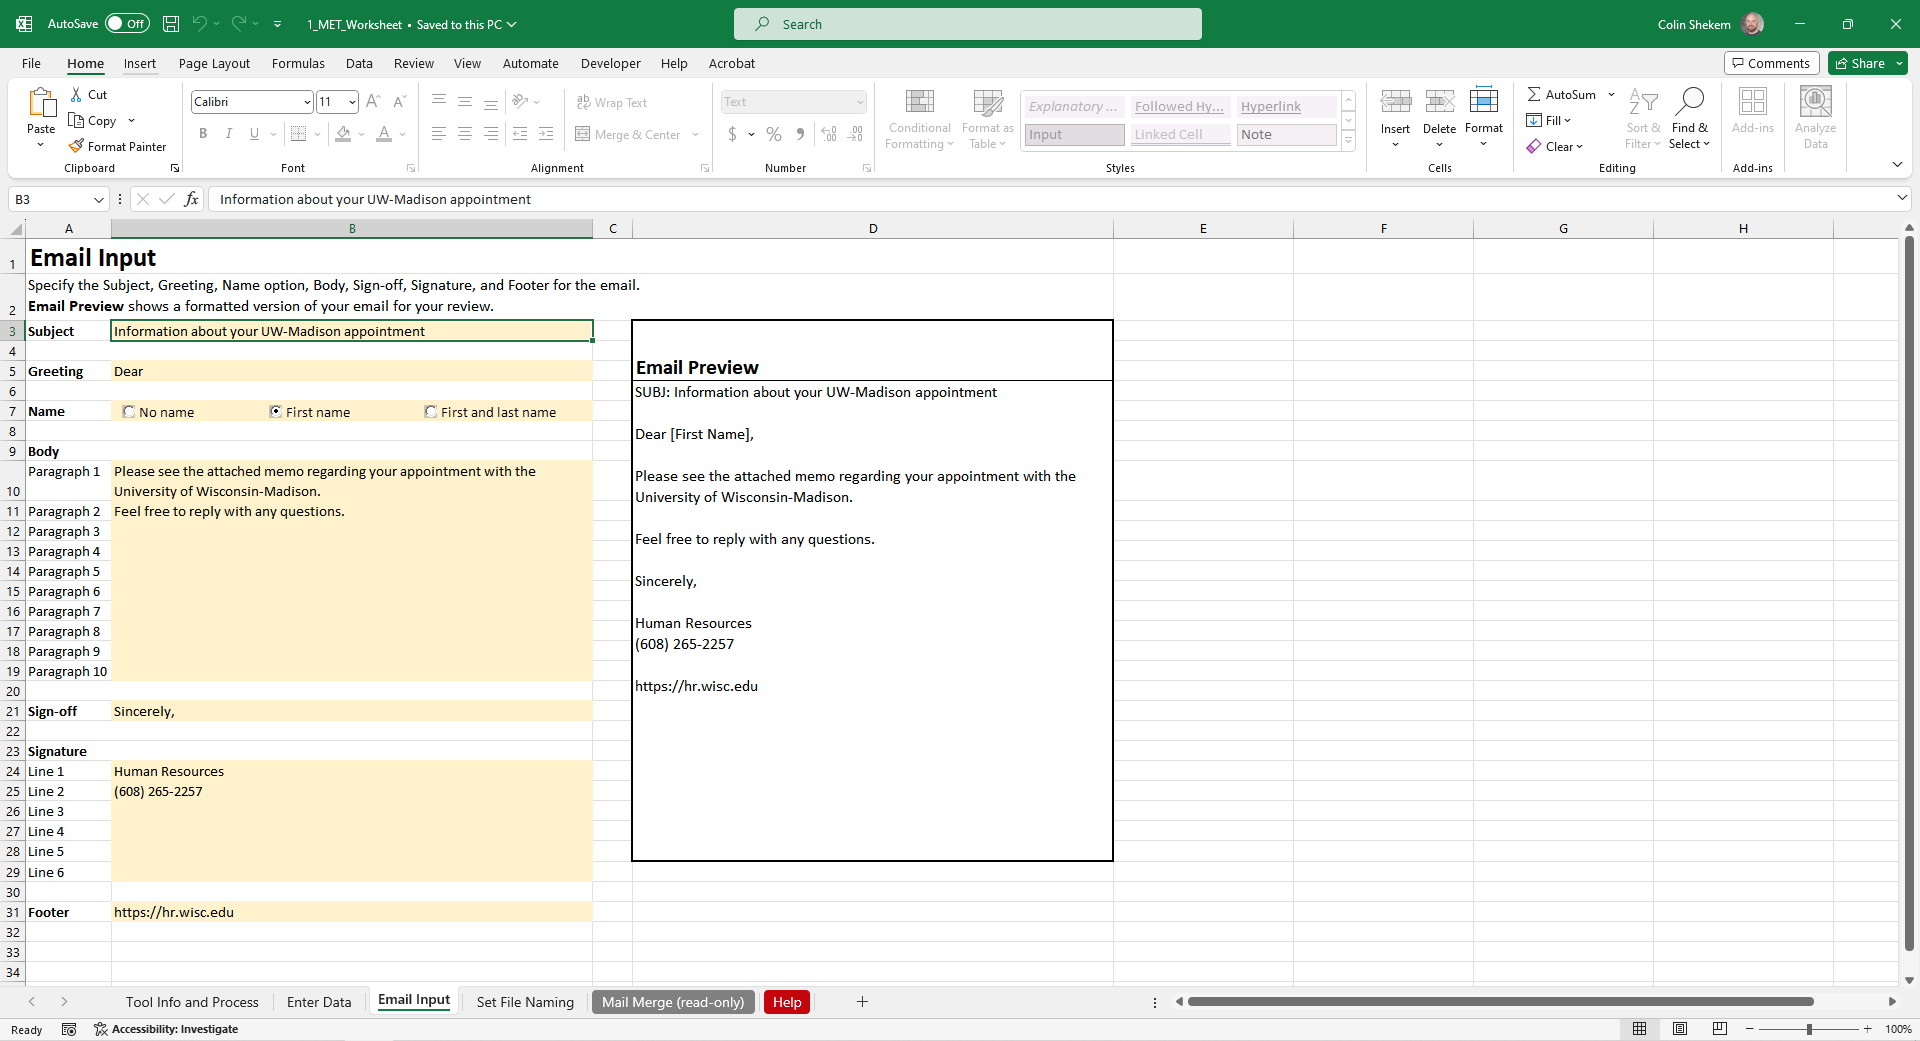
Select image to enlarge - image will open in new tab
The Email Input tab allows you to draft the language for the email that the tool will send. You specify the Subject, Greeting, Name option, body paragraphs, Sign-off, Signature, and Footer. You'll see a preview of your email in the Email Preview cell to ensure it looks correct.
Email limitations
- At this time the only customizable part of the email message is the name in the greeting.
- It is not currently possible to add formatting or hyperlinks to the emails. However, if you enter an email address or URL, most modern email clients will automatically hyperlink them on the recipient's end. We recognize this does not align with accessibility best practices and we will continue to look into ways to make the emails more dynamic.
Set File Naming
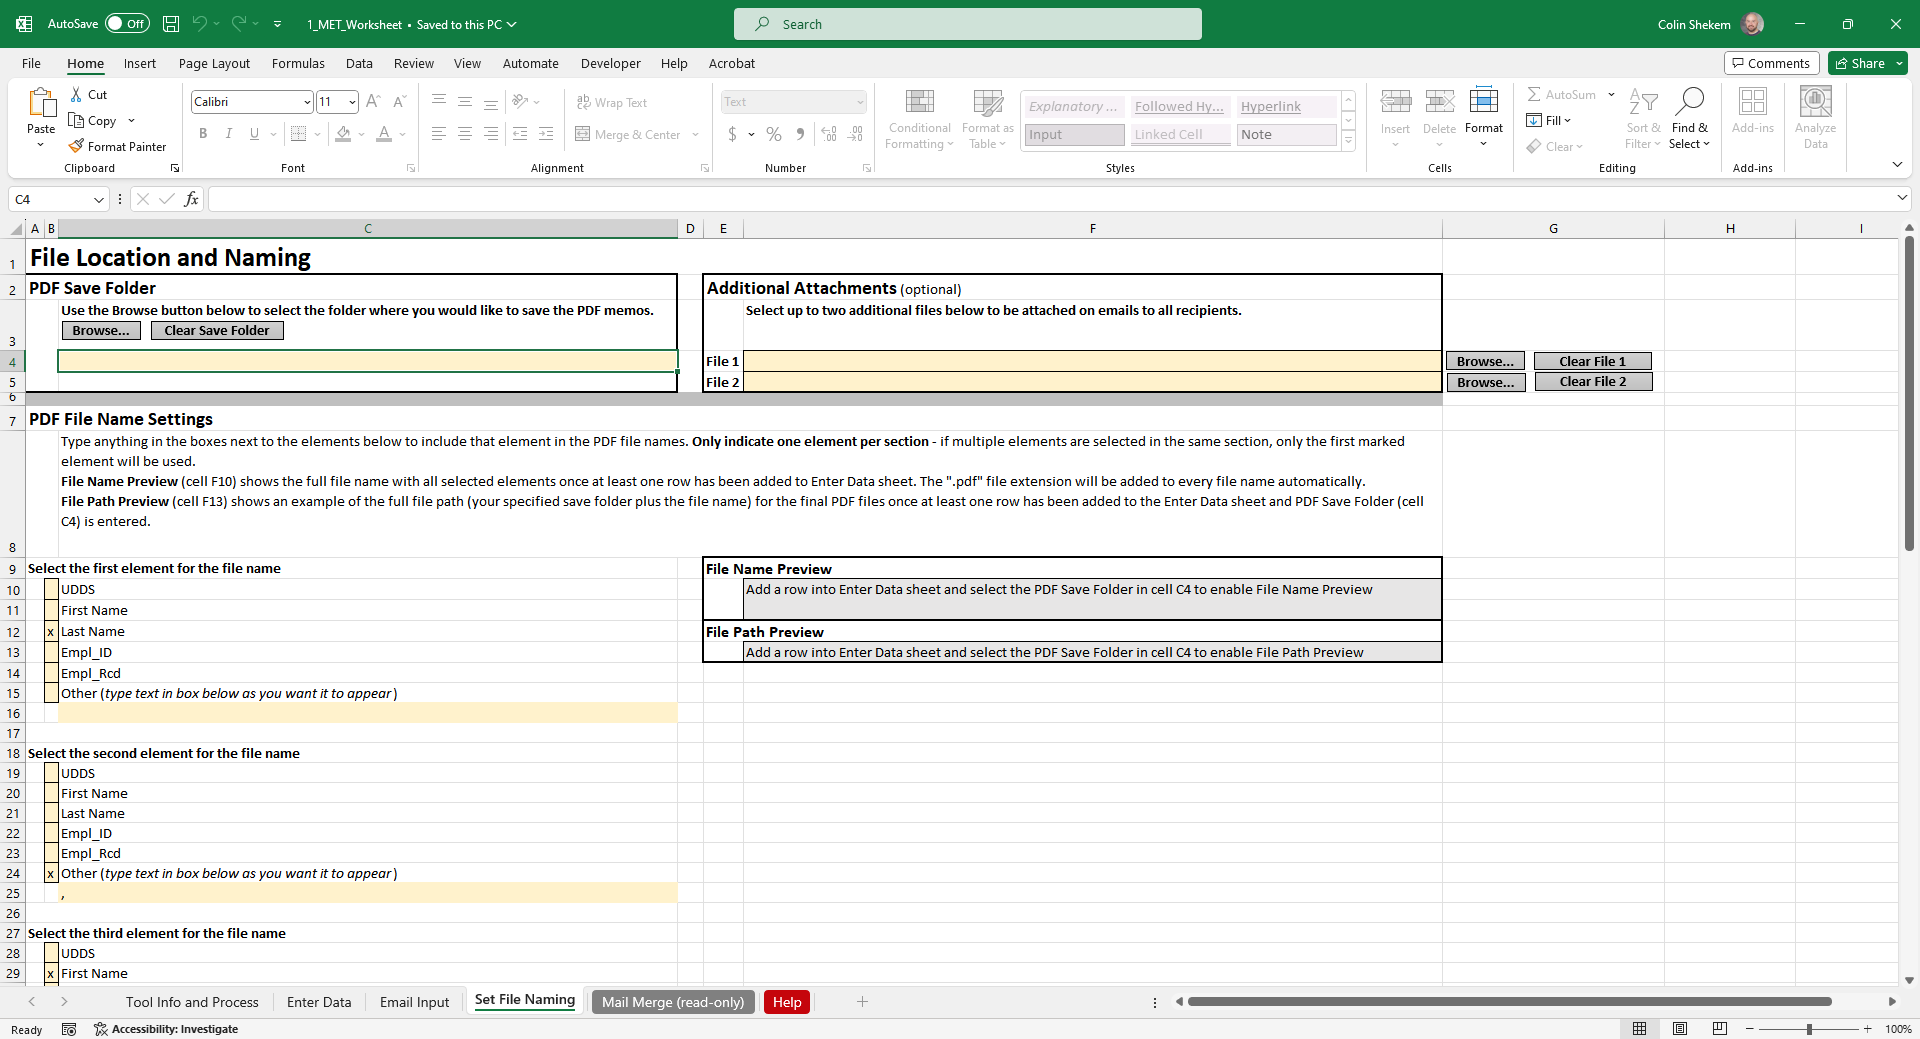
Select image to enlarge - image will open in new tab
The Set File Naming tab is where you will specify the settings for the PDF memo files that the tool will create.
Begin by clicking the Browse... button in the PDF Save Folder section to select the folder where you want your PDF memo files to be saved.
If there are other existing files that you would like to attach to every email, you may select up to two additional files in the Additional Attachments section.
Next you will choose the elements that will be used to create the file names for your PDF memo files. For each element, indicate which data point you would like to use. This data will pull from the Enter Data tab that you filled out previously. Note that the tool automatically adds a space between each element. The File Name Preview shows you an example of what your file names will look like using the first row from the Enter Data sheet. The File Path Preview shows an example of the full file path for your PDF memo files, meaning your selected PDF Save Folder and the file name as you've constructed it.
Important!
You may not use any of the below characters within the file name. These reserved characters have special functions within computer operating systems, so the operating system does not allow them in file names.
< > : " / \ | ? *
If you use one of these characters in your file name, the tool will show an error in the File Name Preview to prompt you to change your settings.

Select image to enlarge - image will open in new tab
Mail Merge (read-only)
Once you have completed setting up the source tabs of your MET Worksheet (Enter Data, Email Input, and Set File Naming), return to the Tool Info and Process tab and select the Generate Mail Merge sheet button. This runs a process to transfer information from your MET Worksheet into the Mail Merge (read-only) tab. This tab cannot be changed manually since the information is entered in specific ways for future processes. If you need to make any changes to the information in this tab, update the information in its source tab and then select the Generate Mail Merge sheet button again; the macro fully deletes the tab and then populates it from scratch each time it is run.

Select image to enlarge - image will open in new tab