
Microsoft 365 (Thunderbird) - Configure Thunderbird
This document explains how to connect to the Microsoft 365 service.
Important: At this time, we have not found a reliable Exchange/Active Sync plug-in which allows Thunderbird to connect to your Microsoft 365 account via this protocol. These instructions will instead configure Thunderbird via IMAP protocol. Which means you will only have access to your mail.
Note: These instructions assume you are running the latest version of Thunderbird.
Configure Thunderbird for Microsoft 365
- Launch the Mozilla Thunderbird application. If you have no other accounts configured, you will be prompted to configure a new account.
- Click on the Display the Thunderbird Menu button (represented by a symbol of three short horizontal lines stacked atop each other).
- Select Options.
- Then select Account Settings.
- Choose Account Actions.
- Click Add Mail Account.
- On the Mail Account Setup window, enter the following information for each text field:
- Your name: Enter your name in this field as you would like it to appear.
- Email address: For a NetID account, format your email address as such: netid@wisc.edu. For a service account, format the email address as such: name_domain@wisc.edu\username_domain.
- Note: If you don't know whether you are configuring a NetID or service account, contact your domain administrator or the DoIT HelpDesk.
- Password: Enter the password associated with the account.
- Click Continue.
- If asked for the domain, enter in your NetID. Otherwise, move on to the next step.
- At this stage of the Mail Account Setup process, Thunderbird should automatically discover and fill in the server settings necessary for your account. See the image below for an example:

- Click Done to confirm the creation of your account.
- This should then take you the Account Settings screen. If you see your newly configured account in the left-hand column, you can now press the X at the top right of the window to exit.
- The setup is complete. Please be aware that email will take some time to sync.
Reconfigure Folder Mapping
Important: Please complete these steps before using your Thunderbird client.
Clients configured using Microsoft Exchange protocol use different folders for some of the primary mail folders. For consistency, we highly recommend that you configure Thunderbird to use these same folders. This will make it less confusing if you also use the web client for Microsoft 365 or a different desktop client that is using the Exchange protocol.
- Right-click on your Microsoft 365 account, and select Subscribe... from the drop-down menu.

- Toggle the boxes to the right of each of the following folders (ensure these specific folder boxes contain a checkmark after toggling): Drafts, Deleted Items, and Sent Items.
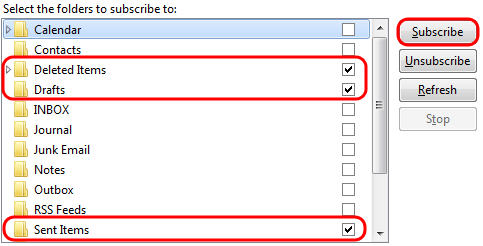
- Click Subscribe.
- Then click OK.
- Now, right-click on your Microsoft 365 account, and select Settings... from the drop-down menu.

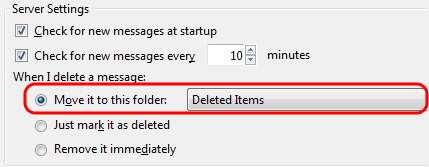
- Under your Microsoft 365 account, select Server Settings.
- Under the section titled When I delete a message:, toggle the option Move it to this folder, and then set the preference box to the right of that to Deleted Items. See the image below for a visual example.
- Under your Microsoft 365 account, select Copies & Folders.
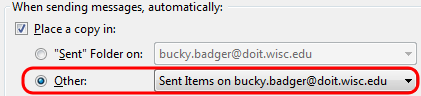
- Under the section titled When sending messages, automatically:, ensure that the box to the left of Place a copy in: is toggled (will display a checkmark).
- Under that, toggle Other, and then set the menu to its right to Sent Items. See the image below for a visual example.
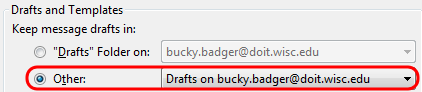
- Under Draft and Templates, find the Keep message drafts in: section. Ensure Other: is toggled, and then set the preference menu to its right to Drafts. See the image below for a visual example.
- Click OK.
- Restart Thunderbird.
Disable the Adaptive Junk Mail Controls
Microsoft 365 server side junk/spam filtering is already enabled for all Microsoft 365 accounts.
- In the left-hand pane, click on the email address you just configured.
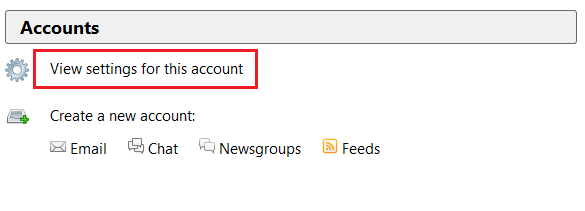
- Then click on View settings for this account.
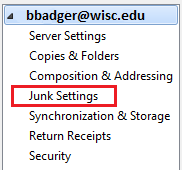
- From the left-hand option panel, select Junk Settings.
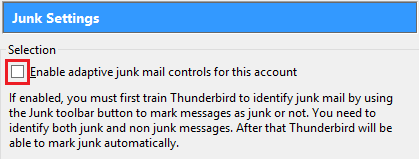
- Uncheck the box for Enable adaptive junk mail controls for this account.
- Click OK.
Configure Access tot he Campus Directory (Whitepages)
Remember: Thunderbird cannot access the Microsoft 365 Global Address List (GAL). Therefore, you may still need access to the Campus Directory (Whitepages) to find the person you are searching for.
See the following article for instructions on how to configure the Campus Directory (Whitepages) within this client: Directory Search (Windows) - Configure Thunderbird for White Pages.