WiscIT - How to Create a One-Step (Tutorial)
One-Steps are groups of actions that can be run in WiscIT in order to simplify a repetitive or complicated actions. Commonly, they are added to a toolbar for ease of use in normal workflow processes. Pre-existing one-steps exist and can be added to a toolbar following these steps: WiscIT - Adding a One-Step to a Toolbar
This document outlines the creation of new one-steps with no background knowledge
Purpose and Planning
One-Steps are powerful tools. Some examples of what One-Steps can do are send emails (automatically, or by opening a template that can be edited before sending), assign incidents to different teams or individuals, update repetitive information on business objects, and much, much, more.
We suggest that before you attempt to create a One-Step, that you lay out a clear plan of what you want it to do in the end. If it seems complicated, or beyond the scope of what is covered in this guide, feel free to send the WiscIT Team an email at wiscit@doit.wisc.edu and an administrator would be more than happy to assist you.
1. Modifying Business Objects
A business object is something like an incident or change request that contains stored information. A majority of one-steps modify a business object's fields, such as which team or team member it is owned by, or the needs attention flag. Let's create a one-step and take a look at how this can be done.
- Select "One-Step" option on the top left corner of the WiscIT window. In the dropdown, select "One-Step Manager". This will open up a folder that one-steps are stored in. On the left side of the window, you can navigate the folder system, which have different permission levels. For the purposes of this guide, select the "User ([your NetID])" folder. On the top right corner of the file window, make sure that you have the proper association set. As we will be demonstrating with incidents, set it to "Incident". Press either the green plus button, or right click and select "New".
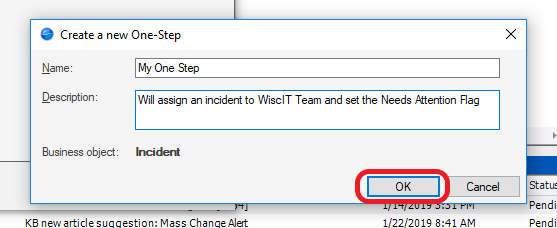
- A prompt will appear asking you to name and describe your One-Step. It is a good idea to give it a descriptive name and description so that it can be easily found in the future.
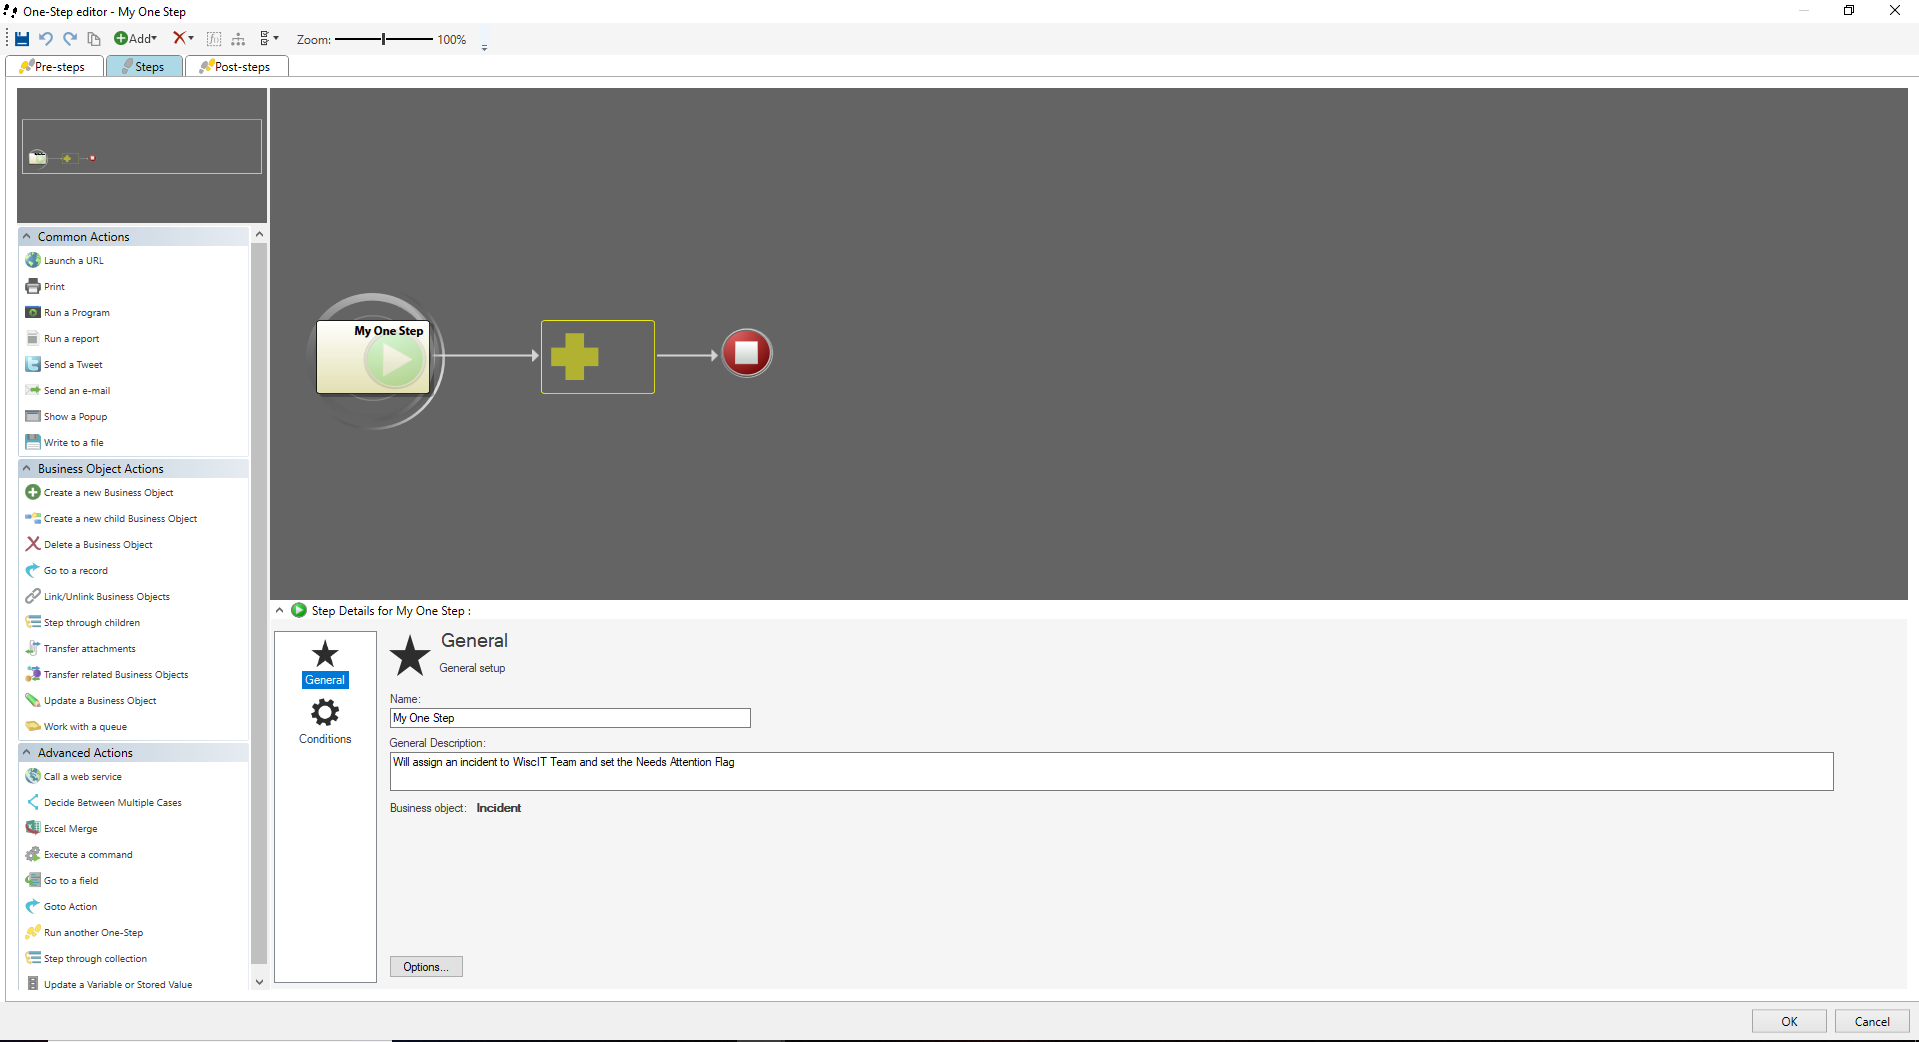
- The One-Step Editor will appear.
- In the middle of the screen is the action flow, which proceeds in the direction the arrows point.
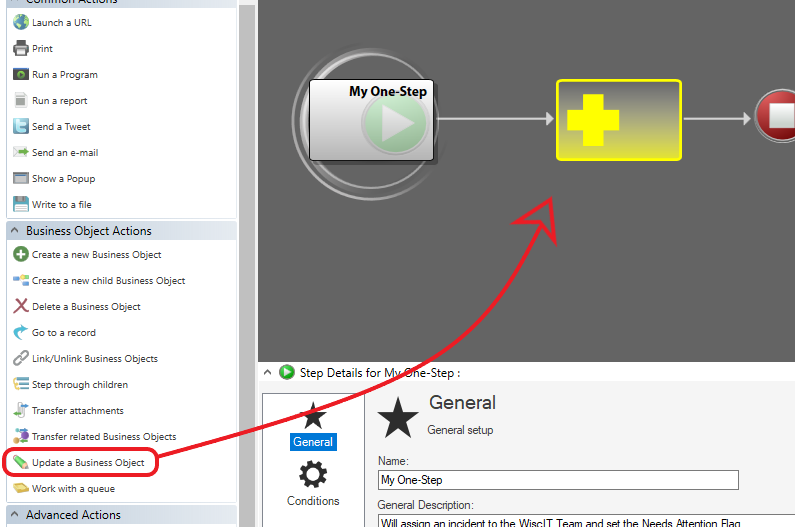
- On the left side are the actions that you can click and drag to the action flow in the middle of the screen.
- Clicking on the actions that you add to the middle will bring up the step details for that action on the bottom, which can change depending on which action you add.
- In order to update the fields of an incident, click and drag the "Update a Business Object" action on to your action flow.
- The Step Details on the bottom should now have updated to the action you have just added. If you want to edit the details of any other steps, simply click on them in the action flow.
- In order to actually make the action change some fields, select the "Fields" tab on the left side of the step details. A list of all the fields for incident should populate. At the top of the list, there is a search bar that can be used to locate a specific field. Type in Owned By, and any fields that contain that phrase will appear.
- Now that we know how to update fields on the Business Object, it's a matter of determining which fields should be updated. For our example of the one-step changing Incident ownership to the WiscIT Team, we will need to consider:

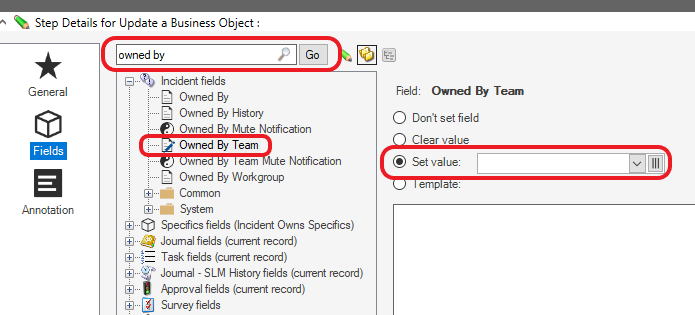
- Owned By: If we are sending this to another team that we aren't a Team Member of, we will need to clear ourselves as owner.
- flag_important: If we send this to another team and it is not flagged as important, it may not show up in their "Incidents Needing Attention" list
- Status: If we send this to another team, does it matter if it is in "Troubleshoot", or should it be set to "Escalate" instead?
NOTE: You can click the little pencil icon to see which fields you have edited for the given search criteria.
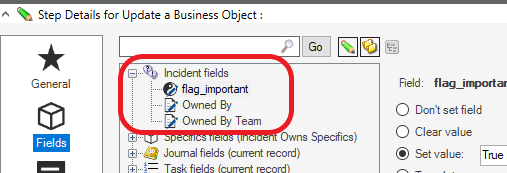
- We can test it out on a test incident to see if it works by pressing "OK" in the bottom right corner, and then running the one-step from the One-Step Manager. The Team ownership should change accordingly when it is run.
- It may be a good idea at this point to consider having a journal note added automatically, as maybe the team we are sending it to doesn't like having random Incidents assigned to them without explanation. Part 4 of this tutorial goes in-depth on how to accomplish this.
- In addition to a journal note, a confirmation pop-up may be nice to have as well, informing the user that the action has been completed. To do this, simply click and drag the "Show a popup" action into the action flow at the end, give it a caption, and fill the contents with a message. The one-step should now display a pop-up.
2. Logic, Variables, and User Input
Logic can be used within a one-step to make decisions based on field values, stored values, variables, and user information. Some examples of when logic are used are:
- Decide Between Multiple Cases
- Goto Action
- Action Conditions
- In order to demonstrate using logic and user input, configure your one-step to look like the image below
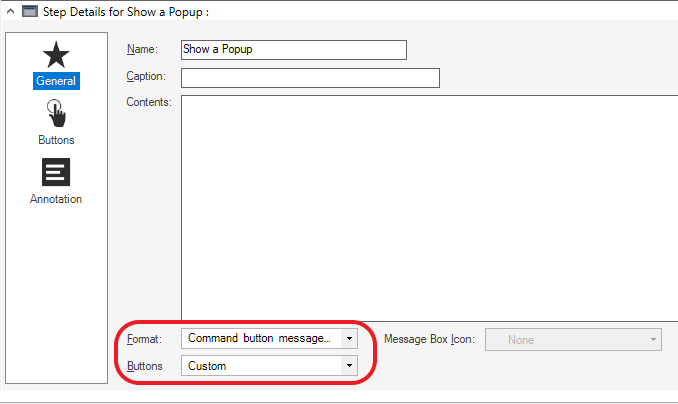
- Variables can easily be stored by using the pop-up step. While pop-ups are generally used to display information to the user they can also store the value of what button a user clicks. Click on the first "Show a popup" step and select the "General" tab. Then, change the "Format:" dropdown to "Command button message box". The "Buttons" dropdown should automatically change to custom.
- Write the question that you want to prompt the user with in the "Contents" field, and the caption of the message in "Caption" field. Then select the "Buttons" tab on the left side.
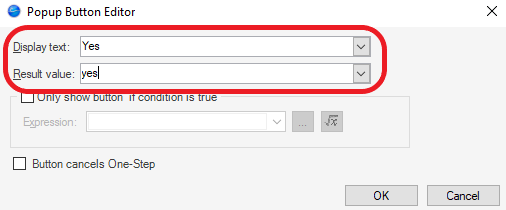
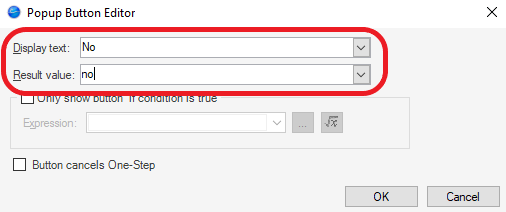
- Click the "Add..." button to add different buttons that the end-user will be able to select. The "Display text" field is what will appear to the user, and the "Result value" is what we will store in the variable. There is also an action condition that can be added so that the button will only appear in certain circumstances, but this will be ignored for now. For this tutorial make simple yes/no buttons as demonstrated below.
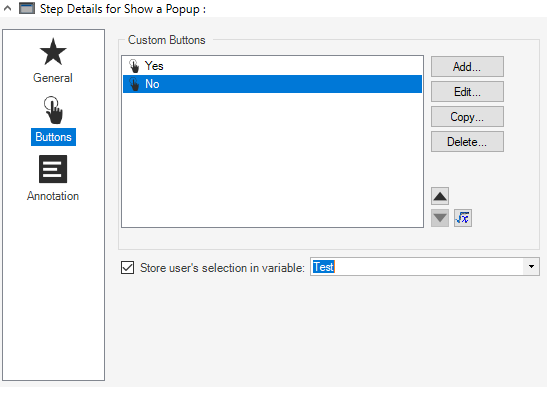
- Select the checkbox for "Store user's selection in variable", and give your variable a name. If it is correctly configured, it should look like the image below.
- Now that the variable has been setup and the user can either answer yes or no to the question, we can finish the "Decide Between Multiple Cases" step. This step is a little complicated, as it isn't obviously clear how it works. The branches that come off of the step are "Case 1", "Case 2", and "Default" starting from the uppermost branch to the lowermost. The default branch is always indicated with an arrow symbol.
- To configure which branch will proceed, select the "General" tab on the step, and click on "Case 1".
Then, on
the far right of the screen, select "Edit Case". This will bring up the Action Condition configurator
which
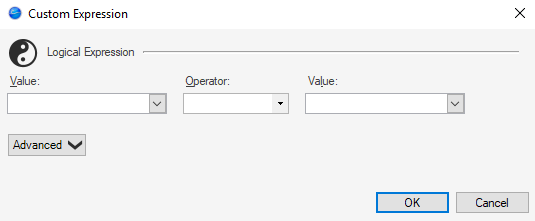
we can setup by pressing the blue expression icon. The expression editor will now appear.
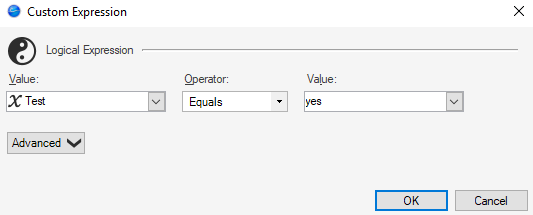
Logical expressions are able to return either true or false back to the one-step. Whether it is true or false depends on which condition that is configured. For case 1 we will configure it to see if the variable we set earlier equals "yes". If so, the one-step will proceed down this branch. If not, then the one-step will check the next case until it reaches default.
- For the left hand side, use the dropdown to find the variable that we created earlier. On the right hand
side, type in "yes" (as this is what was setup to be stored in the variable if the user selected "Yes".
Note that this is case sensitive.
- Click "OK" twice, and you should see that Case 1 has the expression listed. Use these same steps to configure Case 2 for "no".
- Now that the branch is setup, you can fillout the remaining prompts on your one-step to give a message to the user. A good idea would be for them to display "Yes" and "No", respectively.
- You should now be able to make one-steps that use branching logic!

Additional Notes on Logic
Fields of a current object can also be used in order to make logical decisions. Instead of prompting the user for input, instead the expressions in the "Decide Between Multiple Cases" can use fields without needing variables at all.
Double Clicking on a step will bring up action conditions, which are conditions that must be met in order for the step to be run. If the conditions are not met, the step is skipped and will go on to the next step.
3. Email and Text-Modification
Emails and Text-Modifiers are important parts of processing text in an incident. This step will detail how to display information, as well as how to easily use this formatting to send emails to customers
- Create a One-Step that has the "Send an Email" step
- In the upper-most settings, make sure that the icon for "Let user edit email before sending" is checked. This will allow the user to modify the message before sending.
- Right Click on the box next to the "To..." field. This will bring up a menu of fields. Select the + dropdown next to "Customer (Incident Link Customer)" if it is not already selected.
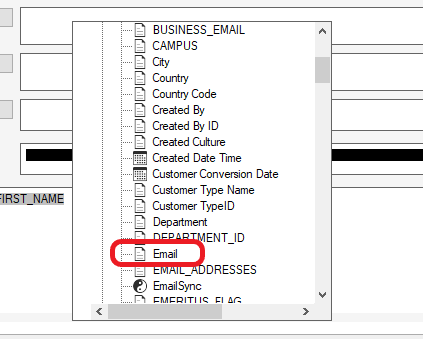
- Select the "Email" field from the list of Customer fields. Whenever the One-step is run, it will pull the email address of the incident that is currently displayed.
- For the subject line, type the word "Incident: ", and then right click and add the Incident.Incident ID field similar to how the Customer.Email field was added previously.
- In the body of the email, we may want to start out by formatting the customer's name. In WiscIT, customer names are typically stored in capital letters, meaning that if we simply use the customer's first name, the email would say "Hello BILL,". To combat this, right click the body of the email and select the "Customer.FIRST_NAME" field similar to how we added "Incident.Incident ID" and "Customer.Email" above.
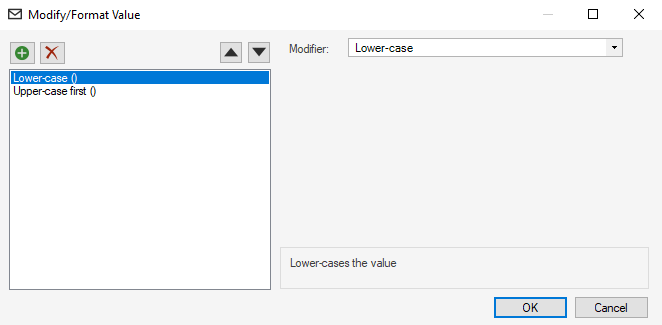
- Once you have added the field, right click on it and click "Modifiers". You can press the green plus button to add a modifier. In order to make a name appear as normal, first add a modifier for "Lower-case". Then add a modifier for "Upper-case first".
- Once you finish writing your email, you should be good to start sending an email from this one-step. Go ahead and save it and try it on an incident that you are the requestor of to see if it works. To add more functionality, or to make it change fields after sending an email, see the first part of this document.

Additional Notes on Email and Text-Modification
WiscIT can spoof any email address that you enter into the "From:" field. A common strategy is to right click the "From" field, press the + button to the left of System Functions, and select CurrentUserEmail(). Then, emails sent will appear as being from you.
See Also
- WiscIT - One-Step Overview
- WiscIT - Run Another One-Step (One-Step Configuration)
- WiscIT - Go To Record (One-Step Configuration)
- WiscIT - Create a New Business Object (One-Step Configuration)
- WiscIT - Update a Business Object (One-Step Configuration)
- WiscIT - Send an Email (One-Step Configuration)
- WiscIT - Update a Variable or Stored Value (One-Step Configuration)
- WiscIT - Create a One-Step
- WiscIT - Accessing the One-Step Manager
- WiscIT - Help Desk Common One-Steps
- WiscIT - Expressions and Logic

