Windows 10 and 11 - How to Take Screenshots (Images, Videos, and Text)
Standard Screenshot (All Windows Versions)
All versions of Windows have the built-in screen capture feature allowing you to capture either the entire screen or a single active window. The two options are detailed below:
Entire Screen
-
Press the Print Screen (sometimes marked as Prt Sc or Prt Scn) key on the keyboard (generally located in the top right-hand corner) to capture an image of the entire screen and store it in the Windows clipboard.
Note: Only one image can be stored at a time.
Single Active Window
-
Press Alt + Print Screen (sometimes labeled as Prt Sc) to capture an image of only the active window and store it in the Windows clipboard.
-
In Windows 10 and older, you can take a screenshot that automatically saves as a file by pressing the Windows logo button + PrtSc button.
-
On a tablet, hold the Windows logo button + Volume down button. By default, the screenshot will save to the local address C:\Users\Username\Pictures\Screenshots.
Note: Only one image can be stored at a time.
Transferring or Saving a Screenshot
-
Ensure that the desired image has been stored in the Windows clipboard via either standard screen capture or screen capture using the Snipping tool (instructions for the latter are listed in the panel below).
-
Open a word processing program (e.g., Microsoft Word, Microsoft Publisher, etc.) or an image manipulation program (e.g., Adobe Photoshop or Microsoft Paint).
-
Transfer/extract the screenshot by selecting Paste from the Edit menu or pressing Ctrl + V.
Image Screenshot Using the Snipping Tool (Windows 10)
In Windows 10, the Snipping Tool can be used to capture a screenshot of anything on your screen. You can then annotate, save, and share the image as well. Visit Microsoft's Snipping Tool support page for instructions on how to annotate, share, crop, rotate, enlarge, print, or delay your snip.
Snipping Tool Types
There are four types, or styles, of the Snipping Tool:
- Free-form snip: Draw any shape around an object.
- Rectangular snip: Drag the cursor around an object to form a rectangle.
- Window snip: Select a window (e.g., a dialog box) that you want to capture.
- Full-screen snip: Capture the entire screen.
Note: When you capture a copy of your screen or part of your screen, it is automatically copied to the Snipping Tool window where you can make changes, save, and share.
Open Snipping Tool
There are three ways to open the Snipping Tool:
- Select the Start button, enter snipping tool, then select Snipping Tool from the results.
- Press the Windows logo key + Shift + S.
- Press Print Screen (PrtSc).
Take a Screenshot with the Snipping Tool
- Open your Snipping Tool (see the instructions directly above).
- In the Snipping Tool box, select the down arrow next to the Mode button; then choose the style of snip you want (the four types are listed at the top of this panel).
- After choosing the kind of snip you want to use, the entire screen will change slightly to grey.
- Select any area of the screen that you want to capture.
- The screenshot should automatically open in a new window.
- To save, click the File button, select Save As, and save the file with the name and local address of your choosing.
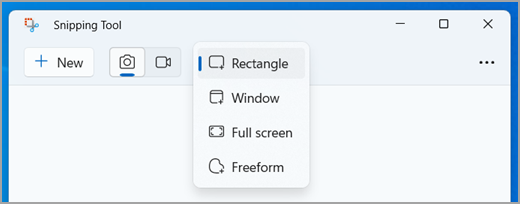
Image & Video Screenshots Using the Snipping Tool (Windows 11)
In Windows 11, the Snipping Tool can be used to capture an image or video screenshot of anything on your screen. You can then annotate, save, and share the image or video as well. Visit Microsoft's Snipping Tool support page for instructions on how to annotate, share, crop, rotate, enlarge, print, delay, or add audio/captions to your snip.
Snipping Tool Types
There are five types, or styles, of the Snipping Tool:
- Free-form snip: Draw any shape around an object.
- Rectangular snip: Drag the cursor around an object to form a rectangle.
- Window snip: Select a window (e.g., a dialog box) that you want to capture.
- Full-screen snip: Capture the entire screen.
- Video snip: Capture a video clip of any part of the screen.
Note: When you capture a copy of your screen or part of your screen, it is automatically copied to the Snipping Tool window where you can make changes, save, and share.
Open Snipping Tool
There are four ways to open the Snipping Tool:
- Select the Start button, enter the words "snipping tool" into the search bar, and then select Snipping Tool from the results.
- Press the Windows logo key + Shift + S for a static image snip.
- Press Print Screen (PrtSc) for a static image snip.
- Press the Windows logo key + Shift + R for a video snip.
Take an Image Screenshot with the Snipping Tool
- Open your Snipping Tool (see the instructions directly above).
- In the Snipping Tool box, select the Mode button; then choose the style of snip you want (the five types are listed at the top of this panel, though video snips should follow the separate set of instructions below).
- After choosing the kind of snip you want to use, the entire screen will change slightly to grey.
- Select any area of the screen that you want to capture.
- The screenshot should automatically open in a new window.
- To save, click the File button, select Save As, and save the file with the name and local address of your choosing.
Take a Video Screenshot with the Snipping Tool
- Open your Snipping Tool (see instructions inside this panel).
- In the Snipping Tool box, select the Record button.
- Then click New.

- Once you select the area of the screen that you want to capture, press Start.
- When you are finished recording, press Stop.
- You can then do one of two things:
- You can save the recording as it is by 1) clicking Save As, 2) typing a file name, location, and type, and 3) selecting Save.
- You can edit the video snip by selecting Edit in Clipchamp to work with the clip in the Clipchamp video editor.