
EUC - Solstice Pod User Documentation
For technical support please contact the LTG HelpDesk using this form or calling (608) 262-8880
Installing the Application
- Download the software:
- Windows: go.wisc.edu/Connect4Windows
- Mac: go.wisc.edu/Connect4Mac
- Android/iOS: search Solstice in the Google Play Store or App Store
- Open the downloaded application
- If you receive a security prompt click the Allow Access button on Windows or Open on Mac
- The application will open with a window asking you to 'Enter your name to get started' (see below). The name entered here is how you will be identified when you connect to a Mersive Solstice device. Enter a name and click continue.

- The application is now setup and ready to use.
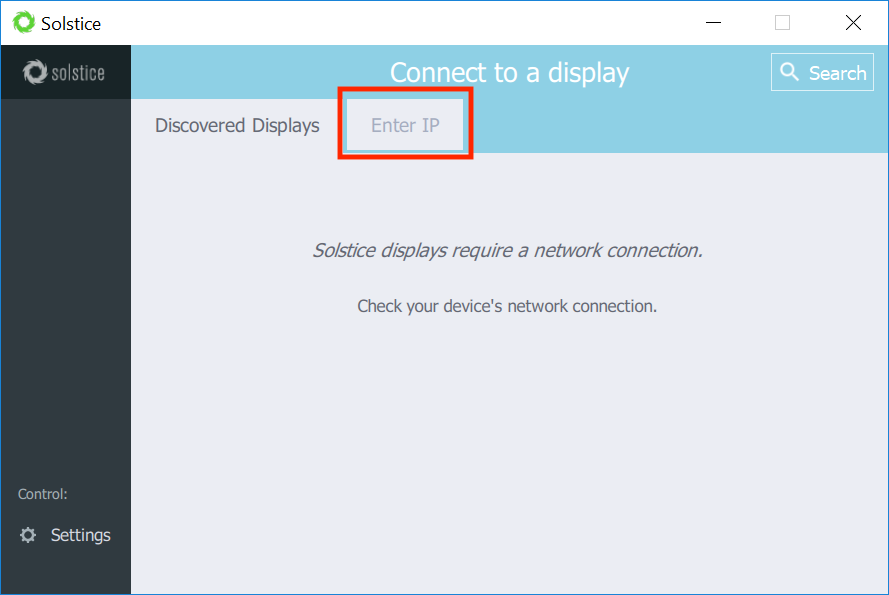
Connecting to a Display
- To connect to a display click the Enter IP tab
- On the screen you want to connect to you will see a WEB address (see below). This is the IP address you need to enter in your application. Enter this IP address in your application and click GO. Note: The Connect directly via IP box will not allow you to type the http:// portion of the WEB address. Only enter the IP portion - 111.11.11.1

- A popup will appear requesting you to Enter the key on screen. Refer to the display you want to connect to and enter the number under KEY into your application and click Ok.

- You are now connected to the display and can begin sharing content.
Sharing Content
On the Share tab of the Solstice app, you can share unlimited content using any of the following options.
- Desktop: Share a real-time view of your desktop (Windows or Mac) with an option to share your desktop audio to the display.
To disable streaming your desktop audio, toggle the Desktop Audio switch to Off. If you are sharing desktop audio on a Mac, you may have additional setup to enable it. See Enable Desktop Audio Streaming on a Mac for more information. - App Window (computers only): Share a real-time view of a single application window open on your Windows or Mac laptop. After selecting this option, hover your cursor over the application window and select.
- Media File: Share media files such as images and videos. Note: Solstice supports a broad range of video types, but not all video files are supported. If a video file is shared but does not post correctly to the display, you can open and play the video from your desktop, then share your desktop to the display with audio. Images need to have dimensions smaller than 10,240 pixels in order to be shared.
- Camera (Mobile only): Take a picture with your mobile device and share it to the display. Note: Ensure the Solstice App has permission to access your camera.
- Take Video (Mobile only): Take a video with your mobile device and share it to the display. Note: Ensure the Solstice App has permission to access your camera and microphone.
When sharing your Desktop, if your user app is set to hide (default) when you are sharing your desktop, you can click on the bar that appears at the top of your desktop screen to unhide it. You can also click Stop Sharing to quickly stop sharing your desktop.
How to Control Content with the Solstice App
On the Layout tab, you have multiple ways that you can control the content and how it appears on the display. Any user connected to the session can control the content layout.
- Drag and drop posts around to change the order of the content, or on and off the on-deck panel on the left side of the display.

- Click and hold, or right-click on a post to view options to make the post full screen, view post details, create a stack, or delete the post. Stacks can be made for a single user's posts
- Click and hold, or right-click on a post, then select to create a stack which acts as a virtual folder.

- Pinch-to-zoom posts on touch-enabled devices.
- Control videos posted to the display with the Solstice video player. The Solstice video player functions similarly to other video players, with play/pause buttons, volume control, and loop options. To view the video player controls, click the camera icon in the lower right corner of the video post.
- Click a Meeple to access the participant menu. This menu gives you options to show, hide, stack, or delete the participant’s posts, as well as disconnect the participant from the collaboration session.

- Click the vertical ellipsis icon to view the media placement menu. This menu allows you to set whether or not posts are aligned to a grid and allows you to quickly move all posts on or off the screen.

Solstice Ink Annotation
Available in the mobile version of the Solstice App (for iOS and Android devices), Solstice Ink allows users to highlight and temporarily mark up content on the Solstice display from anywhere in the room by simply pointing and drawing with their smartphones. This feature is also supported in moderator mode. As a note, this feature not supported on tablets. Solstice Ink has three modes of use:
- Pointer: Press and hold the Ink button or drag the button to the center of the screen to use your phone as a pointer.
- Pulse: Tap the Ink button to pulse the pointer.
- Temporary markup: Drag the Ink button to the center of the screen, then press and hold the button to draw.
To exit Ink mode, drag the Ink button down to re-dock it.
Moderating Sessions
Moderator mode allows you to approve requests from collaborators to join the session or post content to the display. Once moderator mode is enabled, any future collaborators will request to join and wait for a session moderator to approve the request. Only the moderator will have the ability to control what content is posted and the layout of the content.
- Click the Meeting control in the user app sidebar.
- Toggle Moderate this meeting to “On”.
- When a new collaborator tries to connect to the display, an alert will appear in the app’s sidebar. Click Alertsto view the request. Three options display for the connection request:
- Reject: Connection is rejected. The collaborator will be notified that their connection attempt was canceled by the moderator.
- Approve: The collaborator will be connected to the display.
- Approve as Moderator: The collaborator will join with full moderator rights to approve and reject requests to join and post media content.
- When a collaborator tries to post media content to the display, another alert will appear in the app’s sidebar. Click Alertsto view the request. Two options display for the media post request:
- Reject: The post will not appear on the display. Rejecting the request will not alert the user that their post has been rejected.
- Approve: The post will appear on the display.
- To control collaborators in the session, click on the meeple group icon in the user panel. A list of the connected users will appear with an option to Disconnect the user or Make Moderator.
- To exit moderator mode, go to Meeting in the sidebar and toggle Moderate this meeting to “Off”.
Enable Desktop Audio Streaming on a Mac
When you first turn on Desktop Audio sharing for the Solstice App on your Mac, you may be prompted with extra steps to get your audio sharing started.
- Open your Solstice App and connect to a display.
- On the Share panel, click Desktop. The Solstice App minimizes. Click Sharing Desktop at the top of your screen to un-minimize the app.
- Toggle Desktop Audio to Yes.
- In the prompt that appears, click Yes.

- If prompted, enter in your admin password, then click OK.
- If you receive a System Extension Blocked pop-up:
- Click Open Security Preferences. The Security & Privacy settings appear.
- Next to 'System software from developer "Mersive Technologies" was blocked from loading', click Allow.
- Open System Preferences > Sound.


- From the Play sound effects through drop-down, select Desktop Streaming Audio Device.
- Select the Show volume in menu bar option.

- Go back to the Solstice App, stop sharing, and click Disconnect.
- Reconnect to the Solstice display, then share your desktop. Your desktop audio is automatically streamed to the in-room display.
- If you are still unable to get sound, click the Stop Sharing Desktop button and follow the steps for Connecting to the Solstice with AirPlay.
- If you receive a System Extension Blocked pop-up:
Connecting to the Solstice with Airplay on a Mac
- First connect to the display via the solstice app -instructions here
- An AirPlay icon will appear on your top bar. Click that icon and select the name of the display you are trying to connect to.

- A window will appear asking for the AirPlay Device Code. This is the same as the security key that you entered to connect to the Solstice initially. Refer to the display you are trying to connect to and enter the security key.

- Your screen should now be mirrored. If you would like to stop mirroring your display select the AirPlay icon again and select Stop AirPlay.
