
HRS Access Guide - Submitting Requests - Single Employee Requests
This document provides instructions for submitting HRS access requests for individual employees.
After clicking the Security Provisioning eForms tile from the HRS Employee Self Service page (refer to previous document for more info on this), you will see the workflow for the New Provision Request by default, which allows you to submit a request for a single employee. If you will be requesting the exact same changes for multiple employees, you can select the New Multiple Employee Request option from the left menu instead.
Note the following general considerations for requests:
- HRS access requests can be submitted up to 6 days in advance of an appointment/POI start date.
- If the user is transferring between positions, make sure to set the effective date for the day after the old position ends or wait for the current position to end before submitting the request. This allows time for the process of HRS automatically dropping existing access in response to the position change before adding the new access. This can help you avoid needing to submit the same request twice.
- Add Security and Add Security Template requests will always add to the user's existing access. You do not need to request access a user already has. Refer to the end of Add Security Requests for more information.
- A request can include one or any combination of:
Employee and Role Information Sections

Select image to enlarge - image will open in new tab.
- To begin a New Provision Request, search for the employee using the provided fields. It's recommended to search by Empl ID since that is a permanent and unique identifier. If you search by name and receive multiple results, be sure to select the correct person.
- If the person has multiple positions, all positions will be shown underneath the search section - select the position that requires the access.
- After selecting the correct person and position, you will be taken to the New Request screen to enter the request details.
- For the Employee section, pay attention to the following fields:
- Effective Date - this is the date that you want the HRS access to become active. The field will default to the current date, but you may change it as appropriate.
- Request Type - choose Add Security to select all roles manually, Add Security Template to apply a pre-configured set of roles based on functional areas, or Remove Security to remove current roles.
- Note: Add Security Template is the preferred way of setting up new employees. Learn more about security templates.
- Note: You do not need to submit Remove Security requests if you just want someone's access to be removed following the end of a position. Learn more about automatic access changes.
- Row Security Perm. List - if this needs to be changed from what's shown in Old Row Security Perm. List, enter the new value. Otherwise leave it with the default value of the user's current row security level. Learn more about row security permission lists.
- Use the links in the Role Information section to check the user's current access or to view the catalog of all HRS roles within HRS (alternatively: check out the UW-Madison catalogs for HRS and EPM roles for additional guidance!)
- Continue additional instructions for Templates and Requested Roles sections below based on the Request Type you selected:
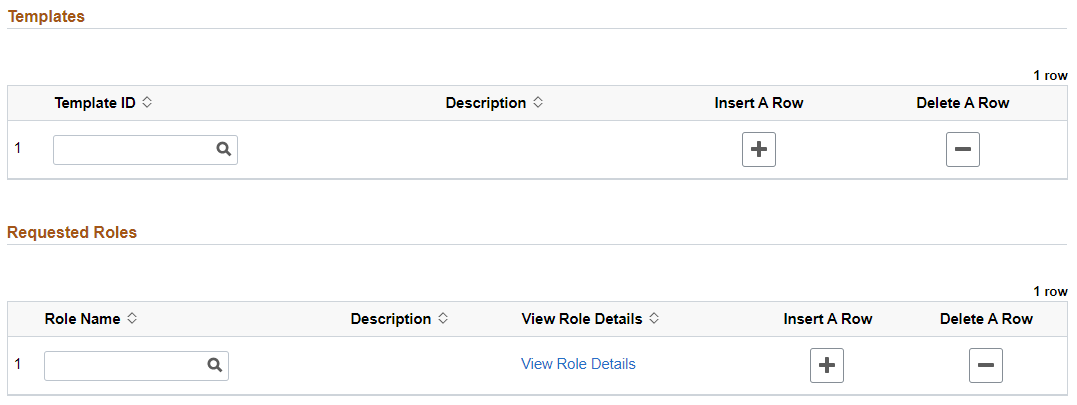
Templates and Requested Roles Sections
Add Security Requests

Select image to enlarge - image will open in new tab.
The Add Security request type allows you to manually enter roles to add for the user. Add Security is best used to add additional roles for someone who already has HRS access or to set up users with specific and uncommon access needs. Trying to manually select roles for a user's initial access is often confusing and inefficient and results in more access than the user really needs or redundant roles.
- If you know the exact Role Name, you can enter it into the Role Name field. Note that a Role Name looks like "UW_UNV_EPM_ALL_QRY_LBRY_NS", not "BI HRS Qry-Non-Sensitive" which is the Description.
- If you do not know the Role Name, click on the magnifying glass symbol in the Role Name field to bring up a Lookup window. The Lookup window shows all roles in Role Name alphabetical order. You can search for a role by clicking on Search Criteria at the top of the Lookup window to expand the Search Criteria section and search by Role Name or Description. (Alternatively, use the UW-Madison catalogs for HRS and EPM roles to find the right role!) Do not include Additional Pay (Addl Pay) roles in your requests. Learn more about Addl Pay access.Make your searches more flexible by clicking the Show Operators link in the upper right, then change "begins with" to "contains". This will look for your search term anywhere within the role name or description instead of only at the beginning.

Screenshot of Search Criteria section of HRS Role Lookup window showing "contains" operator selected in menu.
Select image to enlarge - image will open in new tab. - If you need to add additional roles to the request, click the + (plus sign) button in the Insert A Row column to add another role row.
- If you accidentally add too many rows, click the - (minus sign) button in the Delete A Row column of the row you want to delete.
- Write a comment and click the Submit button to submit the request. Submitting the request will begin the approval process.
- If you have included any roles that the user already has, you'll get a pop-up message. Select "No", then remove all duplicate roles to make the review process easier. You will be shown a message that the submission process has been cancelled, but you won't lose any progress on your request - just submit again after removing all duplicate roles.

Screenshot of HRS pop-up message notifying that user already has roles included in request.
Select image to enlarge - image will open in new tab.
- If you have included any roles that the user already has, you'll get a pop-up message. Select "No", then remove all duplicate roles to make the review process easier. You will be shown a message that the submission process has been cancelled, but you won't lose any progress on your request - just submit again after removing all duplicate roles.
Add Security Template Requests
Select image to enlarge - image will open in new tab.
The Add Security Template request type allows you to select a pre-configured security template to automatically add a set of roles specifically selected to meet the common business needs of different functional areas. Add Security Template is best used to set up initial access for a new user performing HR, Payroll, or Finance functions, or users who might only need to view data in HRS without entering data themselves (department administrators, IT staff, etc.)
- Click the magnifying glass symbol in the Template ID field to open a templates Lookup window.
- Select the appropriate template for the user's job functional area from the list of templates.
- If user's work involves multiple functional areas (for example, doing both HR and Payroll work), click the + (plus sign) button in the Insert A Row column to add another template row and select an additional template.
- If you accidentally add too many rows, click the - (minus sign) button in the Delete A Row column of the row you want to delete.
- The roles included in your selected template will automatically fill in to the Requested Roles section below.
- You can change the roles added by the templates if needed. If the user needs additional roles not included in the templates or if the selected template includes roles that the user doesn't need, you can add or remove roles in the Requested Roles section. Follow the Add Security request instructions to make changes to roles.
- Write a comment (be sure to provide an explanation if you have added or removed roles) and click the Submit button to submit the request. Submitting the request will begin the approval process.
- If you have included any roles that the user already has, you'll get a pop-up message. Select "No", then remove all duplicate roles to make the review process easier. You will be shown a message that the submission process has been cancelled, but you won't lose any progress on your request - just submit again after removing all duplicate roles.
Screenshot of HRS pop-up message notifying that user already has roles included in request.
Select image to enlarge - image will open in new tab.
- If you have included any roles that the user already has, you'll get a pop-up message. Select "No", then remove all duplicate roles to make the review process easier. You will be shown a message that the submission process has been cancelled, but you won't lose any progress on your request - just submit again after removing all duplicate roles.
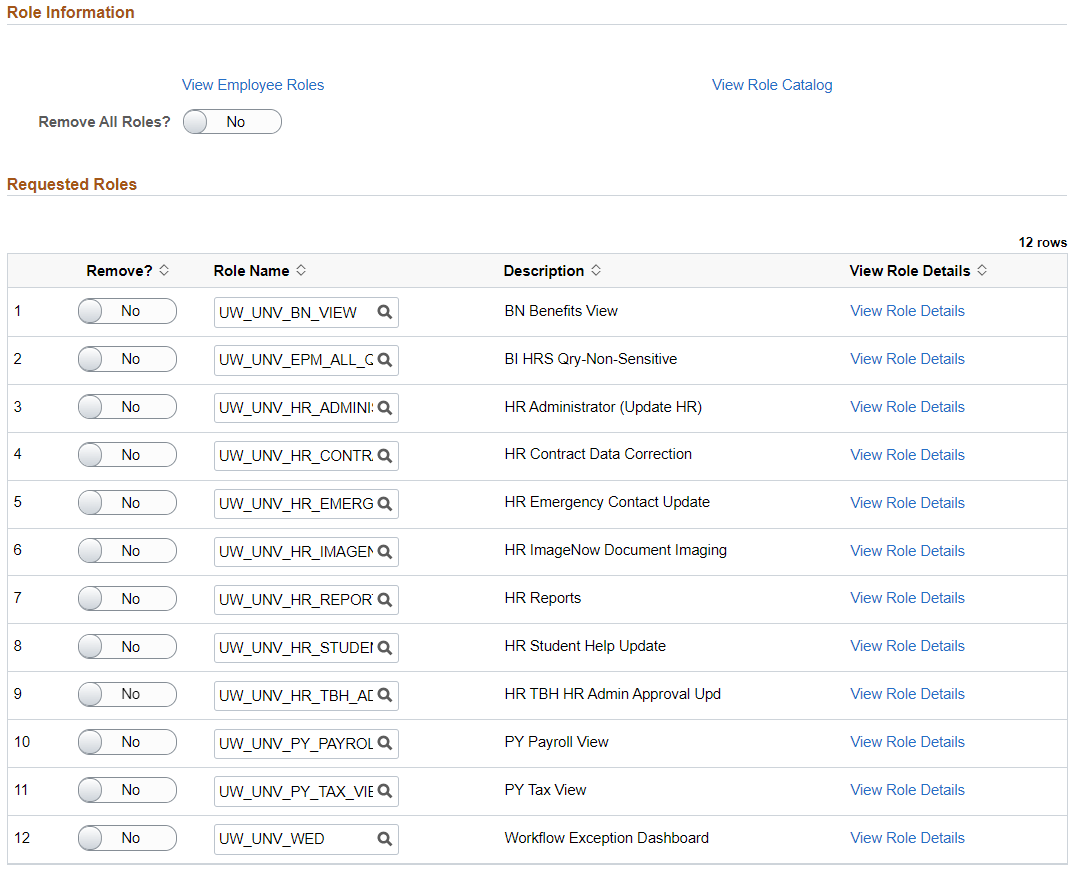
Remove Security Requests
Select image to enlarge - image will open in new tab.
The Remove Security request type is used to remove some or all of a user's roles. Note that you do not need to submit Remove Security requests if you just want someone's access to be removed following the end of a position (learn more about automatic access changes). Examples for when to submit Remove Security requests include:
- The user's work changes and they no longer need access to certain HRS pages or features.
- Intentionally removing access before the user's position ends (for example, someone whose position remains active while they use up leave balances but they are no longer actively working).
- A review of a user's access shows they have roles they don't need for their work or roles that are redundant with other roles they have.
Follow these steps to select roles to remove:
- After selecting the Remove Security request type, a Remove All Roles? toggle will be added into the Role Information section and all of the user's current roles for the selected position will populate in the Requested Roles section.
- If you need to remove all of the user's roles for the selected position, click the Remove All Roles? toggle. The Remove All Roles? toggle as well as the Remove? toggle for each individual role will turn to "Yes".
- If you are only removing some of the user's current roles, click the Remove? toggle next to each role you want to remove to change it to "Yes".
- Write a comment (be sure to provide an explanation of why you need to remove roles) and click the Submit button to submit the request. Submitting the request will begin the approval process. Note that Remove Security requests will not email the user since removing access does not require a compliance agreement.