Topics Map > Student Records
DARS/Faculty&Staff - A New DARS Request App - Request A DARS Audit

Overview
Below are the steps for requesting a DARS audit for a student.
Table of Contents
- Request a DARS audit for a student (declared programs)
- Request a DARS audit for a student ("What-If")
Log into the DARS Request App
Step 1
Go to https://dars.wisc.edu.
Step 2
Login with your NetID.

Request a DARS audit for a student (declared programs)
For staff (faculty, advisors, student workers), you may request a DARS audit for a student by following these steps:
Step 1
Enter a student's Campus ID or EMPLID in the dialog box (circled in red below) and click "Search".
Step 2
Option 1: Click on the "Run degree audit" link next to the Major/Degree Plan for which you want to generate a degree audit.
Option 2: Click on the "Run all degree audits" link to automatically generate an audit for every "darsable" Major/Degree Plan the student is declared in.
Option 3: Click on the "Get student-run audits" to view degree audits generated by the student in the Course Search & Enroll App.
Step 3
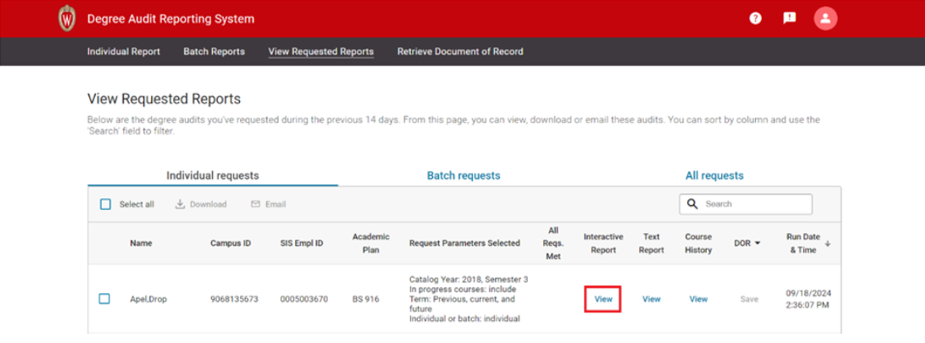
After clicking on an option for running an audit, you will be redirected to the "View Requested Reports" page. Once your audit request(s) finish processing, click "View" for the interactive audit report.
Step 4 (Optional)
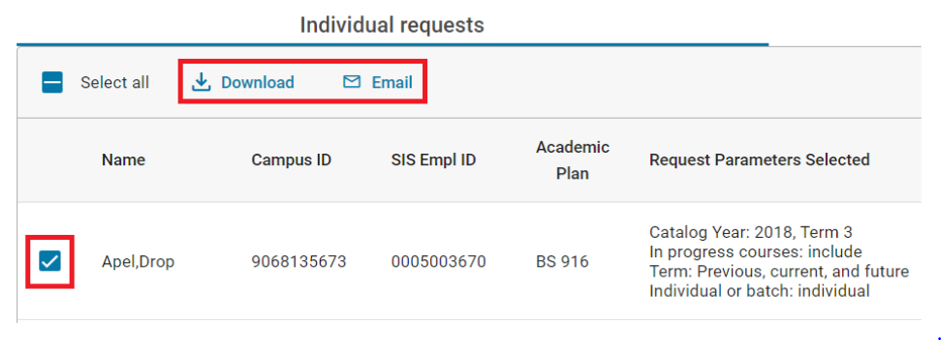
If you wish to generate a PDF of an audit, select the checkbox next to the intended student's name and click "Download" or "Email" at the top of the request table. You can select as many audits as desired.
Step 5 (Optional)
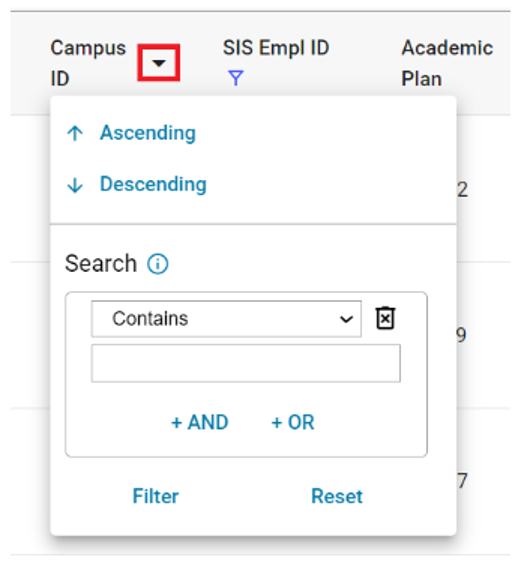
If you wish, you can filter and/or sort audit results based parameters on each column in the table. Example:
Visit the [KB] for an advanced "How-to" on maximizing the filter/sorting capabilities of the DARS Request App.
Request a DARS audit for a student ("What-ifs")
For staff (faculty, advisors, student workers), you may request a DARS audit for a student by following these steps:
Step 1
Enter a student's Campus ID or EMPLID in the dialog box (circled in red below) and click "Search".
Step 2
Scroll down to the "Advance settings for a "What-If" audit" and make a plan selection.
Step 3

Step 4
Click the "Run audit" button to generate the "What-if" audit.
Step 5
After clicking on an option for running an audit, you will be redirected to the "View Requested Reports" page. Once your audit request(s) finish processing, click "View" for the interactive audit report.
Step 6 (Optional)
If you wish to generate a PDF of an audit, select the checkbox next to the intended student's name and click "Download" or "Email" at the top of the request table. You can select as many audits as desired.
Step 7 (Optional)
If you wish, you can filter and/or sort audit results based parameters on each column in the table. Example:
If you have questions regarding audit features or authorizations, please contact dars@em.wisc.edu.
bot


