
ID Card Reader
How to use Trackology scanners to collect and export data from student ID cards, how to link student ID numbers with names and e-mail addresses
Before Event
I. Charge Scanner
- May take up to 3 hours to fully charge the scanner
- Plug into USB port and connect to power source
- Battery life 8 hours at a rate of 1 scan every 5 seconds
- The scanner will scan about 5,760 times per charge
- Operates optimally in temperatures from 32 degrees to 122 degrees Fahrenheit
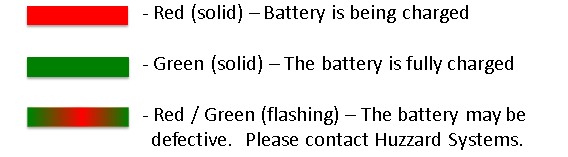
- LED notifications when charging:
II. Decide Mode to Collect and Export Data & Configure Device
- Avoid switching back and forth between modes
- Selecting which mode will be used is done by scanning bar codes on configuration sheet
Configuring Device to HIP USB Mode
- No Special Software required
- Data not time stamped
- Can be exported directly to Excel
- Data deleted automatically after exporting
- Scan bar codes on HID USB configuration sheet
- Scan bar codes on delete check digit sheet, skipping this step results in check digit in student ID number to be included in data collected
VCP (Virtual COM Port) mode (OSTFE is not currently using this mode)
Configuring Device to VCP Mode
- Special Software needed - requires loading of drivers and PC Companion software on device(s) where data will be exported
- More secure Data can only be exported in conjunction with PC Companion software
- User can decide if data is deleted or kept on scanner after exporting
- Additional information can be added to student ID # being exported
- Date and time stamps are recorded
- What device was used to collect the data is recorded
- Beep Volume can be regulated by using PC Companion Software
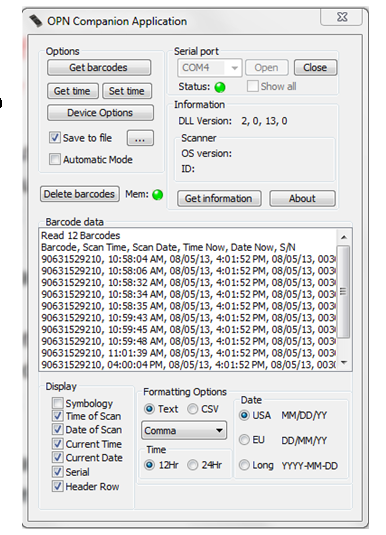
- Click on Device Options on the OPN Companion Application main screen
- Scroll down to Volume line item on the Parameters screen
- Fly-out menu allows you to pick Max= 1 to Min = 5.
- After selecting desired Volume level, Click Settings button in lower right of Parameters screen.
- New settings are uploaded to device (takes a minute or so to complete)
- Scan bar codes on VCP configuration sheet
- Scan bar codes on delete check digit sheet, skipping this step results in check digit in student ID number to be included in data collected
Use of Trakology Scanner
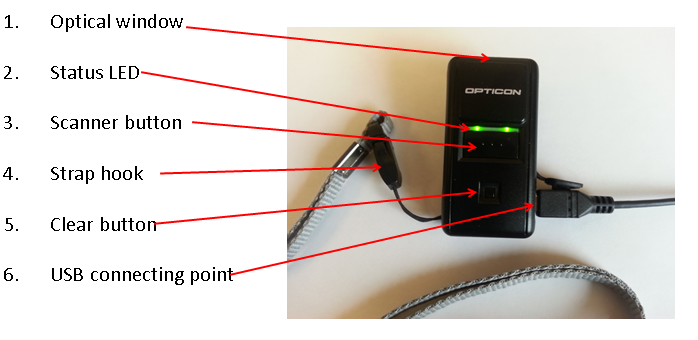
General features of scanner
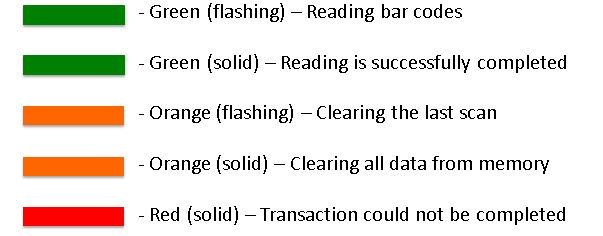
LED codes while scanning
How to Collect Data
- Hold bar code about 2 inches from scanner
- Press Scan button
- Hear beep or see green light to confirm card data was recorded
- The scanner's memory can hold approximately 10,000 bar codes (and time stamps if in VCP mode).
- Connect scanner to USB port on PC or laptop
- Open Excel
- Make sure cursor is in cell A1 (top, left), of your Excel before exporting, if the cursor positioned incorrectly an incomplete data set may be exported
- You can time and date stamp your export just not individual records
- Press Scan button on scanner to begin exporting
- Bar code data automatically deleted from scanner
- Take data from Excel and begin work with web application
Connect scanner to USB port on PC or laptop which has PC Companion software loaded
Working with Data - Login to web application to connect names and e-mail addresses to Campus ID numbers
How to Export Data in VCP Mode (OSTFE is not currently using this mode)
- Go to: http://apps.cfli.wisc.edu/scan/
- Select Administrators
- User Name: newstudent
- Use password:
Technical support
For Trackology scanners::
- Sam Farrell SFarrell@Huzzard.com
- Gary Jahnke GJahnke@Huzzard.com
- 1-920-257-4357
For web application:
- TJ SARGENT tj.sargent@wisc.edu
- (608) 263-1020