Remote Desktop - Windows 10
Verify Connection To GlobalProtect
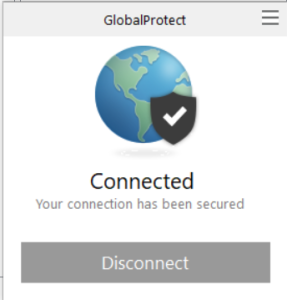
Verify that you are connected to the campus network using your static IP address.
Click the GlobalProtect icon in your system tray and it should show as "Connected".

Starting Remote Desktop Connection
Next, start Remote Desktop Connection. There are a few ways to accomplish this.
Click Start → Windows Accessories → Remote Desktop connection,
OR...
Click into the Search area in your Taskbar and type "Remote Desktop Connection",
OR...
Hit Windows Key + R on your keyboard and the Run prompt will come up. Type "mstsc" into that field and click OK.
Getting Connected
Once Remote Desktop Connection comes up, it will prompt you for the "Computer" you'd like to connect to. Type in the address provided to you by Surgery IT staff and click connect.
You will then see a prompt for credentials. They will probably have your local Microsoft account automatically filled in. Click "more choices" and then "Use a different account".
Provide your Surgery username and password, and click OK.
If successful, you may then be prompted that "The identity of the remote computer cannot be verified..." click Yes on this prompt to continue.
You can check the "Don't ask me again for connections to this computer" box if you don't want to see this prompt again.
If warned about ending another users session, simply click "Yes" to proceed. You are the only one that should be remoting into your computer.
You will then see your Surgery desktop. It will function as though you have sat down at the desktop and logged in like normal. It should have all of your network drives, programs, and be able to reach everything you can while at your computer.
Can't See Your Network Drives?
Remap them with the Desktop Icon. Double-click on the icon to bring up the Micro Focus OES client login.
Provide your Surgery username and password to re-connect your network drives.
Alternatively:
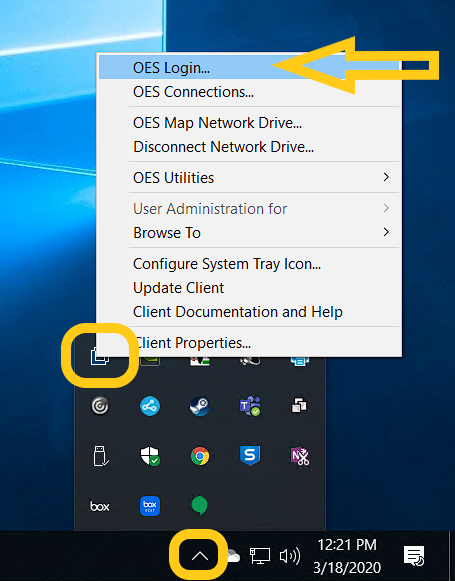
Click on the UP arrow in your system tray in the lower-right corner of your Remote Desktop session.
Find the Icon that looks like an "O" and right click on it.
Select the OES Login selection in the menu that pops up.
A Micro Focus prompt will appear. Provide your Surgery username and password to re-connect your network drives.
When You're Done Working
Disconnect from your Remote Desktop session by clicking the X in the blue bar at the top of the session.

FAQs and Support
Should I turn off (i.e. Shut Down) my computer when I'm done working?
No. If you turn off your workstation, you will not be able to remote in per the instructions above.
Can I restart my computer if something isn't working correctly?
Yes. A restart of your computer is okay but you will need to wait for it to go down and start up again before you can reconnect with Remote Desktop.


