Kaltura - Features [UW-Madison]
Kaltura allows instructors, students, and staff to upload, manage, and deliver video to any device. With the Kaltura Canvas integration, users can integrate video into their course environments for flipped classrooms, video assignments, and more.
Kaltura Canvas Integration
Kaltura is also integrated with Canvas, which is UW-Madison's learning management system. The integration features many of the same capabilities outlined above, and makes them available to instructor's in the following ways:
- Embedding Kaltura media with the Canvas rich-content editor - The Canvas rich-content editor appears during the creation of several Canvas objects (ex. assignments, quizzes, quiz questions, announcements). Instructors are able to embed Kaltura media anywhere the Canvas rich-content editor is used. This is the most common, and the recommended method for embedding Kaltura media in a Canvas course.
- Kaltura My Media - You can access, browse, and upload media to Kaltura MediaSpace from inside Canvas by accessing Kaltura My Media.
- Kaltura Gallery - Every Canvas course shell has a course navigation tool called "Kaltura Gallery." This Kaltura gallery serves as a place where instructors and students can aggregate all course-related media.
Kaltura Mediaspace
Kaltura MediaSpace is a front-end, user-facing interface that provides users the ability to upload, share, browse, and access media content. The vendor describes it as "a market leading social video and rich media portal that enables you to create your own Campus or Corporate YouTube™." For more information see Kaltura's webpage on the Kaltura MediaSpace Video Portal.
Kaltura Media Ingestion
End users have the ability to create and upload media using these methods, from the ADD NEW option on the dashboard:
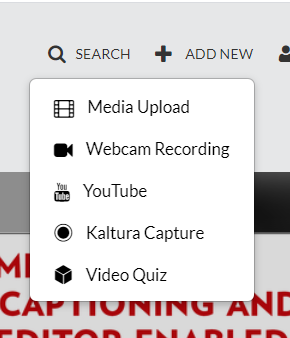
- Media Upload - Users can upload a previously created video file. Many formats are supported - we recommend 1280 x 720 MP4 files. If you're working in Canvas be sure to reference Canvas - Upload and Embed a New Kaltura Mediaspace Video in a Canvas Page [UW-Madison].
- Webcam Recording - Uses the webcam, screen, and audio recorder for creating videos in a browser with no software download required. If you're in Canvas see Kaltura - Webcam Recording in Canvas [UW-Madison].
- YouTube (Embed)- In order to provide a consistent look and feel, users have the option to embed YouTube videos in Kaltura.
- Kaltura Capture - Kaltura Capture uses the webcam, screen, and audio recorder for creating videos. This is ideal for shorter screencasts, that can be done in one take and don't require much editing. A more full-featured screen and webcam capture tool that does allow editing that was newly licensed by UW-Madison in Fall 2020 is TechSmith Camtasia. Other options for creating videos are covered in Learn@UW - Which Should I Use? Options to Create Instructional Videos [UW-Madison].
- Video Quiz - Kaltura's Video Quiz is a powerful tool that allows instructors to build into their videos several interactive elements, including questions, polls and hyperlinks. These additional elements make for a more engaging experience for the student. A Kaltura Video Quiz can be configured to pass a grade back to the Canvas gradebook. However, at this time, UW-Madison does not encourage this, at least not for actual grade-impacting activities. (The link to the Canvas gradebook has been unstable, and presents several technical support challenges.) For more information about the Kaltura Video Quiz, refer to Kaltura's Knowledge Center.
Kaltura media organization tools
Once users’ media is in Kaltura, they have the option to organize it into channels and playlists:
- Playlists - Playlists are groups of media items in which the order the media items are played is dictated by the playlist owner/creator. Playlists can be embedded.
- Channels - Channels are groupings consisting of media items. Channels owners cannot dictate the order in which media items in channels are displayed. Channels have aggregated analytics for all the media items contained within them. Channels can have various permissions that allow them to be viewed/updated by multiple individuals or groups.
- Channel Playlists - The Channel Playlist feature allows Channel Managers to curate, organize and improve displayed featured content in their channels. If you're not sure whether you should use a regular playlist or a channel playlist see Kaltura - MediaSpace Standalone Playlists Compared to Channel Playlists [UW-Madison].
Note: Kaltura does not provide folders. Channels are the closest thing you may get to a "folder", as a media management and organization tool.
Media Sharing
After users have uploaded and organized media items, they have multiple ways to share those items.
- Media Players - The player is the wrapper surrounding a media item that allows a viewer to interact with that media. It allows the viewer to play/pause, show captions, increase the playback rate, and change the video quality. There are multiple players to choose from when using the Embed and oEmbed methods for sharing media items.
- Link to Media Page - Every media item has a "media page" in which that media item can be viewed and played. Whether or not all users can see this page depends on the permissions set by the media’s owner.
- Embed - Every media item can be embedded into a webpage using this option. When configuring embed options, owners and co-publishers are presented with embed code, a list of players to choose from, and a list of size options for those players.
- oEmbed - oEmbed is very similar to regular embed except that it provides you with one URL instead of a large amount of HTML inside of an iFrame. The most prominent use for oEmbed is to embed media items with WordPress or Pressbook sites.
- Download - Media owners, co-editors, and co-publishers have two ways in which they can allow viewers to download media. This can either be done using the download option that is only available from the Media Page or be selecting a player that has a download button.
- Commenting - The commenting feature is only available on the media page. This feature (if enabled by the media owner) allows viewers to leave comments about the media item. Viewers can even designate particular timepoints to comment upon.
- Scheduling - The scheduling feature enables you to create content and set its publishing start time and end time.
Media Editing Tools
Once users have uploaded media to MediaSpace, certain aspects of it can be changed. All editing functions can be found by either navigating to the media page and clicking the Actions dropdown and then selecting Edit or by going to a user’s “My Media” page and clicking the Edit button for the media item they wish to edit. All editing functions are available to owners and co-editors of media items. Each of the following items is a tab on the Edit Media Page:
- Details - The details tab contains fields for changing the name, description, and tags associated with a media item. The description field can contain rich text, links to external resources, and images.
- Publish - Publication settings allow you to set a media item to private (viewable to owner and those you've added as collaborators only), unlisted (available to anyone with the link), or published (available to individuals where the item is published - for example a Kaltura channel)
- Options - The options tab contains checkboxes that enable everyone to create clips from the media item, disable comments for the media item, and closes discussion (allows no new comments).
- Collaboration - The collaboration tab contains functionality to change the media owner and add/remove co-editors, co-publishers, and co-viewers. NOTE: If a media owner still needs access to the media item after they have transferred ownership they should set themselves as co-editor and co-publisher before transferring ownership.
- Thumbnails - The thumbnails tab allows owners and co-editors to set a specific still image to be displayed upon the media item being loaded in a web page. A thumbnail can be generated from an uploaded image, a specific time point in the video, or a randomly chosen time point in the video.
- Downloads - The downloads tab allows owners and co-editors to enable viewers to download media items. In this tab the quality of the downloaded video can be selected. Viewers can download media items that have this feature enabled by navigating to the Media Page and clicking on the Download button.
- Captions - The captions tab is where owners and co-editors can upload caption files (SRT) to media items. See other documents on captioning for further info.
- Attachments - The attachments tab allows owners and co-editors to attach any file to a media item. The attachments only appear on the media page as a button.
- Timeline - The timeline tab allows owners and co-editors to designate chapters and slides for their media items. Timeline has comparable functionality to Video Presentation but does not use Flash. Timeline is the preferred tool.
- Replace Media - The replace video tab allows owners and co-editors to upload different videos but retain all of the metadata associated with a particular video. In other words, owners do not have to completely redo everything if they need to make a simple edit to a video. They just need to replace it using this functionality.
- Video Editing Tools - Clicking the Launch Editor button launches a basic online video editing tool which can be used to remove pieces of your video, and add questions to your video.
Analytics
Kaltura MediaSpace allows media owners and co-editors to track how much their media items have been viewed, the average length of time they were viewed and more.
- Media Analytics - Media owners and co-editors can find an individual media items analytics by navigating to the Media Page, clicking the Actions dropdown and selecting Analytics. Analytics can be downloaded to a CSV and opened in Microsoft Excel or Google Sheets for further, more in-depth analysis.
- Channel Analytics - Channel owners can find channel analytics by navigating to the channel, clicking the Actions dropdown, and selecting Analytics. Analytics can be downloaded to a CSV and opened in Microsoft Excel or Google Sheets for further, more in-depth analysis.